Configuring Prompts
Prompts are user inputs to the large model, which generates corresponding outputs based on these prompts. Configuring prompts can guide the model to understand users' specific needs and generate more accurate and high-quality outputs, ensuring the model's responses meet the application requirements in different scenarios. This section describes how to configure prompts for the intelligent analysis assistant to improve its Q&A quality.
Notes and Constraints
- You must have developer or administrator permissions to configure and manage prompts.
Prerequisites
- A project has been created by referring to Creating a Project.
- A data source has been connected by referring to Connecting to a Data Source.
- A dataset has been created by referring to Creating a Dataset.
- An intelligent analysis assistant has been created by referring to Creating an Intelligent Analysis Assistant.
Configuring Prompts
- Log in to the DataArts Insight console.
- Click
 in the upper left corner of the management console to select a region. Then, select an enterprise project in the upper right corner.
 - On the top menu of the console, click Project. On the displayed My Projects page, click the name of the desired project.
- In the navigation pane on the left, choose Q&A Management > Intelligent Analysis Assistants.
- Locate your desired assistant and click Edit in its Operation column. On the displayed page, click the Assistant Settings tab (Figure 1).
- Select the default prompt from the NL2SQL Prompt Template and Intelligent Insights Prompt Template drop-down lists.
- Click Save.
Managing Prompts
- On the top menu of the console, click Project. On the displayed My Projects page, click the name of the desired project.
- In the navigation pane on the left, choose Q&A Management > Prompt Management.
- Click Add Prompt. The page for adding a prompt is displayed.
- Set the parameters based on Table 1.
Table 1 Parameters for creating a prompt Parameter
Description
Task Type
NL2SQL (natural language to SQL): converts user input in natural language to SQL queries, improving data query efficiency.
INSIGHT: generates corresponding insights based on user queries and the resulting data.
System Prompt
Assigns an identity tag to the model, predefining its behavior and style to help the model respond more appropriately to questions or generate content based on this setting.
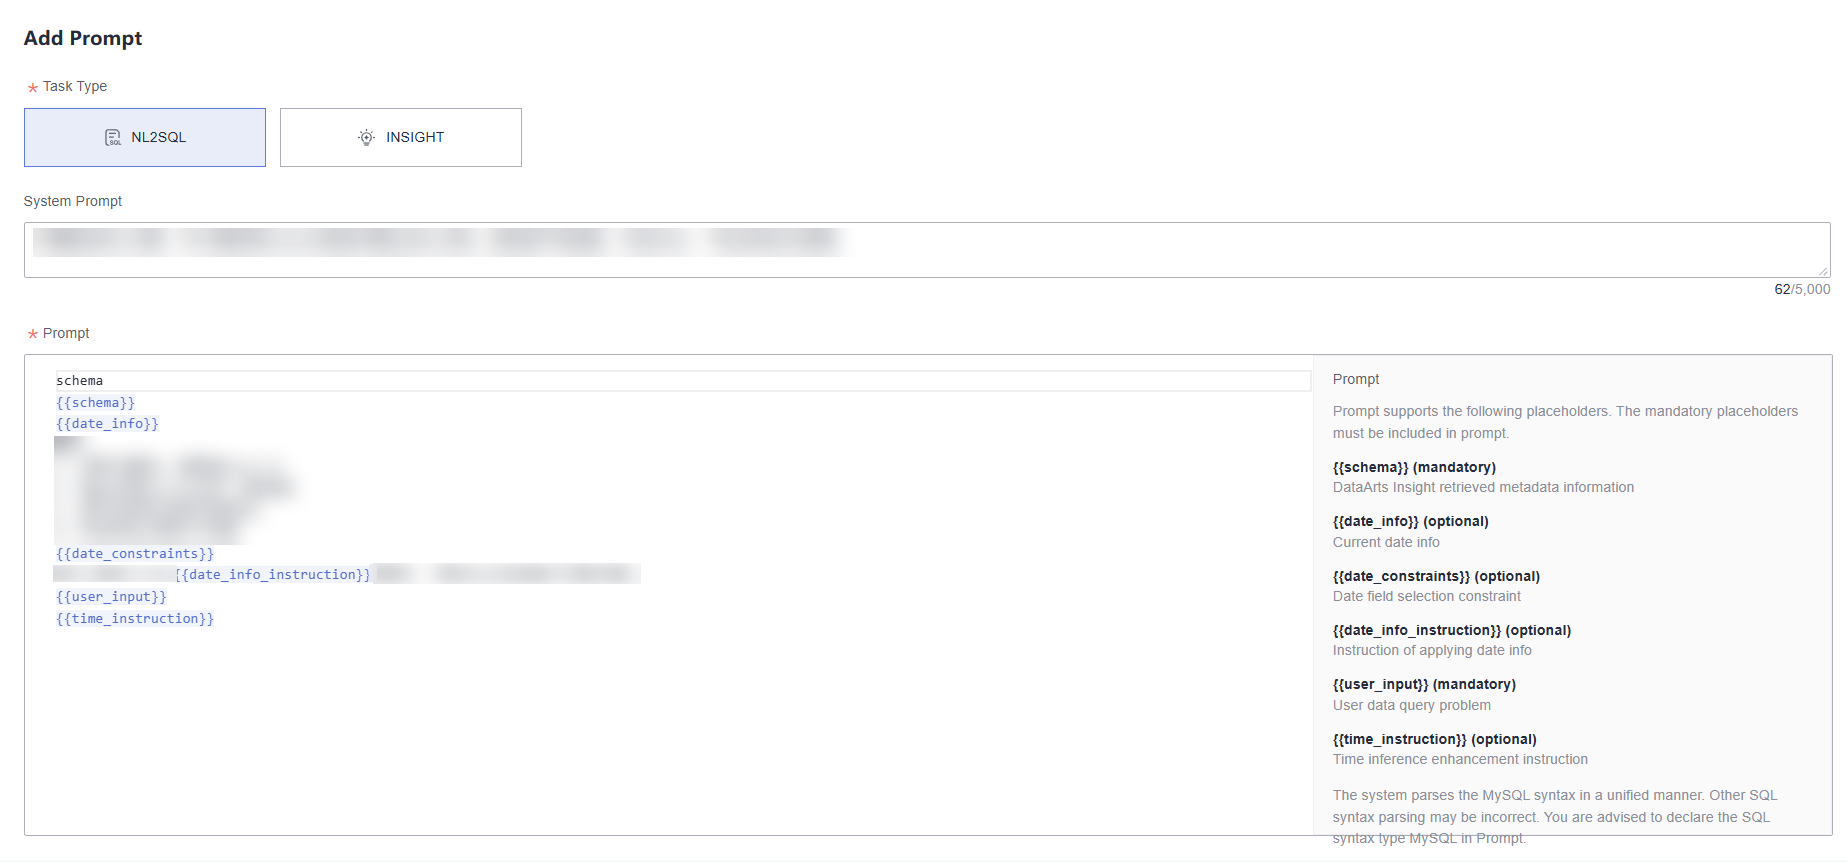
Prompt
A prompt is an input text that guides the model to understand the task requirements and generate specific outputs, helping the model respond more accurately to user needs.
NOTE:To ensure the model's normal reasoning, the prompt must include "required" placeholders as detailed in Figure 2.
- Click Save in the upper right corner of the page. The prompt is created successfully.

You can click Reset in the upper right corner of the page to revert to the last saved content.
- Copying a prompt: On the prompt management page, click Copy. On the displayed page, click OK.
- Editing a prompt: On the prompt management page, click Edit. On the displayed page, set parameters and click Save.
- Deleting a prompt: On the prompt word management page, click Delete. On the displayed page, click OK.
Example Scenario
By creating a prompt for sales data of a product, you can customize the prompt information for the large model in that scenario. By selecting the appropriate placeholders, you can flexibly inject query-related information into the prompt, such as query-related data fields (schema). Specific prompts allow the intelligent analysis assistant to better understand your needs and provide more accurate analysis results.
- On the top menu of the console, click Project. On the displayed My Projects page, click the name of the desired project.
- In the navigation pane on the left, choose Q&A Management > Prompt Management.
- Click Add Prompt. The page for adding a prompt is displayed.
- Configure the prompt based on the actual situation. This example configures the prompt based on the data in Table 2.
Example prompt template:

schema
{{schema}}
{{date_info}}
Requirements
1. If grouping and aggregation are used, use group by.
2. Prefer using schema fields and keep it concise.
3. Strictly follow the field description information.
4. The time field must be of date type.
{{date_constraints}}
Based on the above schema{{date_info_instruction}} and requirements, use MySQL syntax to solve the following problem:
{{user_input}}
{{time_instruction}}

Example sales data prompt:
schema
[{'table_name': '`my_table`', 'table_description': '', 'columns': [['`product_type`', 'TEXT', 'product type'], ['`pay_time`', 'date', 'payment time, format: yyyy-mm-dd'], ['`sales`', 'double', 'sales']]}]
Time information
It is now January 2025, and today is 2025-01-02.
Requirements
1. If grouping and aggregation are used, use group by.
2. Prefer using schema fields and keep it concise.
3. Strictly follow the field description information.
4. The time field must be of date type.
When using the 'sales' field, use the following time field: pay_time.
Based on the above schema, time information, and requirements, use MySQL syntax to solve the following problem:
The time range for June 30, 2023, is ['2023-06-30 00:00:00', '2023-06-30 23:59:59'].
Feedback
Was this page helpful?
Provide feedbackThank you very much for your feedback. We will continue working to improve the documentation.See the reply and handling status in My Cloud VOC.
For any further questions, feel free to contact us through the chatbot.
Chatbot


