Creating a Dashboard
Dashboards can help you intuitively and clearly display data analysis results. DataArts Insight offers various chart styles to meet your flexible and diverse visual analysis needs. This section describes how to create a dashboard.
Prerequisites
- A project has been created by referring to Creating a Project.
- A data source has been created by referring to Connecting to a Data Source.
- A dataset has been created by referring to Creating a Dataset.
Procedure
- Log in to the DataArts Insight console.
- Click
 in the upper left corner of the management console to select a region. Then, select an enterprise project in the upper right corner.
 - You can create a dashboard in any of the following ways:
Method 1: Click Workspace in the top menu of the console and click Create Dashboard.
Method 2: Click Project on the top menu of the console. On the displayed page, click the name of the desired project. On the displayed Dashboard page, click Create Dashboard in the upper right corner.
Method 3: Click Project on the top menu of the console. On the displayed page, click the name of the desired project. In the navigation pane on the left, choose Data Management > Datasets. On the displayed page, locate the desired dataset and click Create Dashboard in the Operation column.
Method 4: Click Project on the top menu of the console. On the displayed page, click the name of the desired project. In the navigation pane on the left, choose Data Management > Datasets. On the displayed page, click the name of the desired dataset. On the displayed dataset editing page, click Create Dashboard in the upper right corner.
- Select the dataset to analyze from the Data area on the right of the dashboard creation page.
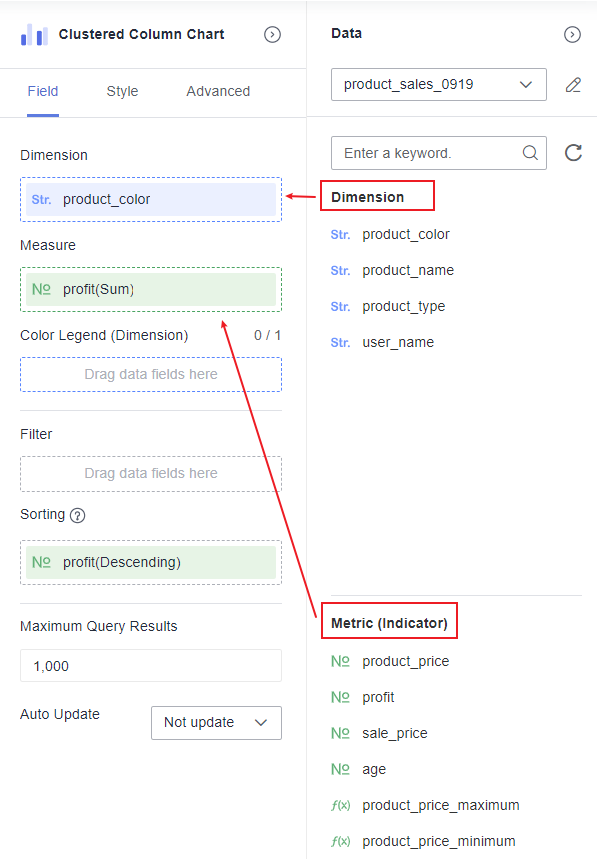
- In the upper right corner of the page, select the desired Visual Controls on a Dashboard and drag the dimensions and metrics of the dataset from the Data area to the Field tab of the visual control.
Figure 1 Selecting fields

- Click Update at the bottom of the Field tab. The chart data is automatically updated.
- Click Save or Save and Publish in the upper right corner to save the dashboard.
- In the displayed Dashboard dialog box, set Name and click Confirm.

The differences between Save and Save and Publish are as follows:
- Save: The dashboard is saved. It cannot be viewed but can be deleted.
- Save and Publish: The dashboard is saved and published simultaneously, allowing it to be viewed. To delete the dashboard, you must first take it offline.
Feedback
Was this page helpful?
Provide feedbackThank you very much for your feedback. We will continue working to improve the documentation.See the reply and handling status in My Cloud VOC.
For any further questions, feel free to contact us through the chatbot.
Chatbot


