Copied.
Handling an Incident Ticket
Upon receiving an incident ticket, the assigned owner must strictly adhere to the standard operating procedure to ensure timely, consistent, and controlled resolution. The owner should first accept the ticket, verify the completeness of the ticket information (including the incident description, impact scope, and urgency), confirm the acceptance status, and notify the ticket creator of the ticket progress. Next, during the handling of the ticket, the owner must develop a targeted action plan based on the incident type and effectively execute key activities such as root cause identification, resource coordination, and implementation of corrective measures, while thoroughly documenting all steps taken. Upon completion of handling, verification is required to confirm that the issue has been fully resolved and meets expected requirements—through methods such as on-site validation, data review, or explicit confirmation from the initiator. Throughout this process, closed-loop management principles are applied to standardize workflows, enable efficient response, maintain business stability, and continuously enhance both resolution quality and stakeholder satisfaction.
Incident Handling Process
Forwarding an Incident Ticket
If an incident ticket belongs to another application or needs to be handled by an O&M expert, you can forward the incident ticket to the corresponding owner.
- Log in to COC.
- In the navigation pane, choose Fault Management > Incidents.
- On the Pending tab page, locate the target incident ticket and click its title to go to the details page.
- Click Change Owner.
- Set parameters for changing the owner. Figure 2 Changing the owner
Table 1 Parameters for changing the owner Parameter
Description
Change Owner
Select Shift or Individual.- Shift: Select a shift scenario and corresponding roles from the drop-down lists based on the configured values. For details about how to configure a shift, see Shift Schedule Management.
- Individual: Select an owner. For details about how to configure an owner, see Personnel Management.
Description
Enter description for changing the owner.
Positioning in the current phase
Provide information about positioning in the current phase.
- Click OK.
After the incident ticket is forwarded, the owner is changed.
Rejecting an Incident Ticket
After an incident ticket is created, the handler can reject it if the incident is improper or for other reasons. After the rejection, the creator can modify and resubmit the incident ticket or close the incident ticket.
- Log in to COC.
- In the navigation pane, choose Fault Management > Incidents.
- On the Pending tab page, locate the target incident ticket and click its title to go to the details page.
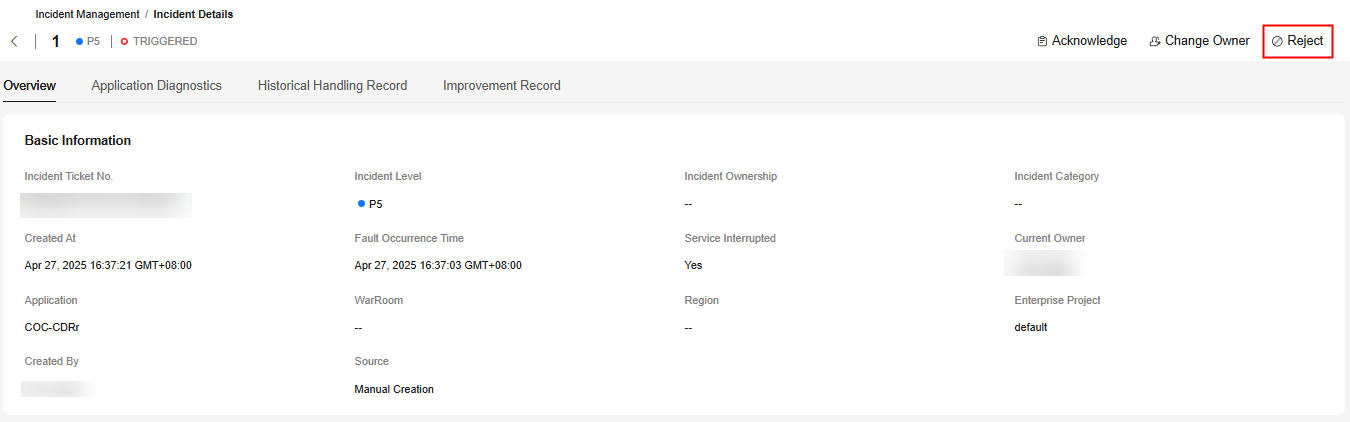
- Click Reject. Figure 3 Rejecting an incident ticket
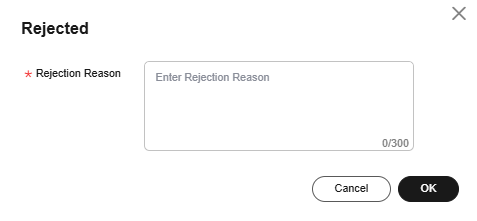
- Enter the rejection reason and click OK. The status of the incident ticket changes to Rejected.Figure 4 Entering the reason for rejecting the incident ticket
Accepting an Incident Ticket
After an incident ticket is created, the owner analyzes the incident. If the incident exists, the owner accepts and handles the incident ticket.
- Log in to COC.
- In the navigation pane, choose Fault Management > Incidents.
- On the Pending tab page, locate the target incident ticket and click its title to go to the details page.
- Click Accept.
The incident ticket status changes from Unaccepted to Accepted.
- After an incident ticket is rejected, it is in the Rejected state. The creator can close the incident ticket or restart the incident ticket after updating the information.
Closing an Incident Ticket
After an incident ticket is rejected, the submitter can reconfirm the rejection reason. If the incident ticket does not need to be followed up anymore, the ticket can be closed.
- Log in to COC.
- In the navigation pane, choose Fault Management > Incidents.
- On the Pending tab page, locate the target incident ticket and click its title to go to the details page.
- Click Close.
The status of the incident ticket changes from Rejected to Closed.
Restarting an Incident Ticket
After an incident ticket is rejected, the submitter reconfirms that the incident ticket needs to be submitted. The submitter can modify the incident ticket and submit it again.
- Log in to COC.
- In the navigation pane, choose Fault Management > Incidents.
- On the Pending tab page, locate the target incident ticket and click its title to go to the details page.
- Click Restart.
- Set parameters for modifying an incident ticket.
Table 2 Parameters for modifying an incident ticket Parameter
Description
Incident
Specify the incident name according to the naming rules.
Description
Describe the incident.
Attachment
Click Add File to upload incident-related attachments.
A maximum of 10 files can be uploaded. The supported file types are JPG, PNG, DOCX, TXT, and PDF. The size of a single file cannot exceed 10 MB.
Incident Level
The options are P1, P2, P3, P4, and P5.
- P1: Core service functions are unavailable, affecting all customers.
- P2: Core service functions are affected, affecting the core services of some customers.
- P3: An error is reported for non-core service functions, affecting some customer services.
- P4: Non-core service functions are faulty. The service latency increases, the performance deteriorates, and user experience decreases.
- P5: Non-core service exception occurs, which is customer consultation or request issue.
Incident Type
(Optional) Select an incident type.
Incident Ownership
(Optional) Select the incident to which the ticket belongs.
- Alarm detection
- Customer fault reporting
- Proactive O&M
- Other
Region
(Optional) The preset value is N/A. Select the region where the incident occurs.
Enterprise Project
Select an enterprise project.
Fault Occurrence Time
Enter the time when the fault occurs.
Application
Select the application affected by the incident.
Service Interrupted
The options are Yes and No.
Owner
Select Shift or Individual.- Shift: Select a shift scenario and corresponding roles from the drop-down lists based on the configured values. For details about how to configure a shift, see Shift Schedule Management.
- Individual: Select an owner. For details about how to configure an owner, see Personnel Management.
- Click OK.
The status of the incident ticket changes from Rejected to Unaccepted.
- After an incident ticket is accepted, it is in the Accepted state. You can escalate or de-escalate the ticket, add remarks to it, execute response plans, and initiate war rooms.
Escalating or De-escalating an Incident Ticket
During handling an incident ticket, if the incident level is inconsistent with the actual situation, you can escalate or de-escalate the ticket.
Note: The incident level can be changed only after the incident ticket is accepted. You can add a review process for incident ticket de-escalation by referring to incident review. Once a review process is added, an incident ticket can be de-escalated only after the application is approved by the reviewer.
- Log in to COC.
- In the navigation pane, choose Fault Management > Incidents.
- On the Pending tab page, locate the target incident ticket and click its title to go to the details page.
- Click the escalation or de-escalation button and adjust the incident level by referring to Table 3.
Table 3 Parameters for escalating or de-escalating an incident ticket Parameter
Description
Incident Level
The options are P1, P2, P3, P4, and P5.
Default incident levels:
- P1: Core service functions are unavailable, affecting all customers.
- P2: Core service functions are affected, affecting the core services of some customers.
- P3: An error is reported for non-core service functions, affecting some customer services.
- P4: Non-core service functions are faulty. The service latency increases, the performance deteriorates, and user experience decreases.
- P5: Non-core service exception occurs, which is customer consultation or request issue.
Description
Enter the service impact and reason for the escalation or de-escalation.
- Click OK.
If a review process is added for de-escalating an incident ticket, the reviewer needs to review the de-escalation application that meets the conditions.
Adding Remarks to an Incident Ticket
When handling an incident ticket, you can add remarks to it if needed.
Note: Remarks can be added only after an incident ticket is accepted.
- Log in to COC.
- In the navigation pane, choose Fault Management > Incidents.
- On the Pending tab page, locate the target incident ticket and click its title to go to the details page.
- Click Add Remarks.
- On the displayed page, enter the remarks.
- Click OK.
Diagnosing an Application
After an incident ticket is created, you can use the application diagnosis (full-link diagnosis) function to quickly locate the root cause of the incident. You can view the relationship topology of the applications, components, and resources based on abnormal data of resources and application alarms. The application diagnosis module also displays core resource metrics and diagnoses instances.
To use the application diagnosis function, the following requirements must be met:
- Applications have been created and associated with resources on CloudCMDB, and the application topology has been completed.
- Cloud Eye has been enabled and configured through integration management.
- An incident ticket has been created.
- To display workload and pod information of a CCE cluster, you must tag the workloads of that cluster. Note that each group can include only one CCE cluster resource; otherwise, workload details will not be displayed. Figure 5 Tagging the workloads of a CCE cluster
To use application diagnosis, perform the following steps:
- Log in to COC.
- In the navigation pane, choose Fault Management > Incidents.
- Click All Incident Tickets to view all incident tickets.
- Locate the incident ticket to be diagnosed and click its title to go to the details page.
- Click Application Diagnostics to switch to the Application Diagnostics tab page.
- Click the time box and set the fault occurrence time.
The time entered in the time box is the end time. The start time is one hour earlier than the end time. After the time is selected, the number of alarms for the application and its sub-applications in the selected time period is displayed on the application topology dashboard, and the application fault details are displayed on the details page on the right.
- (Optional) Select Auto Refresh and select a refresh frequency.
After Auto Refresh is selected, the end time is updated to the current system time based on the refresh frequency.
- (Optional) If the application has sub-applications, click the target sub-application.
The application topology dashboard displays all components of the sub-application. The sub-application fault details are displayed on the details page on the right. You can switch to other sub-applications on the topology dashboard.
- Click a component under the application or its sub-application.
The application topology dashboard displays all resources of the component. The component fault details are displayed on the details page. You can switch to other components on the topology dashboard. Metrics of core cloud services can be displayed. If APM is associated in application management, you can also view link-related metrics.
- Click
to expand the page on the right. - Click Alarm to switch to the Alarm tab page.
On the Alarm tab page, you can view application alarm information. Alarms generated within the time range on the right axis are displayed in the list. After you select a topology object on the left, the alarm information of the selected object is automatically displayed.
- Click Change to switch to the Change tab page.
On the Change tab page, you can view application change information. Changes within the change time range on the right axis are displayed in the list.
- Click Fault Diagnosis to switch to the fault diagnosis tab page.
On the Fault Diagnosis tab page, you can view the fault diagnosis data of your resources. DCS, RDS, DMS, ECS, and ELB resources can be diagnosed. After you select a topology object on the left, the diagnosis information of the selected object is automatically displayed.
If no diagnosis tasks have been created or you need to create a new diagnosis task, perform the following operations:
- Click Create Diagnosis Task. The Create Diagnosis Task page is displayed.
- Select the resource you want to diagnose.
- Click OK.
- Read and agree to Frontend Data Authorization Agreement on Guest OS Diagnosis Service, and click Agree.
You need to sign the agreement only if you select ECSs for fault diagnosis.
- Once the diagnosis is complete, click View Details in the diagnosis result list to view the diagnosis report.
- Click Alarm to switch to the Alarm tab page.
Executing a Response Plan
Once an incident ticket is handled and the cause is found, you can quickly run a contingency plan, script, or job to fix the issue and record the details.
You can view the associated raw alarms in the incident details page for the incidents generated by alarms.
- Log in to COC.
- In the navigation pane, choose Fault Management > Incidents.
- On the Pending tab page, locate the target incident ticket and click its title to go to the details page.
- Perform the following steps based on the selected response plan:
- If you want to choose a contingency plan:
- Select the contingency plan from the drop-down list and click Execute Response Plan.
If there is no desired contingency plan, click Create Contingency Plan. For details, see Creating a Contingency Plan.
- In the dialog box on the right, confirm the contingency plan steps and click Execute.
- Set parameters for a contingency plan.
- If the contingency plan is associated with a script, set the contingency plan by referring to Executing a Script and click Submit.
- If the contingency plan is associated with a job, set the contingency plan by referring to Executing a Job and click Submit.
- If the contingency plan is associated with a document, execute the contingency plan according to the document.
- Select the contingency plan from the drop-down list and click Execute Response Plan.
- If you want to choose a script:
- Select the corresponding script from the drop-down list and click Execute Response Plan.
If there is no desired script, click Create Script. For details, see Creating a Script.
- Set the script by referring to Executing a Script.
- Click Submit.
The system automatically switches to the service ticket details page. On the details page, you can view the service ticket execution progress.
- Select the corresponding script from the drop-down list and click Execute Response Plan.
- If you want to choose a job:
- Select the corresponding job from the drop-down list and click Execute Response Plan.
If there is no desired job, click Create Job. For details, see Creating a Job.
- Set the job by referring to Executing a Job.
- Click Submit.
The system automatically switches to the service ticket details page. On the details page, you can view the service ticket execution progress.
- Select the corresponding job from the drop-down list and click Execute Response Plan.
- If you want to choose a contingency plan:
- Click OK.
Initiating a War Room
- Log in to COC.
- In the navigation pane, choose Fault Management > Incidents.
- On the Pending tab page, locate the target incident ticket and click its title to go to the details page.
- Click Start WarRoom.
- Set parameters for initiating a war room.
Table 4 Parameters for initiating a war room Parameter
Description
WarRoom Name
The preset value is the incident ticket name. You can specify one.
WarRoom Description
Description of the war room.
War Room Administrator
Select a user from the drop-down list as the war room administrator.
Region
(Optional) Select a region for the war room. You can select multiple regions.
Enterprise Project
Select an enterprise project.
Application
Select an affected application. You can select multiple applications.
Group Creation Method
(Optional) Set this parameter to WeCom, Lark, or DingTalk.
Configure the application notification channel in mobile app management. After the notification channel is selected, the shift roles and participants will be added to the corresponding group when the war room is initiated.
Notification Mode
(Optional) Set this parameter to SMS, WeCom, Lark, Phone, or DingTalk.
To select WeCom, Lark, or DingTalk, configure the application notification channel in mobile application management first.
Shift
Select a shift scenario and corresponding roles from the drop-down lists. For details about how to configure a shift, see Shift Schedule Management.
Participant
Select a participant. You can select multiple participants.
- Click OK.
Recording Incident Handling Details
- Log in to COC.
- In the navigation pane, choose Fault Management > Incidents.
- On the Pending tab page, locate the target incident ticket and click its title to go to the details page.
- Click Handle Incident and set parameters.
Table 5 Parameters for handling an incident ticket Parameter
Description
Incident Type
(Mandatory) Select an incident type.
Service Interrupted
(Mandatory) The options are Yes and No.
Fault Occurrence Time
Enter the time when the fault occurs.
This parameter is mandatory when Service Interrupted is set to Yes.
Demarcation Completion Time
Enter the issue or fault locating completion time.
Fault Rectification Time
Enter the time when the fault is rectified.
This parameter is mandatory when Service Interrupted is set to Yes.
Reason
Enter the cause for the incident.
Solution
Enter the solution for the incident.
Add File
Click Add File to upload incident-related attachments.
A maximum of 10 files can be uploaded. The supported file types are JPG, PNG, DOCX, TXT, and PDF. The size of the file to be uploaded cannot exceed 10 MB.
- Click OK.
Creating an Improvement Ticket
During the incident ticket handling process, if product or O&M items are detected to be improved, you can create an improvement ticket to follow up on the process.
Note: An improvement ticket can be created only after an incident ticket is accepted.
- Log in to COC.
- In the navigation pane, choose Fault Management > Incidents.
- On the Pending tab page, locate the target incident ticket and click its title to go to the details page.
- Click
. On the displayed page, click Create Improvement Ticket. - Set parameters for creating an improvement ticket.
Table 6 Parameters for creating an improvement ticket Parameter
Description
Improvement Ticket
Name of an improvement ticket.
The name can contain a maximum of 64 characters, including letters, digits, hyphens (-), underscores (_), and spaces. It cannot start or end with a space.
Application
Select an application for which the improvement is performed.
Improvement Type
Select an improvement type.
Improvement Owner
Select an owner.
Improvement Acceptor
Select an acceptance user.
Expected Completion Time
Enter the expected completion time.
You can select a day. The date cannot be earlier than the current day.
Symptom
Enter the incident-related symptom.
The value can contain a maximum of 1,000 characters.
Improvement Ticket Closure Criteria
Enter the improvement ticket closure criteria.
The value can contain a maximum of 1,000 characters.
- Click OK.
On the incident ticket details page, click Improvement Records to view the status and current owner of the improvement ticket. Click the name of the improvement ticket to go to the improvement management page and handle the improvement ticket.
- After an incident ticket is handled, it is in the Resolved and To Be Verified state. The incident ticket can be verified. If the verification is successful, the incident ticket is in the Completed state. If the verification fails, the incident ticket will be in the Accepted state again.
Verifying an Incident Ticket
After the incident ticket is handled, confirm whether the fault is resolved or the desired result is achieved. Record the verification outcome in the ticket. Unresolved incident tickets may be rejected, requiring the handler to re-engage in fault locating and handling.
- Log in to COC.
- In the navigation pane, choose Fault Management > Incidents.
- On the Pending tab page, locate the target incident ticket and click its title to go to the details page.
- Click Verify Incident Closure.
- Set parameters for verifying incident closure.
Table 7 Parameters for verifying incident closure Parameter
Description
Verification Conclusion
The options are Resolved and Unresolved.
If you select Unresolved, the incident will be rejected and the incident process status will change to Pending.
Description
Enter incident-related description.
- Click OK.
Viewing Incident Ticket History
You can view the incident ticket history to check the actions taken on a node during incident ticket handling. The incident ticket history shows the whole handling process of an incident ticket.
- Log in to COC.
- In the navigation pane, choose Fault Management > Incidents.
- Click All Incident Tickets to view all incident tickets.
- Locate the incident ticket to be viewed and click its title to go to the details page.
- Click Incident Ticket History.
- On the displayed page, check the incident ticket history to trace the incident ticket handling process.
Helpful Links
- For details about how to specify incident levels, types, review rules, and fault review rules, see Incident Management in Basic Configurations.
- When massive faults occur or a major fault occurs, you can initiate a war room to handle the faults collaboratively. For details, see Handling an Incident Ticket Through a War Room.
- On COC, you can create, manage, and process incident tickets by calling APIs. For details, see Incident Management.
Feedback
Was this page helpful?
Provide feedbackThank you very much for your feedback. We will continue working to improve the documentation.See the reply and handling status in My Cloud VOC.
For any further questions, feel free to contact us through the chatbot.
Chatbot