Creating an OS Version Change Task
Scenarios
You can choose Resource O&M > Automatic O&M in the navigation pane. On the displayed page, click the OS Version Change card and create an OS version change task. After the task is created, a service ticket for upgrading the OS version is generated.
The OS version change feature is billed on a pay-per-use basis. You can create OS version change tasks as required. For details, see Billing Mode.
Creating an OS Change Task
- Log in to COC.
- In the navigation pane on the left, choose Resource O&M > Automated O&M.
- In the Advanced O&M module, click OS Version Change.
- Set the basic information.
Figure 1 Configuring basic parameters
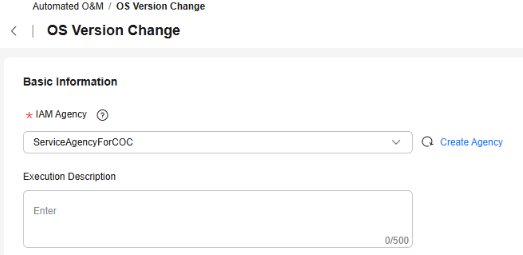
Table 1 Basic information parameters Parameter
Description
Example Value
IAM Agency
(Mandatory) Scope of permissions that can be used on COC to execute jobs.
ServiceAgencyForCOC
Execution Description
(Optional) Description of the job to be executed.
-
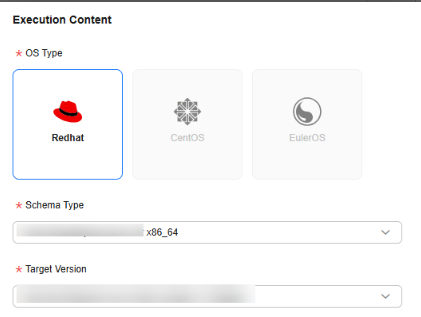
- Specify OS Type, Schema Type, and Target Version.
- OS Type: Select the type of the OS you want to use for the target version. Currently, only Red Hat type is supported.
- Architecture Type: Select the CPU architecture type you want to use in the target version.
- Target Version: Select the target version.
Figure 2 Configuring execution content
- Set the OS upgrade procedure.
- The following 11 steps have been preset in the system: BusinessProcessingBeforeUpgrading User-defined, PreparationBeforeUpgrading, CheckBeforeUpgrading, BackupBeforeUpgrading, UpgradeOS, RebootOS, Sleep-20s, WaitingForOSReboot, SystemProcessingAfterUpgrading, BusinessProcessingAfterUpgrading User-defined, and BusinessVerificationAfterUpgrading User-defined.
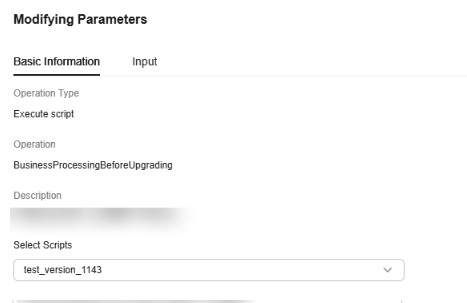
- BusinessProcessingBeforeUpgrading User-defined, BusinessProcessingAfterUpgrading User-defined, and BusinessVerificationAfterUpgrading User-defined support user-defined configurations. You can click Modify under each step to go to the Modify Parameter drawer on the right. You can select a customized script on the Basic Information tab page. On the Input tab page, modify the input parameters. Other steps do not support user-defined configuration.
Figure 3 Custom parameters
- Click Add Instance and set instance information.
Figure 4 Adding an instance
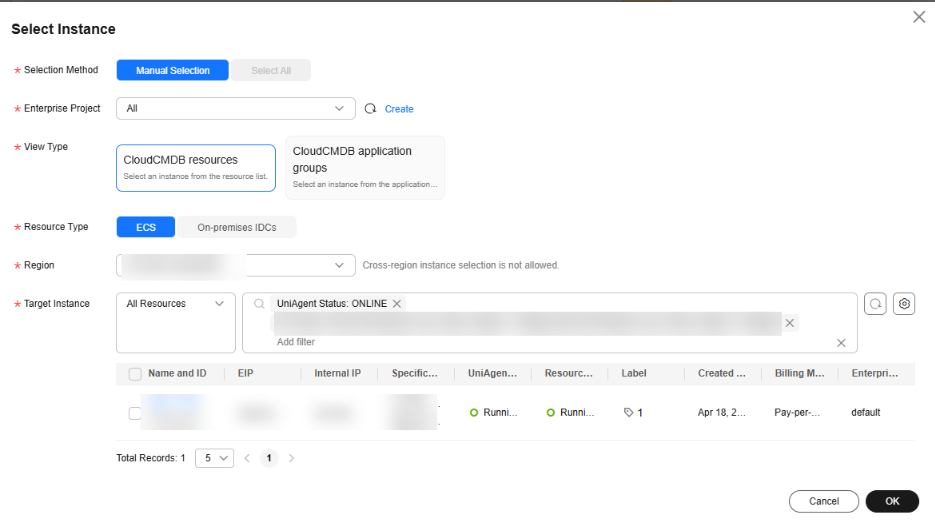
Table 2 Instance parameters Parameter
Description
Example Value
Selection Method
Select an instance selection method. Select All is not enabled.
- Manual Selection: Manually select an instance based on Enterprise Project, View Type, Resource Type, Region, and Target Instance.
- Select All: Automatically select all instances based on Enterprise Project, View Type, Resource Type, Region, and Target Instance.
Manual Selection
Enterprise Project
Select an enterprise project. You can select All.
All
View Type
Select a view type.
- CloudCMDB resources: Select an instance from the resource list.
- CloudCMDB application groups: Select an instance from the application group list.
CloudCMDB resources
Resource Type
Select a resource type. The default value is used and cannot be changed.
ECS
Region
Select an execution region. The target DB instance cannot be selected across regions.
CN North-Beijing4
Target Instance
Set filter criteria in the filter box and select the filtered instances manually or automatically.
Select the required instance.
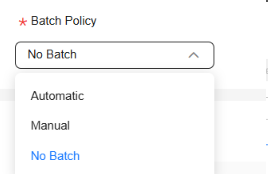
- Select a batch policy.
- Automatic: The selected instances to be executed are automatically divided into multiple batches based on the preset rule.
- Manual: You can manually create multiple batches and add instances to each batch as required.
- No Batch: All instances will be executed in the same batch.
Figure 5 Selecting a batch policy
- (Optional) Set global parameters.
Click Modify to modify the global parameters related to the OS version change.
- Click OK, confirm the execution information, and click OK again.
- The OS version change service ticket page is displayed. You can perform the following operations:
- Retry: If the service ticket status is abnormal, you can retry at the instance level and re-execute the current failed step.
- Rollback: If the service ticket status is abnormal or complete, you can create an OS rollback task. After the task is created, an OS rollback service ticket is generated.
Feedback
Was this page helpful?
Provide feedbackThank you very much for your feedback. We will continue working to improve the documentation.See the reply and handling status in My Cloud VOC.
For any further questions, feel free to contact us through the chatbot.
Chatbot


