
Interconnecting with FunctionGraph to Call Serverless Services
FunctionGraph hosts and computes functions in a serverless context. It automatically scales up/down resources during peaks and spikes without requiring the reservation of dedicated servers or capacities. Resources are billed on a pay-per-use basis.
In Huawei Cloud Astro Zero, configure a FunctionGraph connector to link Huawei Cloud Astro Zero with FunctionGraph. Once connected, you can call services developed on the FunctionGraph console. For example, use flows to call a function created on the FunctionGraph console.
Prerequisites
exports.handler = async (event, context) => {
    const result = {
        "greetings": event.name + ", hello"
    }
    return result;
}
Billing
After connecting an application to the FunctionGraph connector, you must pay for the FunctionGraph service separately. For details, see Huawei Cloud Pricing. After the application is disabled, FunctionGraph is still billed based on the specified billing rules. If you do not need to use FunctionGraph, unsubscribe from the instance in a timely manner by referring to Billing Termination to avoid extra fees.
Creating a FunctionGraph Connector
- Log in to the application designer by referring to Logging In to the Application Designer.
- In the navigation pane, choose Integrations.
- Click Connector Instance under Connector.
- In the navigation pane, choose HTTP > FunctionGraph Service.
- On the right of the page, click +, set basic information, and click Next. Figure 1 Creating a FunctionGraph connector

- Set authentication information and click Save. Figure 2 Authentication information

Table 2 Authentication information parameters Parameter
Description
Root Region
Region where FunctionGraph is located. FunctionGraph and Huawei Cloud Astro Zero can be in different regions.
Auth Mode
Authentication mode for accessing FunctionGraph.
- Agency: You can create an agency to share FunctionGraph resources.
- AK/SK: The AK/SK pair is used for authentication.
Access Key
Set this parameter to the value of Access Key Id in the access key pair. Obtain the AK and SK by referring to Obtaining an AK/SK.
This parameter needs to be set only when Auth Mode is set to AK/SK.
Secret Key
Set this parameter to the value of Secret Access Key in the access key pair. Obtain the AK and SK by referring to Obtaining an AK/SK.
This parameter needs to be set only when Auth Mode is set to AK/SK.
Package Current Configuration
If this parameter is selected, the connector will be packed together with applications. For example, if an application package is released to the runtime environment, the current configuration is synchronized to the runtime environment by default. If this option is not selected, the connector will not be packaged and released to the runtime environment. In this case, you need to create the corresponding connector by referring to Managing Connectors in Applications.
This parameter is selected by default. You are advised not to select this option in information-sensitive scenarios.
- Configure an action, that is, the function to be called.
- On the Action List tab page, click New.
- In the basic information area, select the function to be called, for example, hello created in Prerequisites, set the action label and name, and click the next button.
- Configure the message header input parameters. In this example, you do not need to configure the message header input parameters. Click the next button and delete the parameters in the first row.
If this API does not have header input parameters, you do not need to set the parameters. Delete the first row. If there are multiple message header input parameters, click the add button.
Table 3 Input parameters in the message header Parameter
Description
Label
Label of a message header input parameter, which is displayed on the page.
Name
Unique ID of a message header input parameter in the system. The value cannot be changed after being created.
Data Type
Data type of a header input parameter. The options are as follows:
- Number: The value is a number.
- String
- Boolean: Only two values are allowed, for example, true and false.
Default Value
Default value of a parameter
Description
Description of the header input parameter.
Default Value
Indicates whether the input parameter of the header has a default value. If this parameter is selected, you can customize the value in Default Value. If Data Type is set to Sensitive Text, the default value cannot be set.
Required
Indicates whether the input parameter of the header is mandatory.
Operation
Click
 or
or  to copy or delete the header input parameter.
 - Configure input parameters
As shown in Figure 3, the input parameter name of the character string type needs to be set in this scenario. If this API does not have input parameters, you do not need to set the parameters. Delete the first row. If there are multiple input parameters, click the add button and define basic information about the input parameters.
Message body format in the upper right corner of the page is displayed only when Method is set to PUT or POST. If the third-party input parameter is of the array or non-JSON type, set Message body format to Value.
For example, if Message body format is set to Key-Value and input parameters A, B, and C are defined, the request message body will pass {A:1, B:2, C:3}, and the request receiver will receive {A:1, B:2, C:3}. If Message body format is set to Value, $in will be introduced. The request message body will pass {$in: [1,2,3]}, and the request receiver will receive [1,2,3].
Table 4 Input parameters Parameter
Description
Label
Label of an input parameter, which is displayed on the page.
Name
Unique ID of the input parameter in the system, which cannot be changed after being created.
Location
Position of the input parameter. The options are as follows:
- Body
- URL Query
- URL Path
Data Type
Data type of the input parameter. The options are as follows:
- Date: The value is accurate to day.
- Date/Time: time type, accurate to second.
- Number: The value is a number.
- String
- Boolean: The value is true or false.
- Global structure
- Key-value pair (Map): Map collection type.
- Object: Object identifier type.
- Sensitive text, such as the name and mobile number.
Namespace
If the data type is set to global structure, you need to set the namespace to which the parameter belongs.
Metadata Name
When the structure type is set to object, set a specific object.
Description
Enter the description of the input parameter.
Value: 1–255 characters.
Default Value
Sets the default value of an input parameter.
Required
Indicates whether an input parameter is mandatory.
Collection
Whether the input parameter is set to the array type.
Operation
Click
 or
or  to copy or delete the input parameter.
 - Set the output parameter, as shown in Figure 4. In this example, you need to set the output parameter greetings of the character string type.
If this API does not have output parameters, you do not need to set the parameters. Delete the first row. If there are multiple output parameters, click the add button and define basic information about the output parameters.
When you select Value for Message body format, a common variable $out, will be introduced. The body content will be saved to $out as output parameters.
For example, if Message body format is set to Key-Value and output parameters A, B, and C are defined, the response message body will pass {A:1, B:2, C:3}, and the request sender will receive {A:1, B:2, C:3}. If Message body format is set to Value, $out will be introduced. The response message body will pass [1,2,3], and the request sender will receive {$out: [1,2,3]}.
Table 5 Output parameters Parameter
Description
Label
Label of an output parameter, which is displayed on the page.
Name
Name of an output parameter, which uniquely identifies the output parameter in the system.
Placement
Position of the output parameter. The options are as follows:
- Header
- Body
Data Type
Data type of the output parameter. The options are as follows:- Date: The value is accurate to day.
- Date/Time: time type, accurate to second.
- Number: The value is a number.
- Character string: The value is a character string.
- Boolean: The value is true or false.
- Global structure
- Key-value pair (Map): Map collection type.
- Object: Object identifier type.
Namespace
If the data type is set to global structure, you need to set the namespace to which the parameter belongs.
Metadata Name
When the structure type is set to object, set a specific object.
Description
Description of the parameter.
Collection
Whether the input parameter is set to the array type.
Operation
Click
 or
or  to copy or delete the parameter.
 - Click the save button.
- Click
 in the row where the action is located to enable the action.
- (Optional) Test the function.
- Click the name of the created action. The action details page is displayed.
- Click the test button, set the following parameters, and click test button.
{
"name":"Lily"
}
If Figure 5 is returned, the function is successfully executed.


Calling a Connector in a Flow
In a flow, use the connector diagram element to call the function created on the FunctionGraph console.
- Create a blank flow by referring to Creating a Blank Flow.
- Set input and output parameters for the flow.
- On the right of the flow designer, click
 .
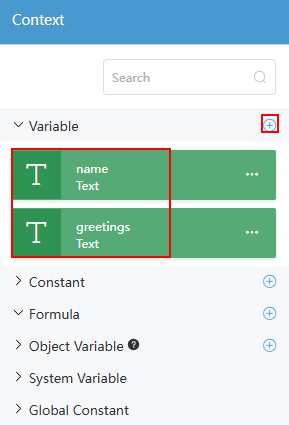
. - On the Context panel, click the plus sign (+) next to Variable.
- Create the input parameter variable name and output parameter variable greetings, and set the variable type to Text, as shown in Figure 6.
- Click
 and set the input and output parameters of the flow. Figure 7 Setting input and output parameters
- On the right of the flow designer, click
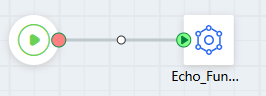
- On the left of the flow design page, select the FunctionGraph connector created in Creating a FunctionGraph Connector, drag it to the canvas, and connect diagram elements. Figure 8 Connecting diagram elements
- Configure action parameters. Figure 9 Configuring action parameters

- Action: Call the action configured in 7.
- Input parameters: Set the input parameters of the node. Select a parameter from Target and drag the corresponding variable in Context to Source.
- Output parameters: Set the output parameters of the node. Select a parameter from Source and drag the corresponding variable in Context to Target.
- Click
 to save the flow.
 - Click
 , set input parameters, and click the run button to run the flow.
 { "name": "Lily" }If the following information is displayed, the function is successfully called:
{
    "interviewId": "002N000000pjDj5T7Djk",
    "outputs": {
        "greetings": "Lily, hello"
    }
}
Calling a Connector in a Script
In a script, call the created connector to call the function created on the FunctionGraph console.
- Create an empty script by referring to Creating a Blank Script.
- In the script editor, enter the following script code:
import { Decimal } from "decimal"; import { Error } from "error"; import * as connector from "connector"; export class Input { @action.param({ type: "String", required: true, description: "name" }) name: string; } export class Output { @action.param({ type: "String", required: true }) greetings: String; } export class Functiongraph { @action.method({ input: "Input", output: "Output", description: "do a operation" }) run(input: Input): Output { let output = new Output(); let client = connector.newClient("functiongraph", "Namespace__FunctionGraph"); let result = client.invoke("Namespace__hello", input); console.log(result); output.greetings = result.greetings; return output; } }Namespace__FunctionGraph indicates the connector name, and Namespace__hello indicates the action name.
- Click
 in the upper part of the script editor to save the script.
 - Click
 in the upper part of the editor page to execute the script.
 - On the input parameter tab page at the bottom of the page, enter request parameters and click
 in the upper right corner of the test window.
 { "name": "Lily" }If the following information is displayed, the function is successfully called:
{
    "greetings": "Lily, hello"
}
Feedback
Was this page helpful?
Provide feedbackThank you very much for your feedback. We will continue working to improve the documentation.See the reply and handling status in My Cloud VOC.
For any further questions, feel free to contact us through the chatbot.
Chatbot


