How Do I Test the Network Bandwidth Between the Source and Target Servers Using iPerf?
Prerequisites
Ensure that the network between the source and target server is connected, and the port used for the iPerf test is allowed by a security group rule configured for the target server on Huawei Cloud. For how to configure a security group rule, see How Do I Configure Security Group Rules for Target Servers?
This test must be performed before the migration, and workloads running on the source server must have little impact on the network, or the test results will be inaccurate.
Procedure
- Download iPerf based on the source server OS.
- Extract the iPerf installation package into directories on the source and target servers. You can also use another ECS in the same region as the target server. On a Windows server, the iPerf installation package looks like follows.

- On the target server, run iPerf in server mode using the CLI. The following uses Windows as an example.
- Switch to the directory with the iPerf executable:
In this command, <path> is where you extracted iPerf on the target server in 2.
- Run iPerf in server mode:
In this command, <port> is the port the iPerf server listens on. It is recommended that port 8900 be used for Windows and port 22 for Linux since the two ports are configured as data transmission ports. You can also use another port for testing, but ensure that this TCP or UDP port is allowed in security group rules configured for the target server.
For details about more parameters, run the iperf -h command.
For example, if port 8900 is used for Windows and Server listening on 8900 is displayed in the command output, iPerf is running.

- Switch to the directory with the iPerf executable:
- On the source server, run iPerf in client mode using the CLI. Test the TCP bandwidth, UDP jitter, packet loss rate, and bandwidth. The following uses Windows as an example.
- Switch to the directory with the iPerf executable:
In this command, path is where you extracted iPerf on the source server in 2.
- Test the TCP bandwidth using iPerf:
iperf3 -c <target-IP-address> -p <port> -t <time>
In the preceding command, -c is used to run iPerf in client mode.
- <target-IP-address> is the IP address of the target server (iPerf server).
- <port> is the port used for connecting to the target server, that is, the iPerf listening port in 3.b.
- <time> is the total test time. The default unit is second.
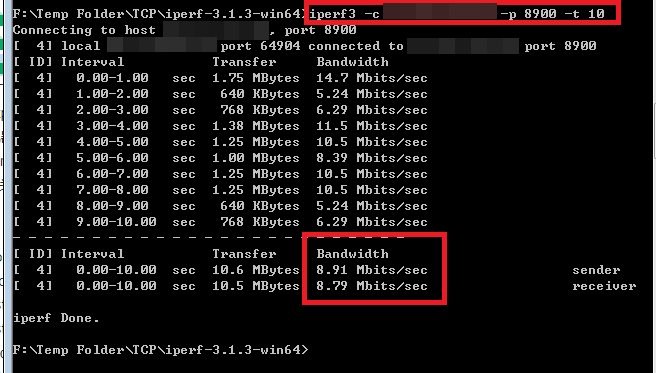
Wait for the iPerf client to connect to the iPerf server and the bandwidth test to complete, and then check the results. The following figure uses port 8900 on Windows as an example.

- Test the UDP jitter, packet loss rate, and bandwidth.
iperf3 -c <target-IP-address> -p <port> -u -t <time>
-u is used to measure the UDP jitter, packet loss rate, and bandwidth.
- <target-IP-address> is the IP address of the target server (iPerf server).
- <port> is the port used for connecting to the target server, that is, the iPerf listening port in 3.b.
- <time> is the total test time. The default unit is second.
Wait for the iPerf client is connected to the iPerf server and the test is complete, and check the result. The following figure uses port 8900 on Windows as an example.

- Run the following command to measure the network latency:
<target-IP-address> is the IP address of the target server (iPerf server).
Ensure the ICMP packets are allowed to pass through by the security group rules of the VPC that the target server belongs to.
- Switch to the directory with the iPerf executable:
- View all testing options. Alternatively, you can obtain the help information about iPerf on its official website.
iperf3 -h
Feedback
Was this page helpful?
Provide feedbackThank you very much for your feedback. We will continue working to improve the documentation.See the reply and handling status in My Cloud VOC.
For any further questions, feel free to contact us through the chatbot.
Chatbot


