
Verifying a Solution on HaydnCSF
This section describes how to verify solutions on HaydnCSF.
Prerequisites
- You are a HaydnCSF user, and your role is an architect role or a test engineer. A HaydnCSF user can have multiple roles. For details about how to become a HaydnCSF user, see Accessing HaydnCSF. For details about user roles, see HaydnCSF User Access Permissions.
- You have created a workspace and invited related members to the workspace. For details, see Member Management.
- You have built a solution on HaydnCSF.

The corresponding requirement review owner or test case design owner of each step will receive to-do notifications and handle them through the To-Dos page, quick link, or menu bar.
Submitting a Test Requirement
You need to specify your test requirements before verifying your solution. To create a test requirement on HaydnCSF, your role in the workspace should be an architect or test engineer.
- Create a test requirement.
- Log in to HaydnCSF and enter the workspace that has been created during the solution building.
- In the navigation pane on the left, choose Verification Center > Requirements and click Create.
- On the page displayed, select the solution displayed in the Workspace To-Dos and configure the verification requirements.
Table 1 Test requirement parameters Parameter
Description
Solution Name
Select a solution built during the solution building. Before creating a test requirement, ensure that a solution has been built. You can create more than one requirement for a solution.
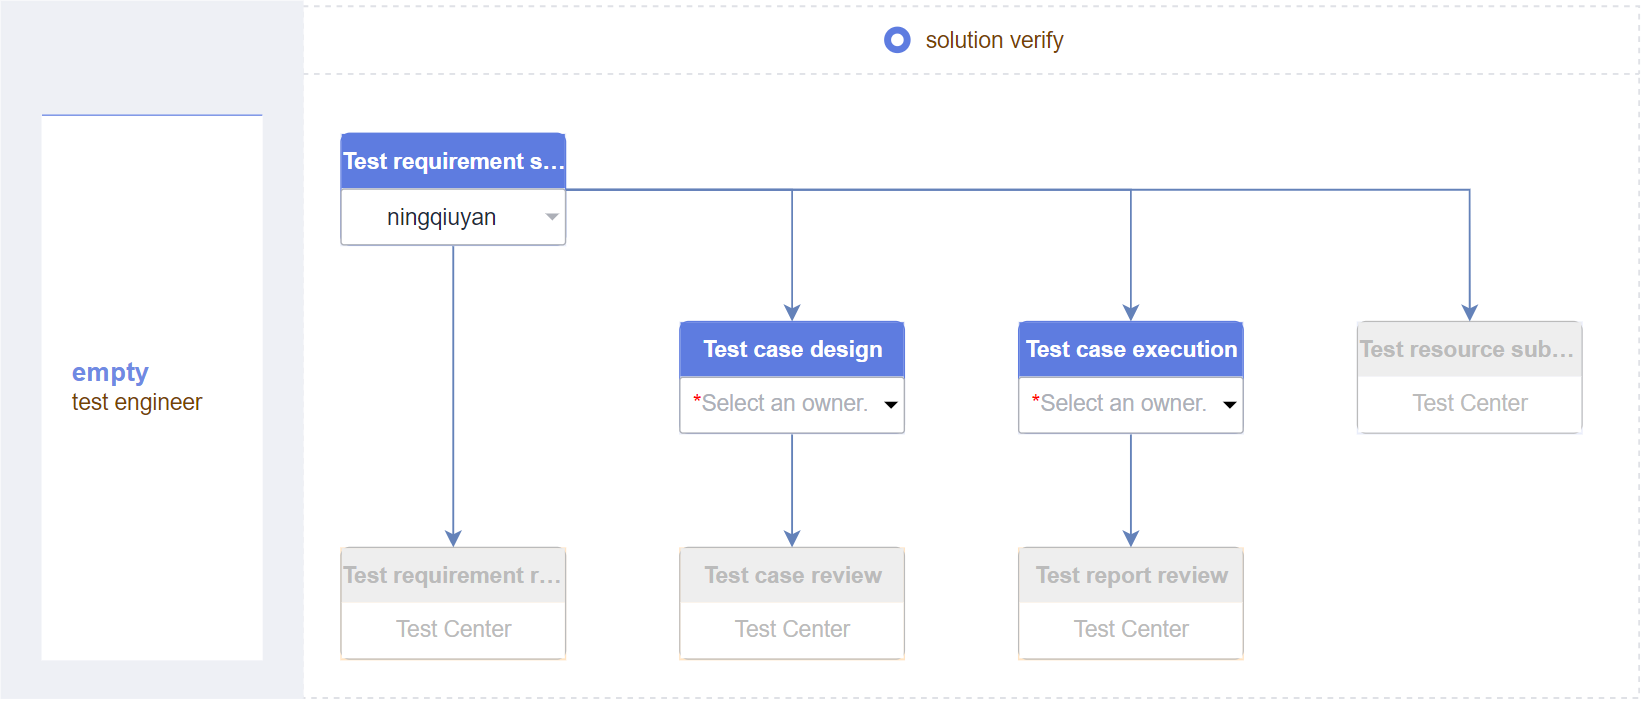
Verification Process
This section takes Fast Solution Process as an example.
- Fast Solution Process: Build a solution quickly on HaydnCSF. By default, all key steps of this process do not need to be reviewed.
- Common Solution Process: Build a solution using the common solution process on HaydnCSF. All key steps of this process need to be reviewed.
- Customize Flowcharts: Customize the steps you want to skip.
Default handlers are specified for all steps of these processes. They can be changed by either the corresponding handlers or the workspace administrator in Workspace To-Dos.
Deployment Environment
Select the type of the Huawei Cloud deployment environment of the application to be verified.
Verification Policy
Independent Verification indicates that the solution is verified in an independent deployment environment. Select the corresponding deployment environments and solutions.
Deployment Account
Huawei Cloud account for deploying resources and applications
Test Requirement Name
Specify the test requirement name, for example, "xx Solution Verification Requirement".
Requirement Start and End Date
Expected start and end dates of verification
Test Requirement Type
Select a test requirement type based on your service requirements. Subsequent test cases will be classified based on the requirement type. Each test requirement type can have multiple test requirements.
You can use templates for a quick experience. You can also select and modify the requirements and test cases in these templates based on your needs.
Test Plan
Make a test plan that includes the plan name, start and end dates, and testing steps.
Figure 2 Creating a test requirement-1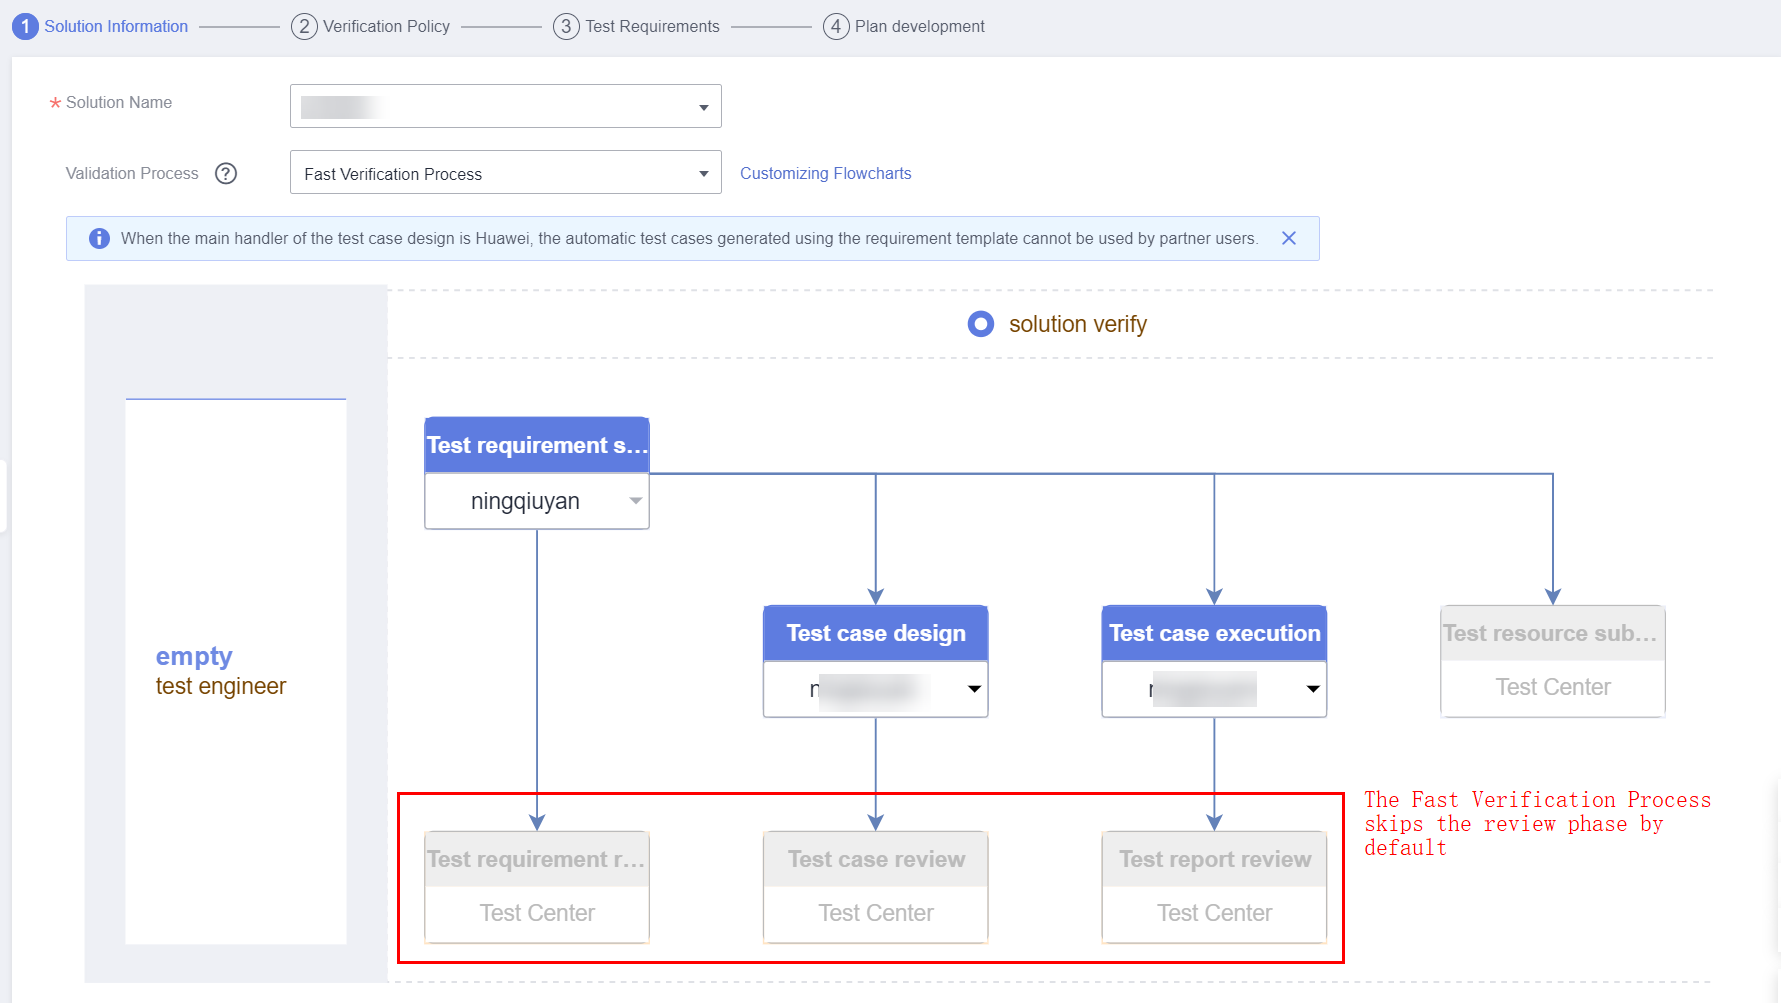 Figure 3 Creating a test requirement-2
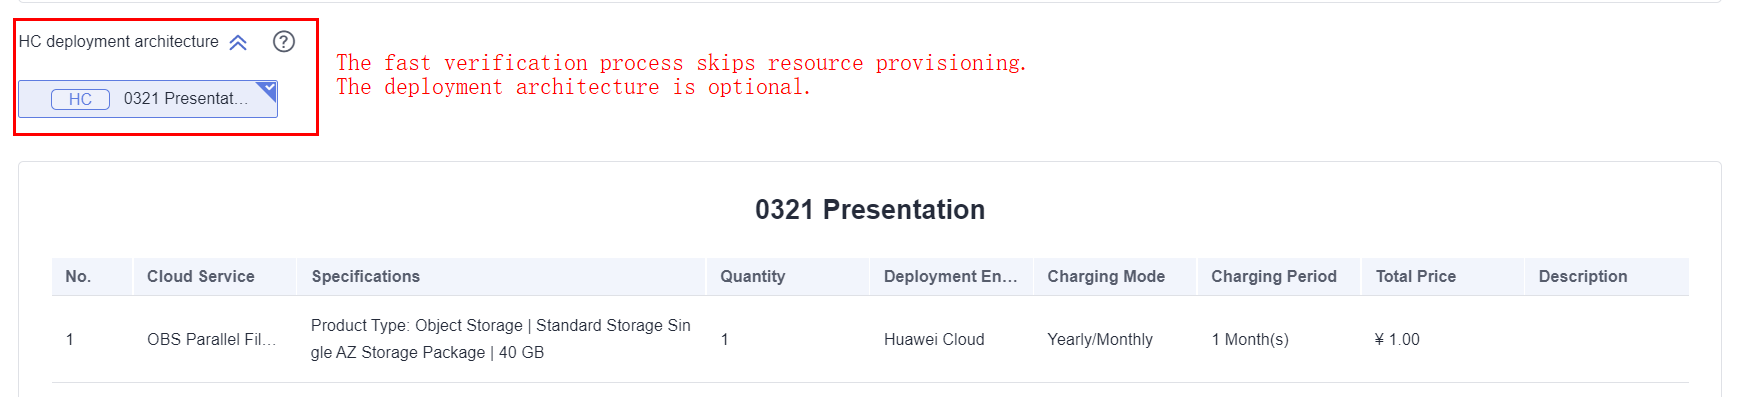 Figure 4 Creating a test requirement-3
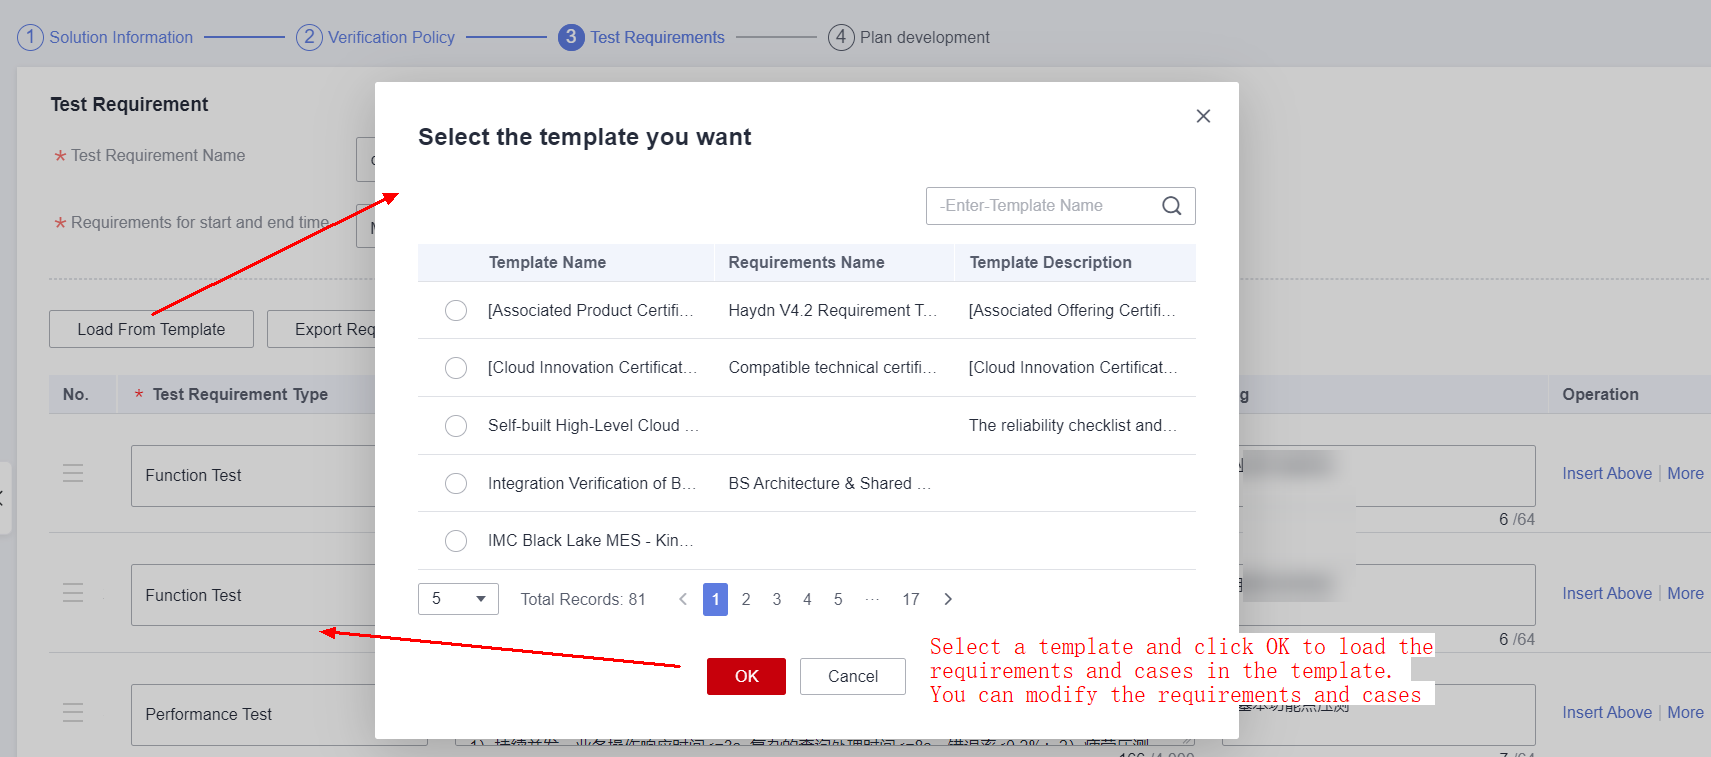 Figure 5 Creating a test requirement-4
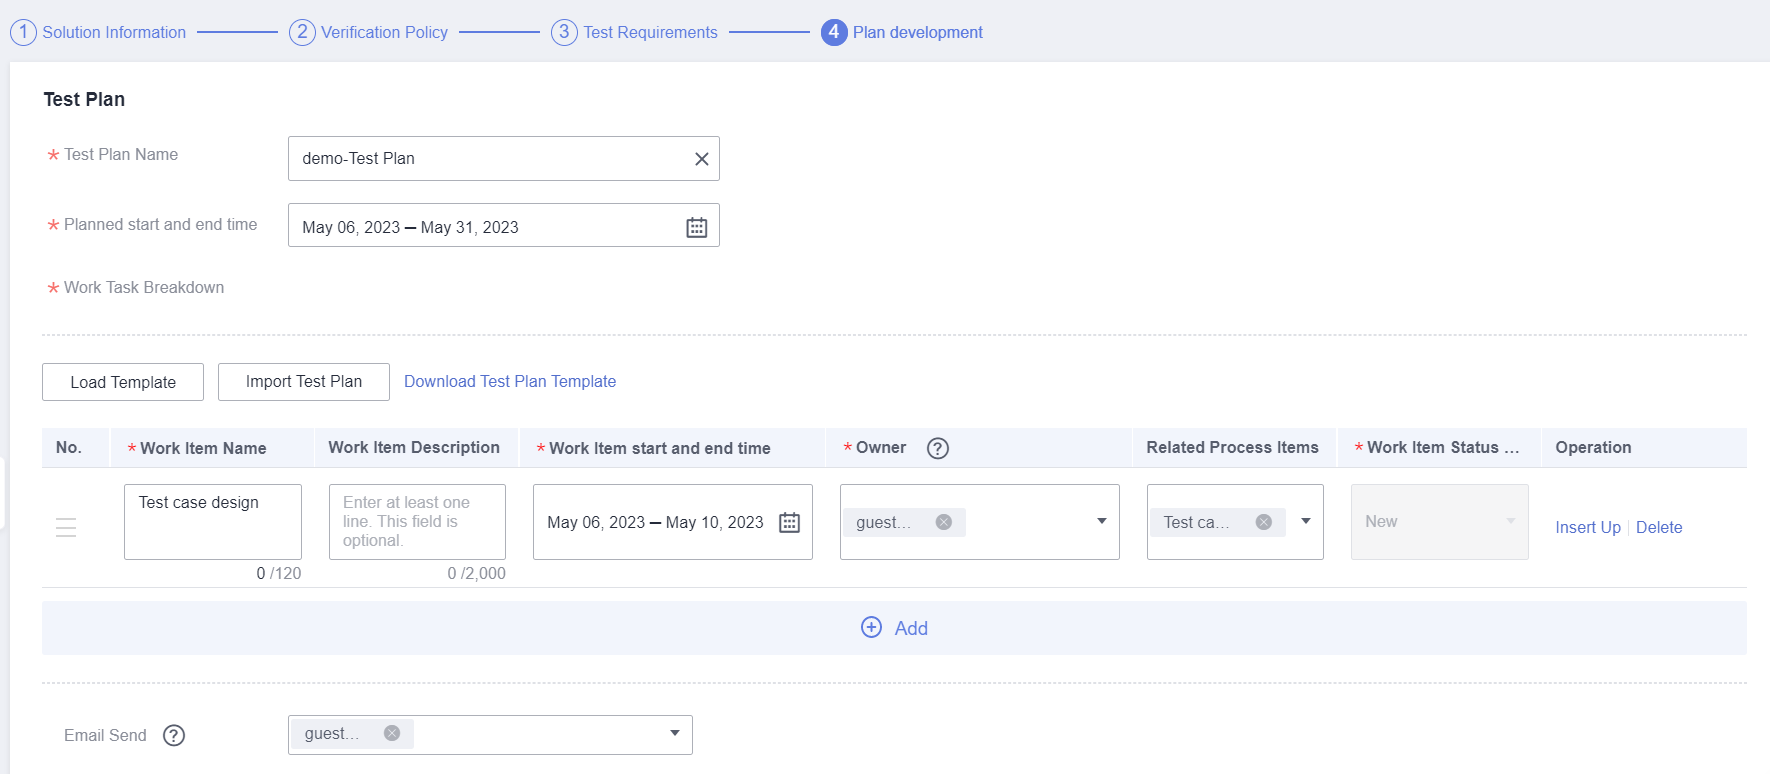
- Save the test requirement.
The status of the saved requirements can be modified by the architect or the test engineer in the workspace.
- Submit the test requirement.
The creator of the requirement can change the requirement after it is submitted.
Designing a Test Case
Only the test engineer role can create test cases on HaydnCSF.
Log in to HaydnCSF as the test case design owner specified during the requirement creation. Enter the workspace created during the solution building. In the navigation pane on the left, choose Verification Center > Cases.
- Create a test case.
If you select Load Template when you create your test requirement, the test cases in the template will be automatically displayed in the Case Management page. You can edit or delete these cases based on your needs.
- Manually add a test case.
In the Test Requirements pane, select the requirement and click Create.
Figure 6 Managing test cases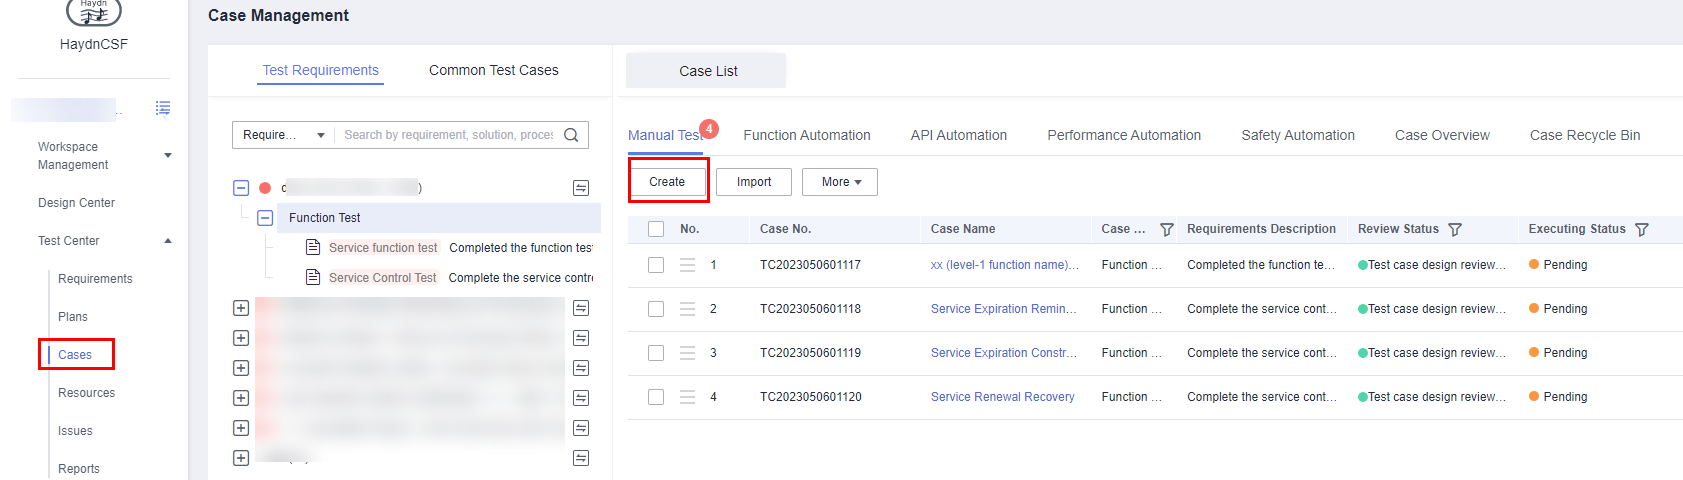 Figure 7 Manually creating a test case
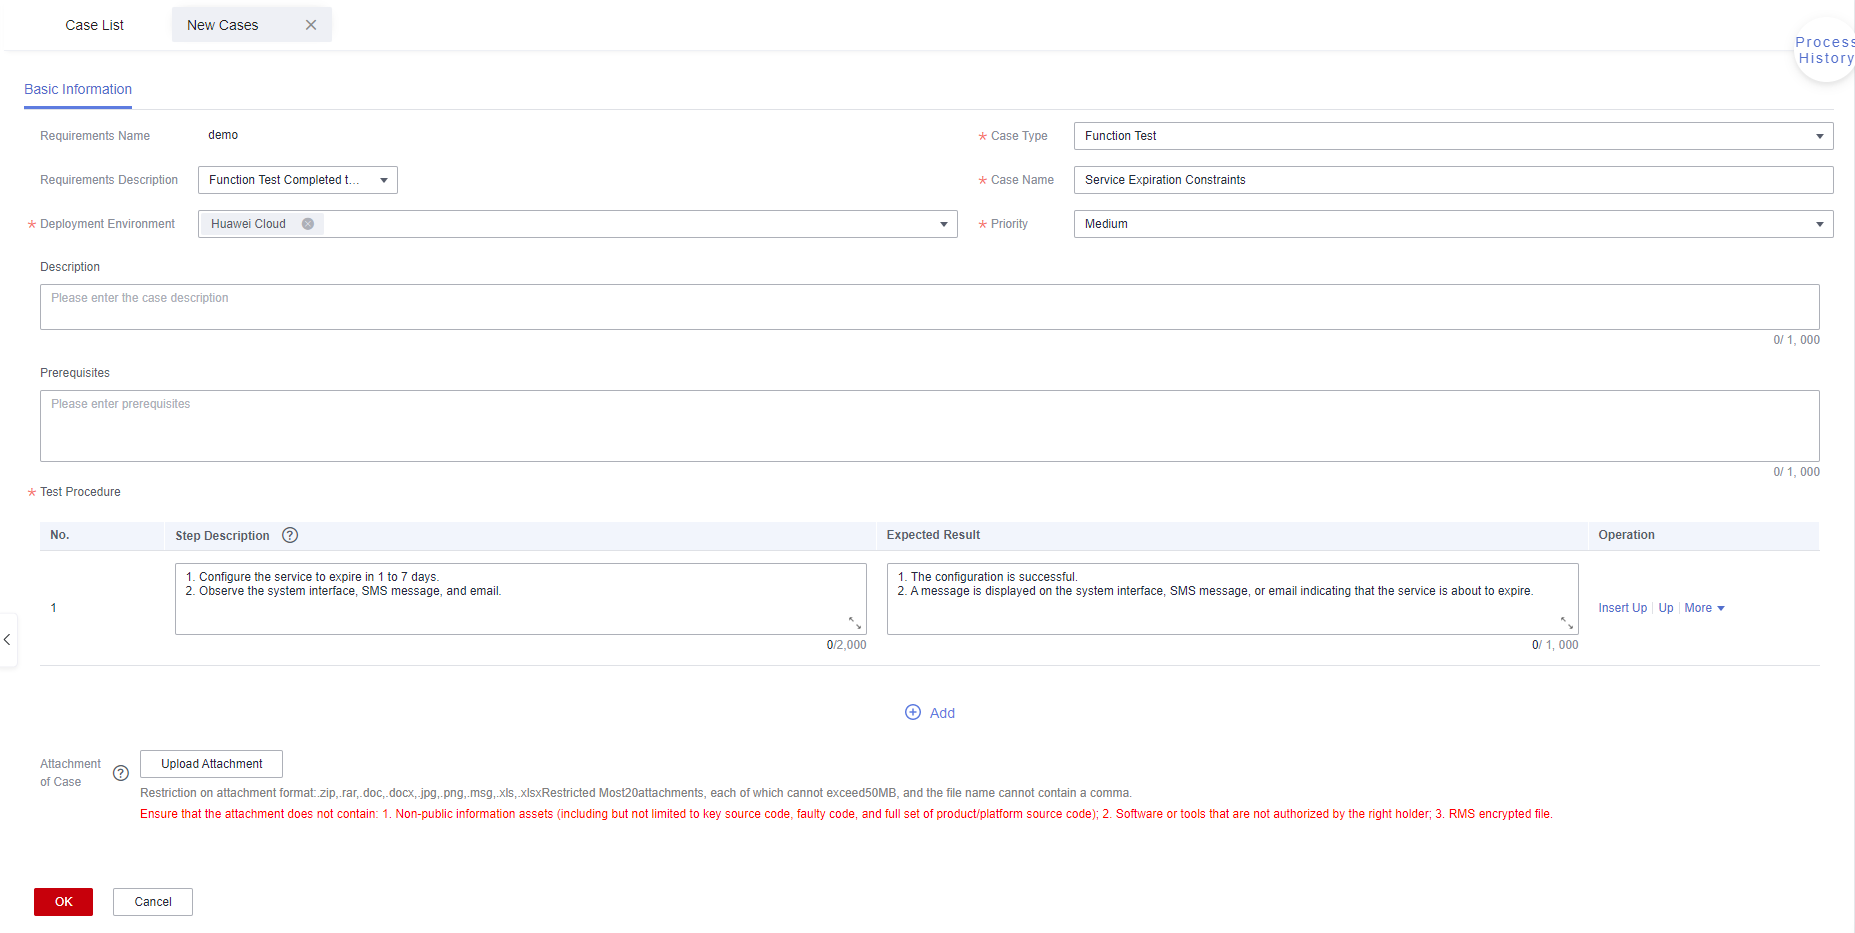
- Requirement Description: Select the requirement that the test case belongs to from the drop-down list.
- Case Name: Specify the test case name. It is recommended that you standardize the test case name so that the function can be reflected in the test case name.
- Deployment Environment: Select the development environment of the test case to be deployed from the drop-down list.
- Priority: Select the importance level of the test case from the drop-down list.
- Description: Describe the test case.
- Prerequisites: Customize the prerequisites for executing the test case.
- Step Description: Specify the steps involved in the test case.
- Expected Result: Enter the expected result of each step.
- Attachments: Upload the associated files required by the test case.
- Import a test case.
In the Test Requirements pane, select the test requirement and click Import. In the displayed dialogue box, click Download Case Template. Fill in the template and then upload it to HaydnCSF.
Figure 8 Importing a test case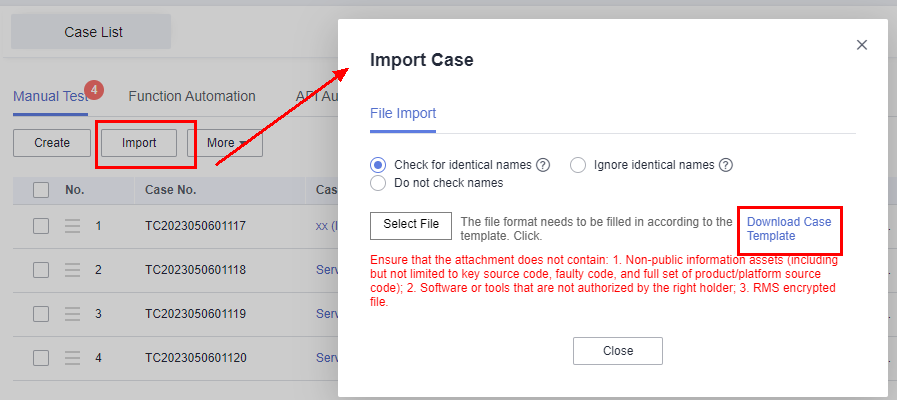
- HaydnCSF supports automatic testing. You can create an automatic test case on the Function Automation, API Automation or other automation tab pages. For details, see Case Management.
- Only the test case design owner specified in Submitting a Test Requirement can create a test case. More than one owner can be specified. Other roles in the workspace can view the test cases but cannot create or change them.
- To change the test case designer when you design or execute a test case, click Change Case Designer on the Case Management page.
Figure 9 Changing the case designer or executor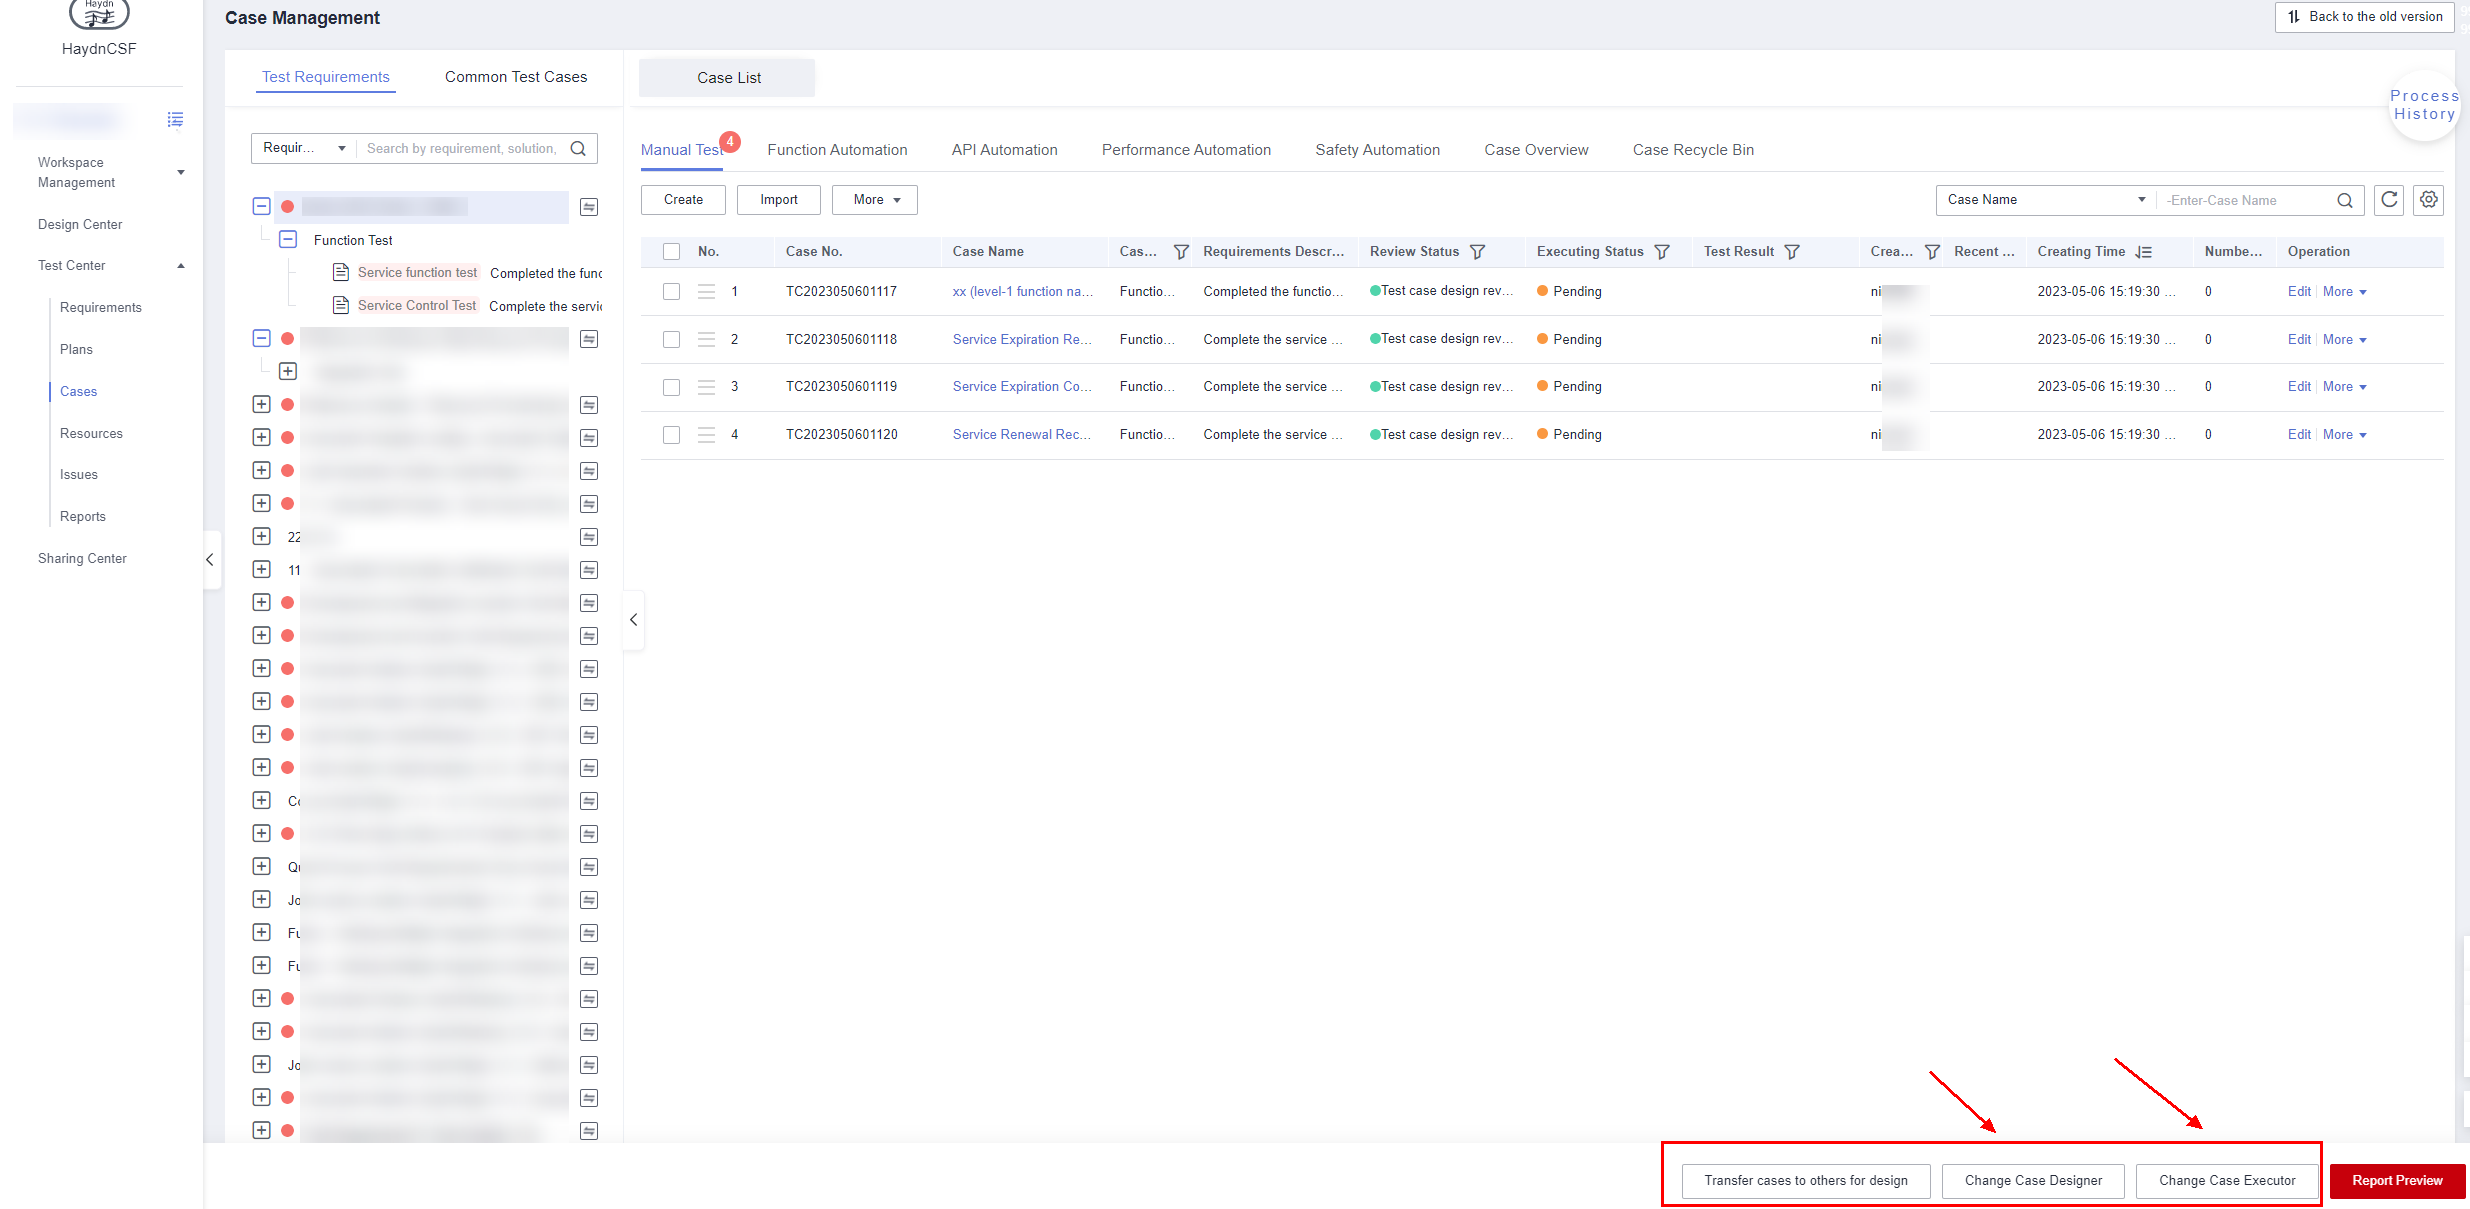
- Manually add a test case.
- Submit the test case.
Submit the test case after finishing the design. This section takes the fast solution process as an example, so the test case will pass the review by default after being submitted.
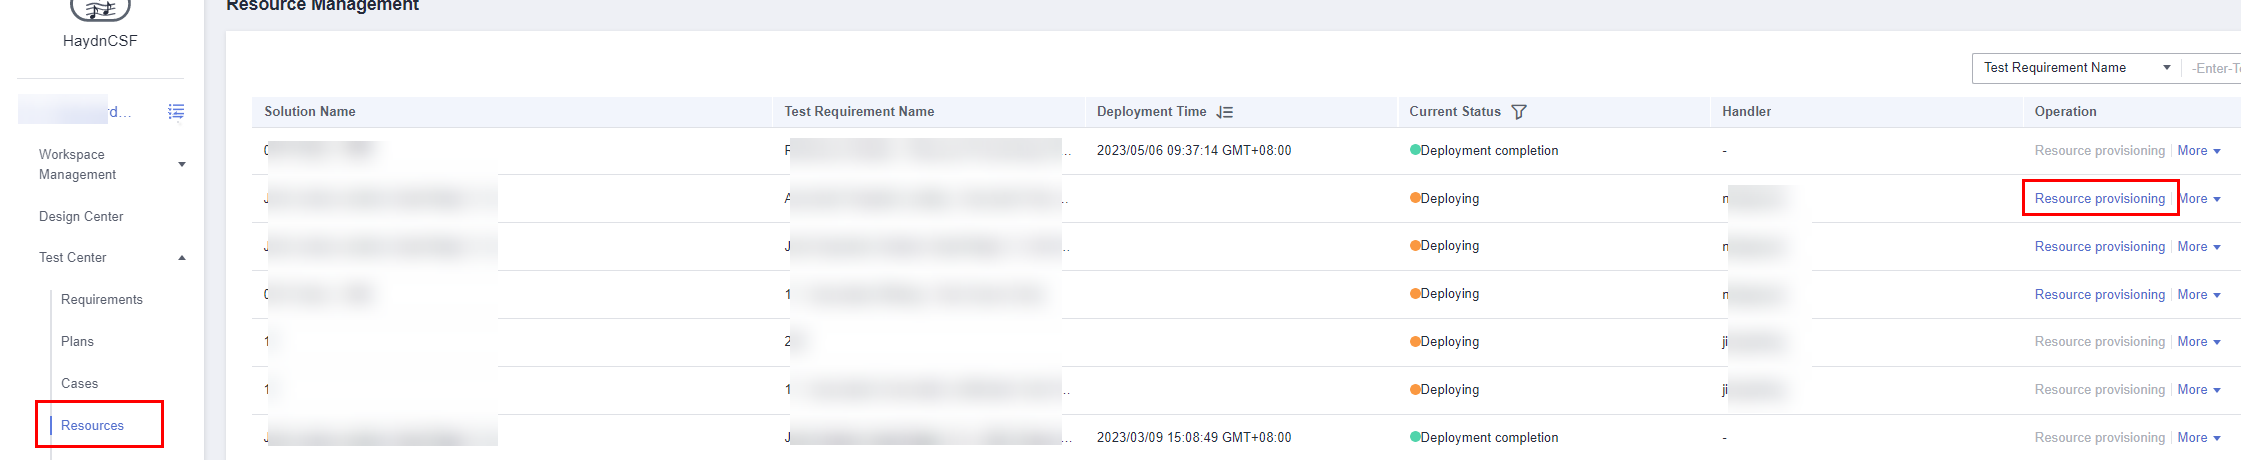
Provisioning Cloud Service Resources and Deploying Applications
Test resources can be provisioned for the designed test cases. You can enter the resource provisioning page from resource provisioning to-dos or the resource management page of the Verification Center in your workspace.
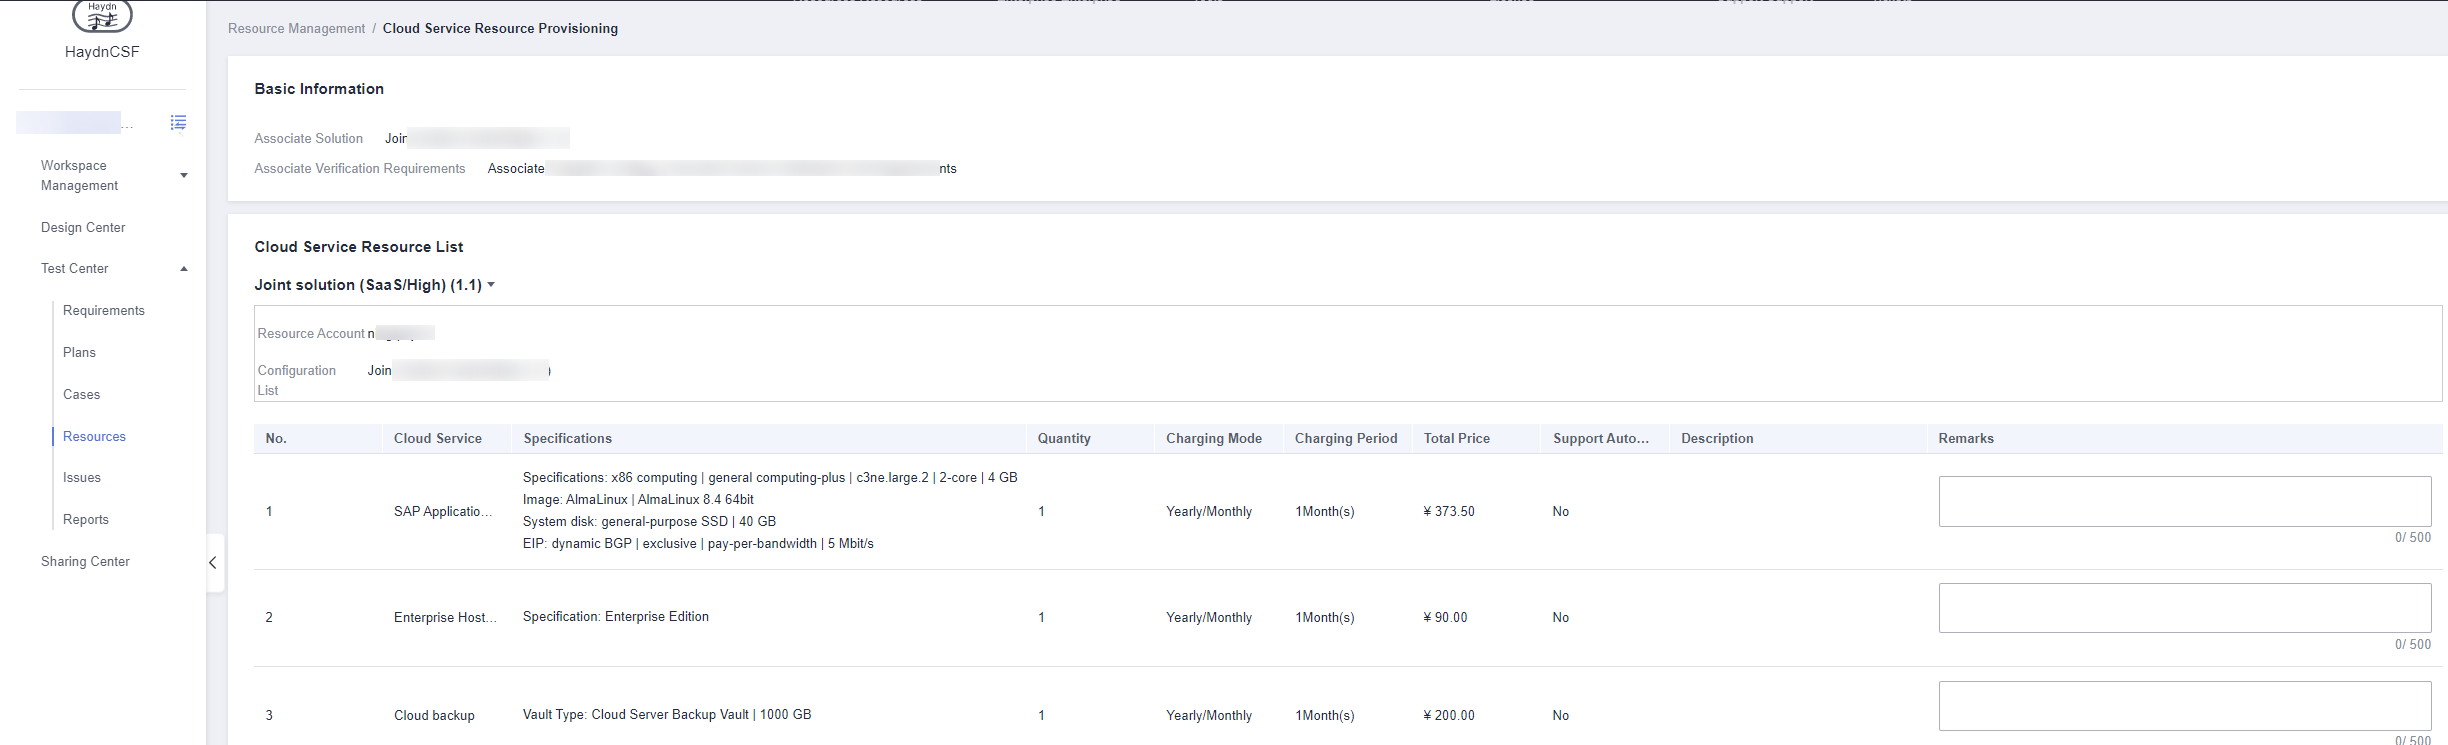
On the Cloud Service Resource Provisioning page, enter the remarks, and application and technology stack information. Then, click Submit.
|
Parameter |
Description |
|---|---|
|
Remarks |
Enter the remarks for each service in the list. |
|
Application Information/Technology Stack Information |
Information about the applications and technology stack components required in the verification environment, such as WordPress and MySQL installed for website deployment. |
|
Attachments |
Files related to resource provisioning in the formats of zip, rar, tar, ppt, pptx, doc, docx, xls, xlsx, or pdf. A maximum of five files can be uploaded, with each no larger than 50 MB. The attachments must not contain non-public information assets (including but not limited to key source codes, compartmentalized codes, and full sets of product or platform source codes), unauthorized software or tools, or encrypted RMS files. |
Executing the Test Case
Only the test engineer role can execute test cases on HaydnCSF.
- Execute the test case.
- Log in to HaydnCSF as the test case executor specified during the requirement creation. Enter the workspace created during the solution building. In the navigation pane on the left, choose Verification Center > Cases.
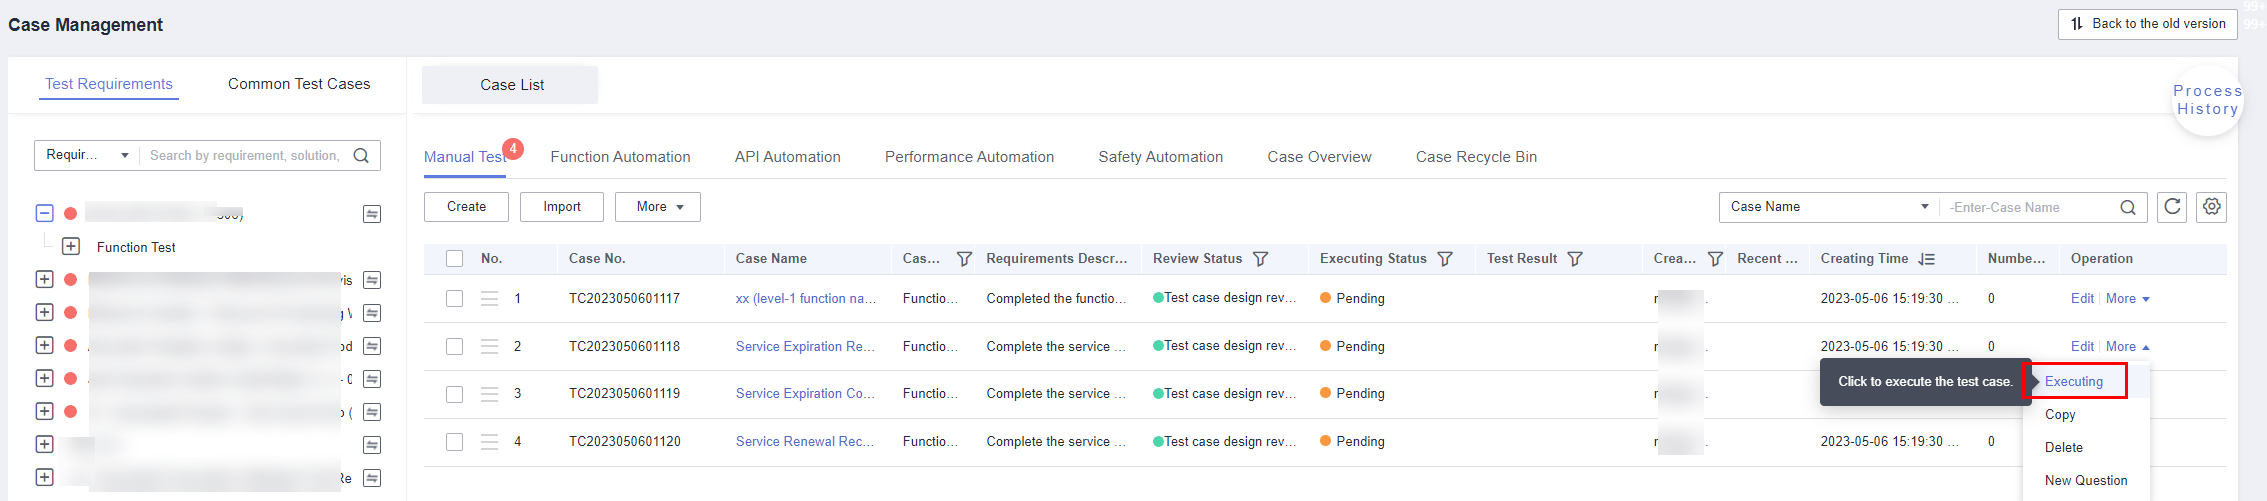
- Select the test requirement and locate the test case to be executed. Click More, and select Execute from the drop-down list.
Figure 12 Case execution entry
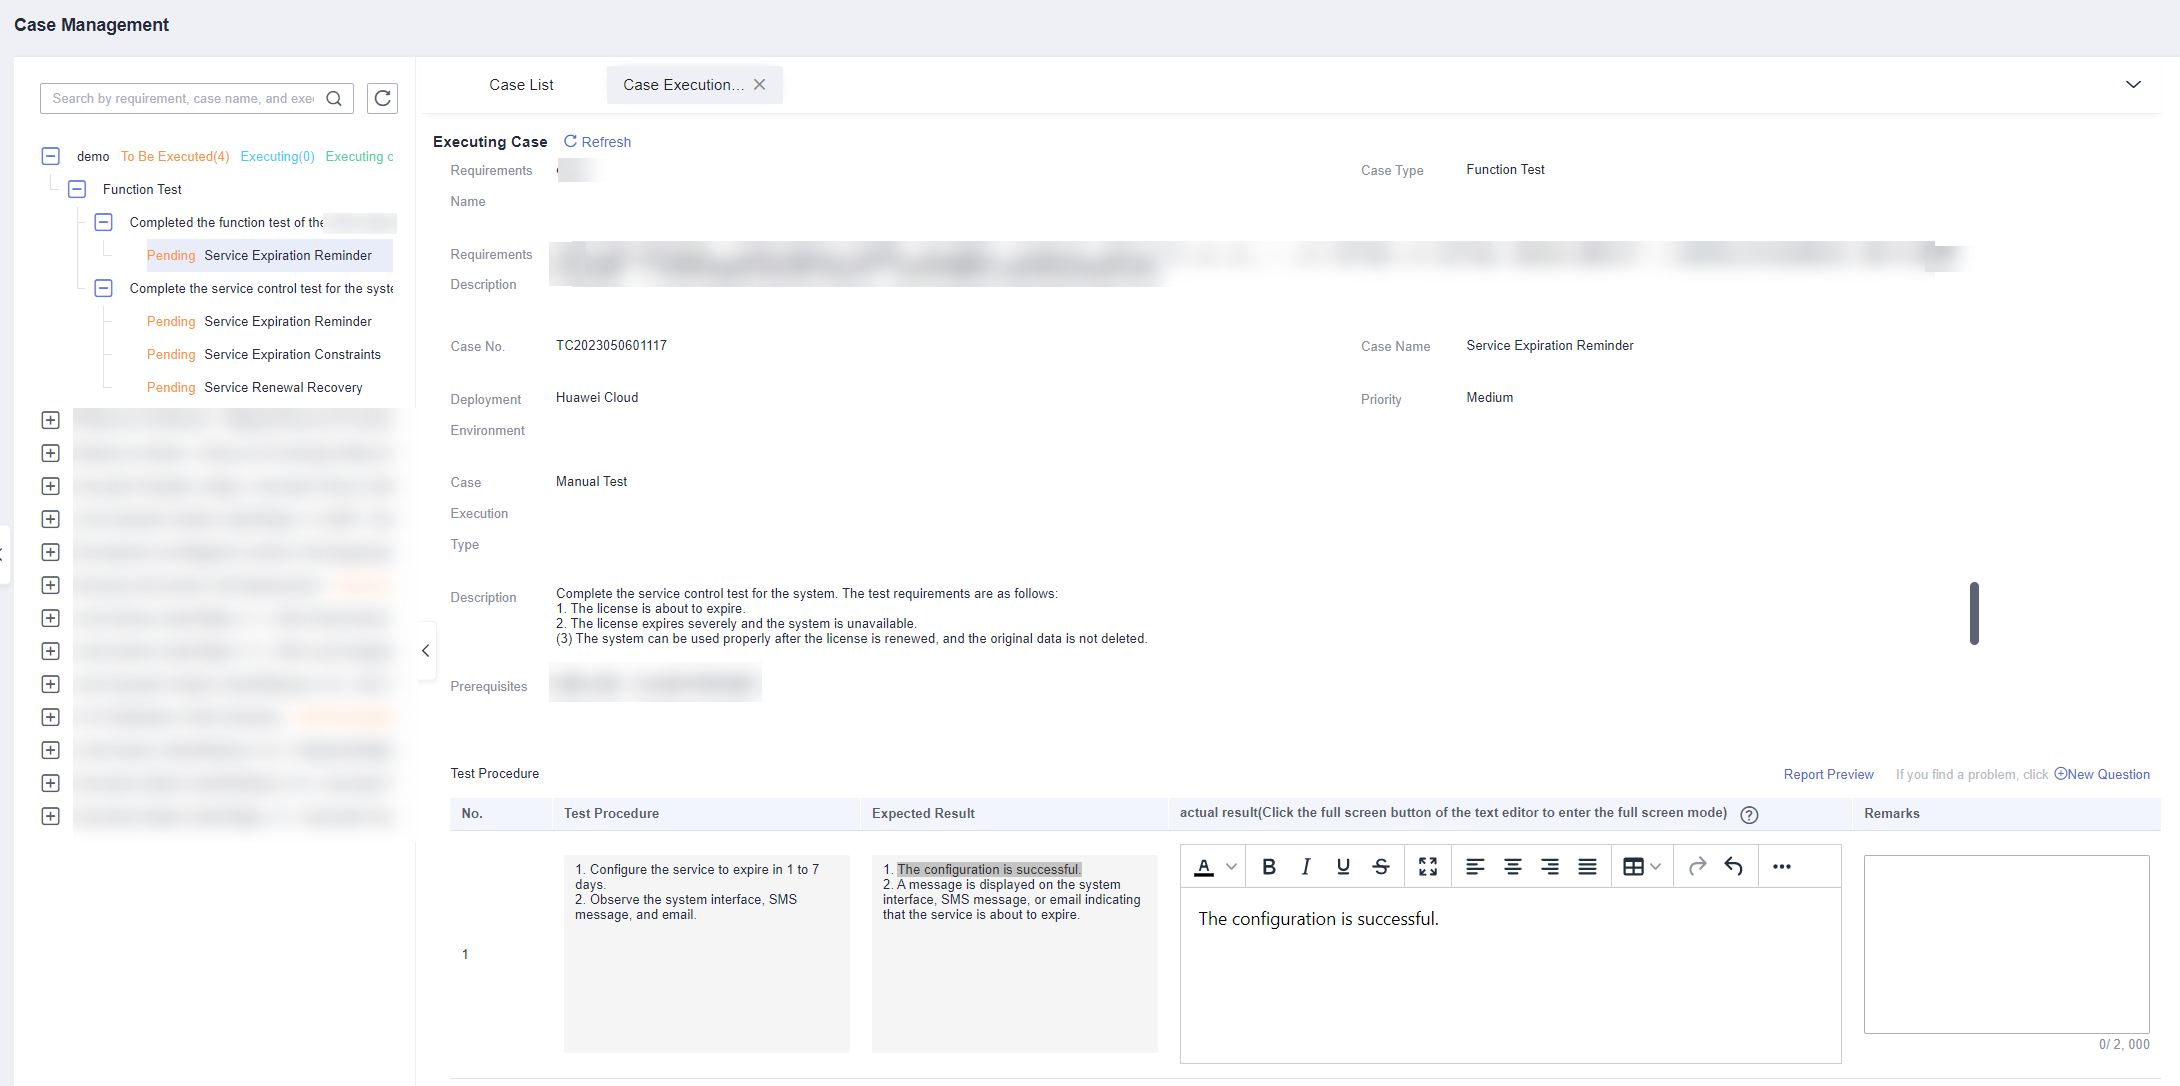
- On the Case Execution page, enter the actual result of each step, and select a case status (Pending, Executing, or Completed) to complete the execution. You can copy the screenshot of the actual result to the box. You can also upload the attachments of the execution process.
Figure 13 Executing the test case
- Create an issue.
You can create an issue on the Case Management, Case Execution, or Issue Management page.
Figure 14 Creating an issue on the case management page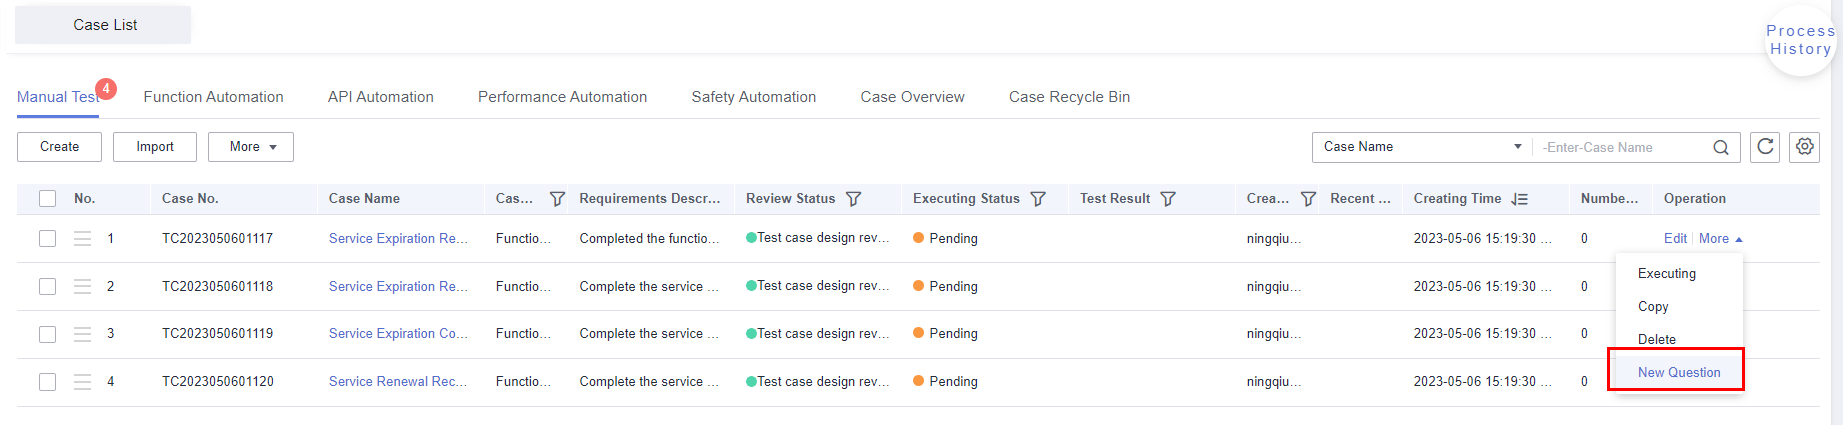 Figure 15 Creating an issue on the case execution page
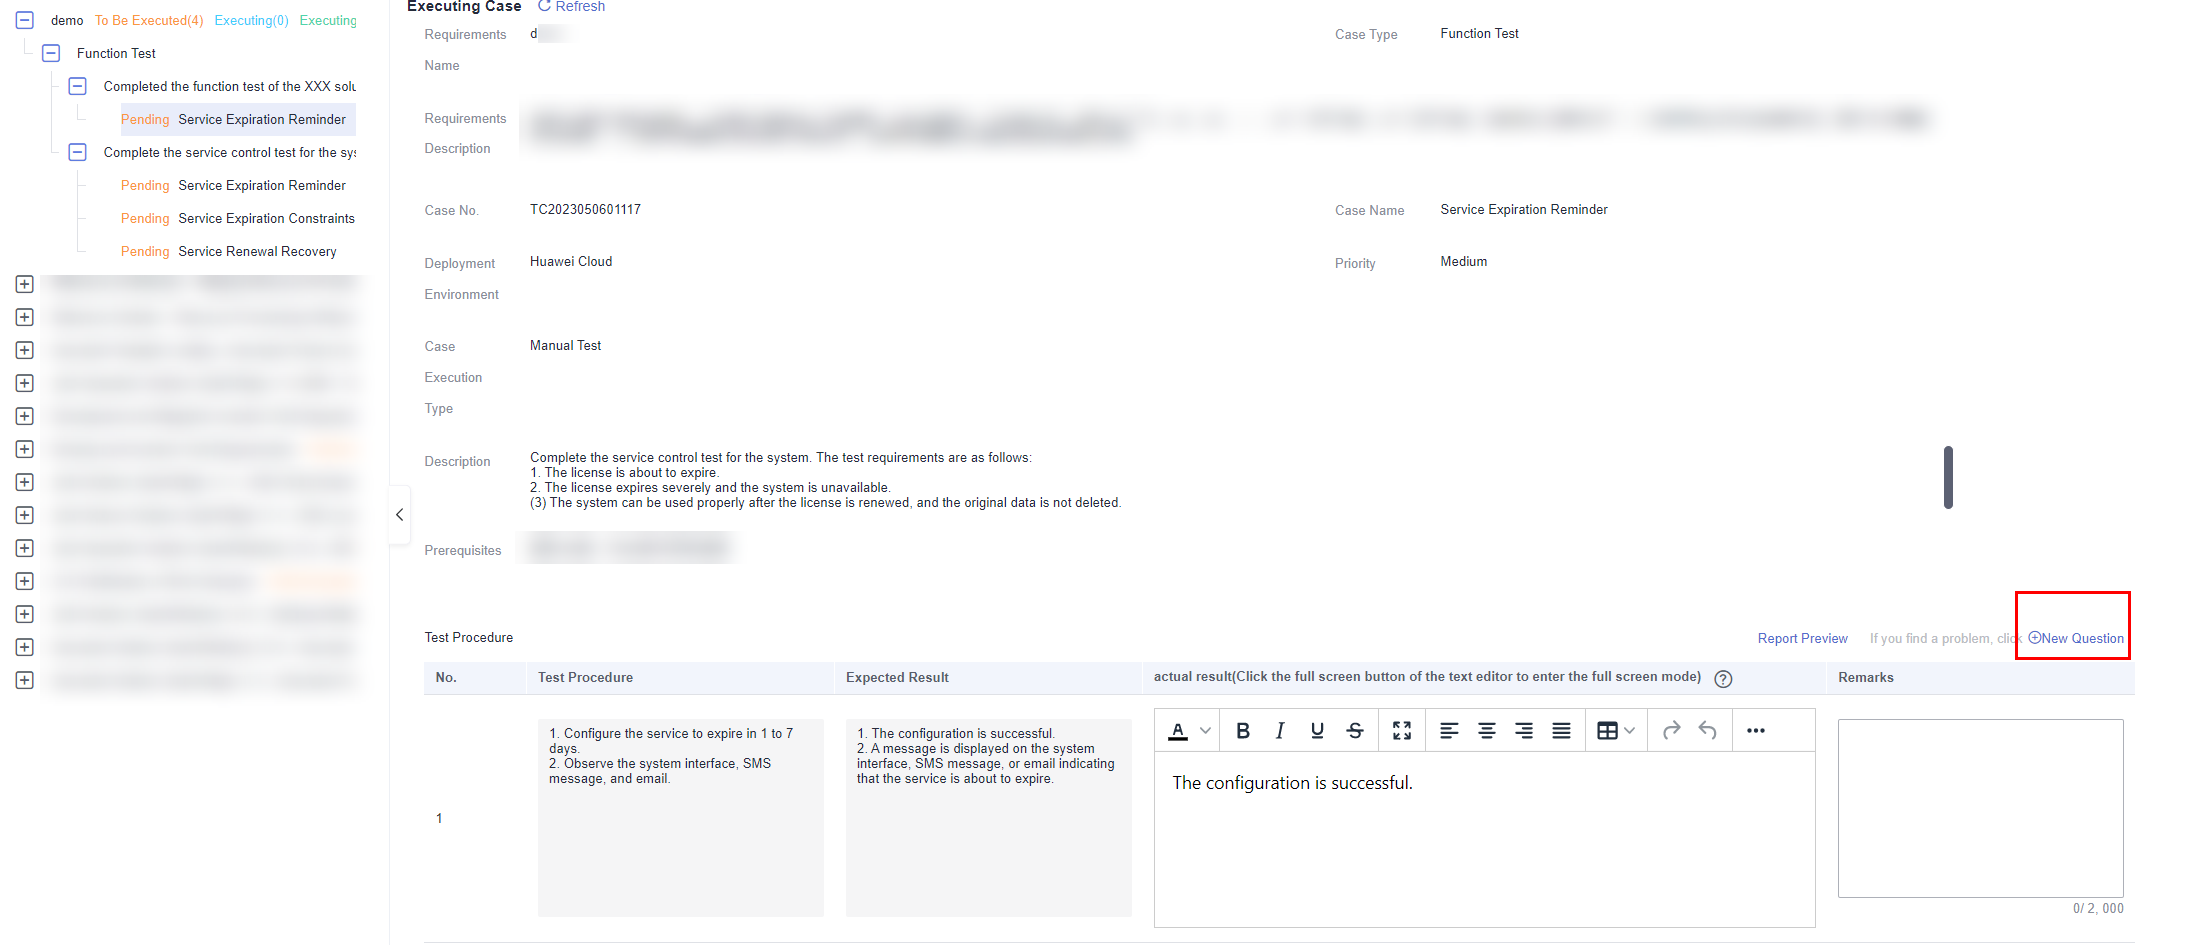 Figure 16 Creating an issue on the issue management page
 Figure 17 Creating an issue
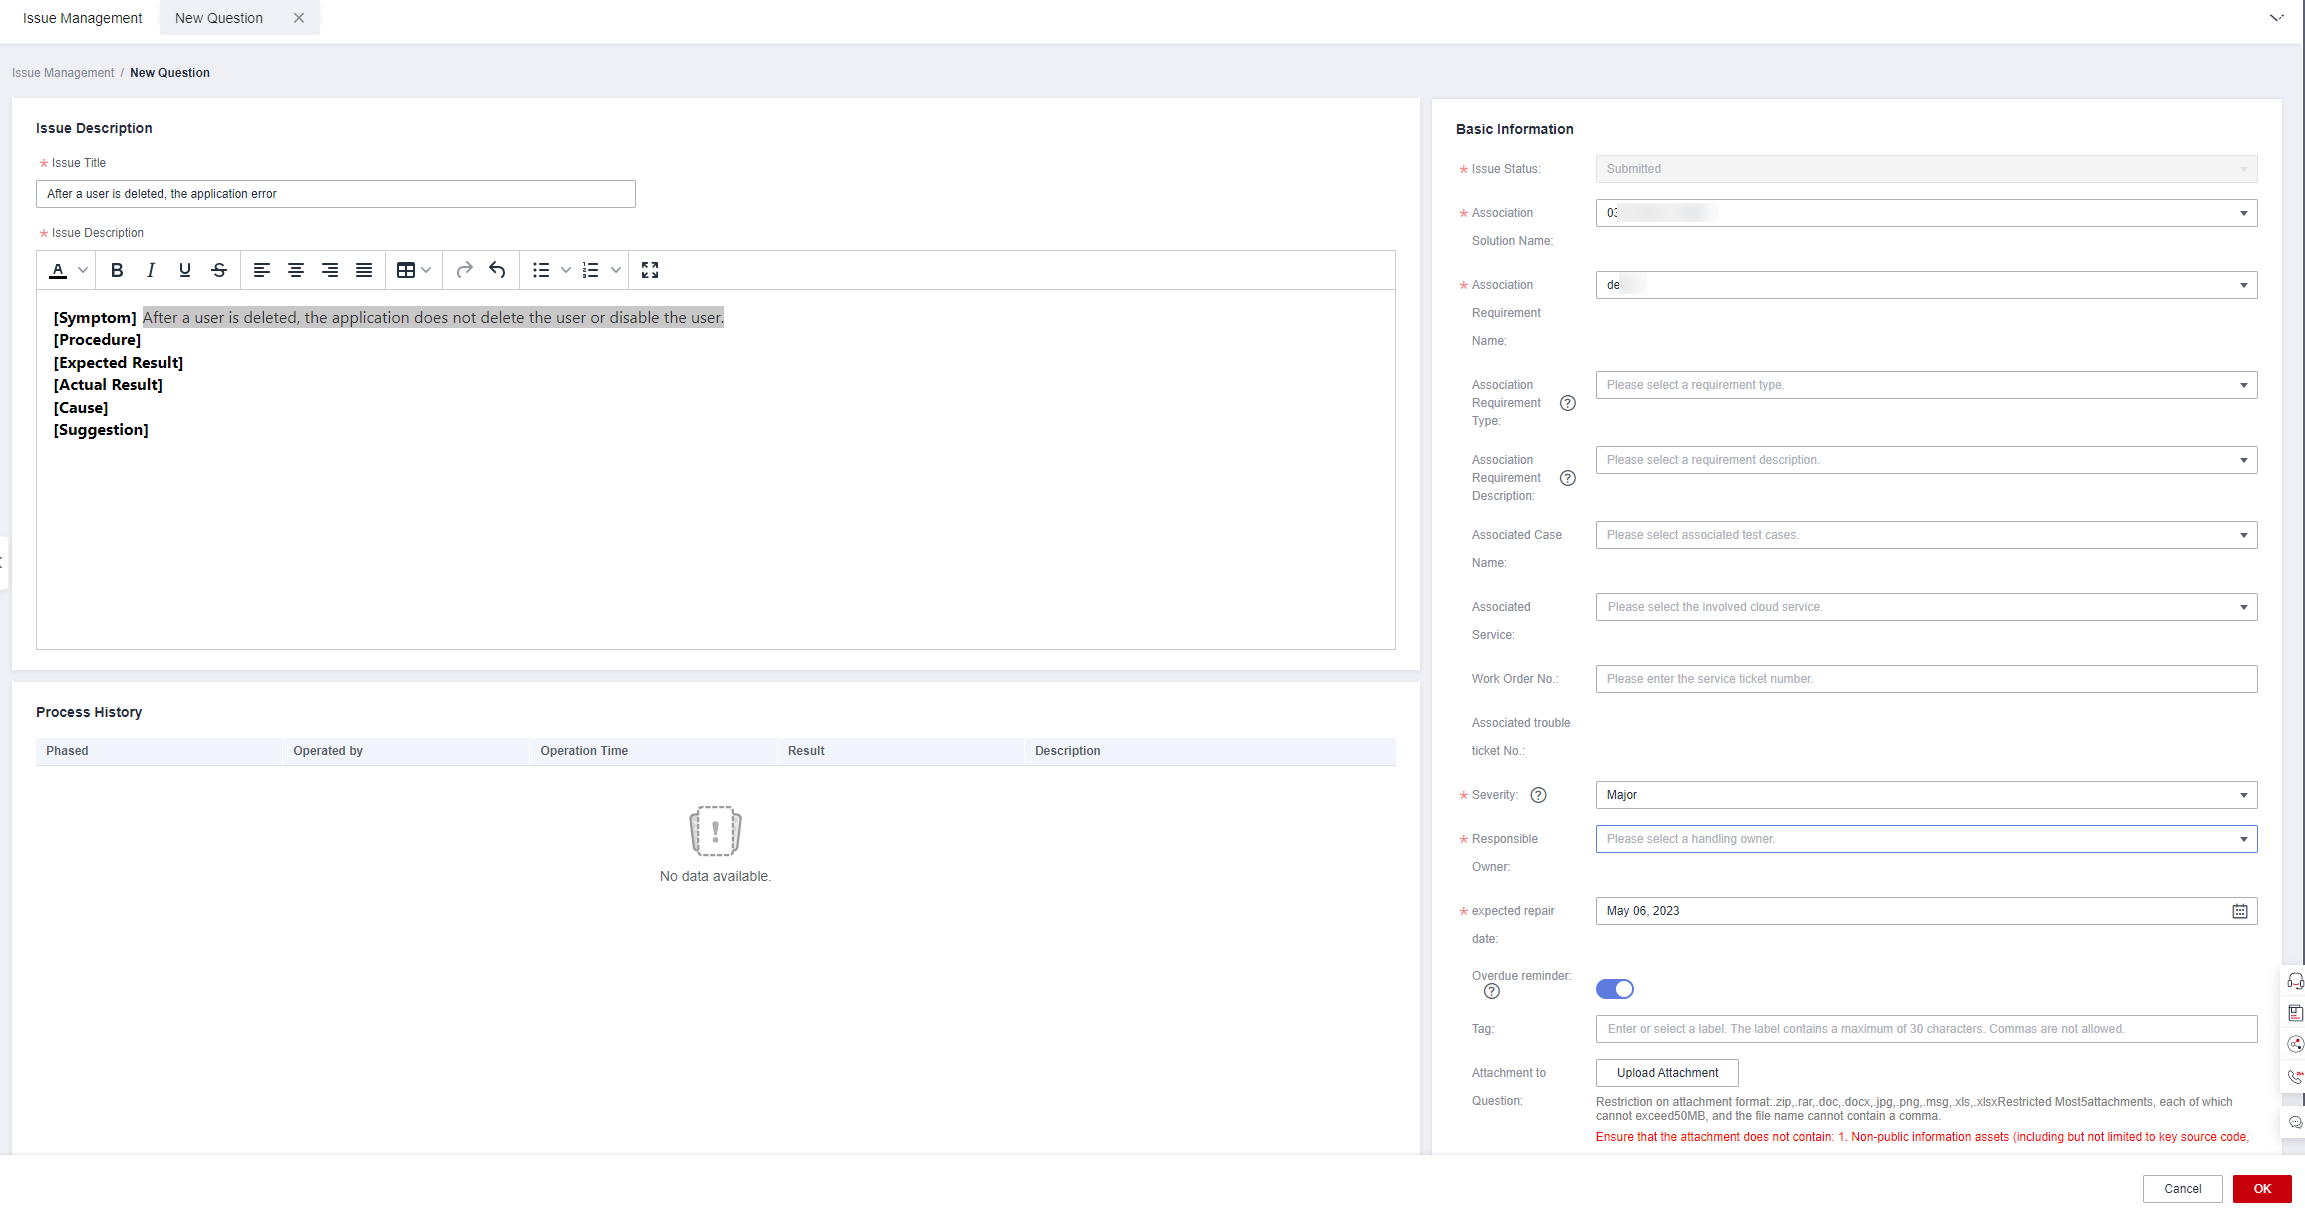
Table 3 Parameters required for creating an issue Parameter
Description
Issue Title
Enter a title for the new issue ticket. The title can contain key information such as the issue proposer, cloud service, or test case name.
Issue Description
Describe the issue in detail.
Associated Solution
Select the solution associated with the issue from the drop-down list.
Associated Requirement
Select the requirement associated with the issue from the drop-down list.
Requirement Type
Select the type of requirement associated with the issue from the drop-down list.
Associated Case
Select the test case where the issue is identified.
Service Ticket No.
If there is no issue ticket, create one as prompted and then enter the ticket ID.
Severity
- Critical: Critical issues that paralyze the system, for example, incorrect code, infinite loops, database deadlocks, and abnormal database connection or communication. As a result, the system or application breaks down, the system is suspended, or the data is lost. The key functions also become unavailable, and their modules or related modules are abnormal.
- Major: Major issues that congest services, for example, major statement errors, API errors, and database tables, service rules, and default values without integrity constraints. As a result, some key functions become unavailable and the data is lost. The auxiliary functions also become unavailable and their modules are abnormal.
- Minor: Common functional issues, for example, information errors, invalid module functions, incorrect log content, and unsatisfactory user experience and efficiency. As a result, some auxiliary functions are adversely affected, but can be used.
- Information: Non-functional issues, for example, spelling mistakes, non-standard interfaces, unclear descriptions, test object issues, and other issues proposed by testers. As a result, some software defects cause inconvenience to the operators, but have little impact on function implementation.
Responsible Owner
Select an owner in the workspace who is responsible for handling the issue from the drop-down list.
Expected Rectification Date
Select an expected date when the issue is resolved.
Overdue Reminder
A notification email will be sent if the issue is overdue. This function is enabled by default.
Tag
Add a tag to the issue so that you can search for the issue by tag on the Issue Management page.
- Preview the report.
You can preview your test report during the case execution on the Case Management page in the Verification Center.
Figure 18 Report preview entry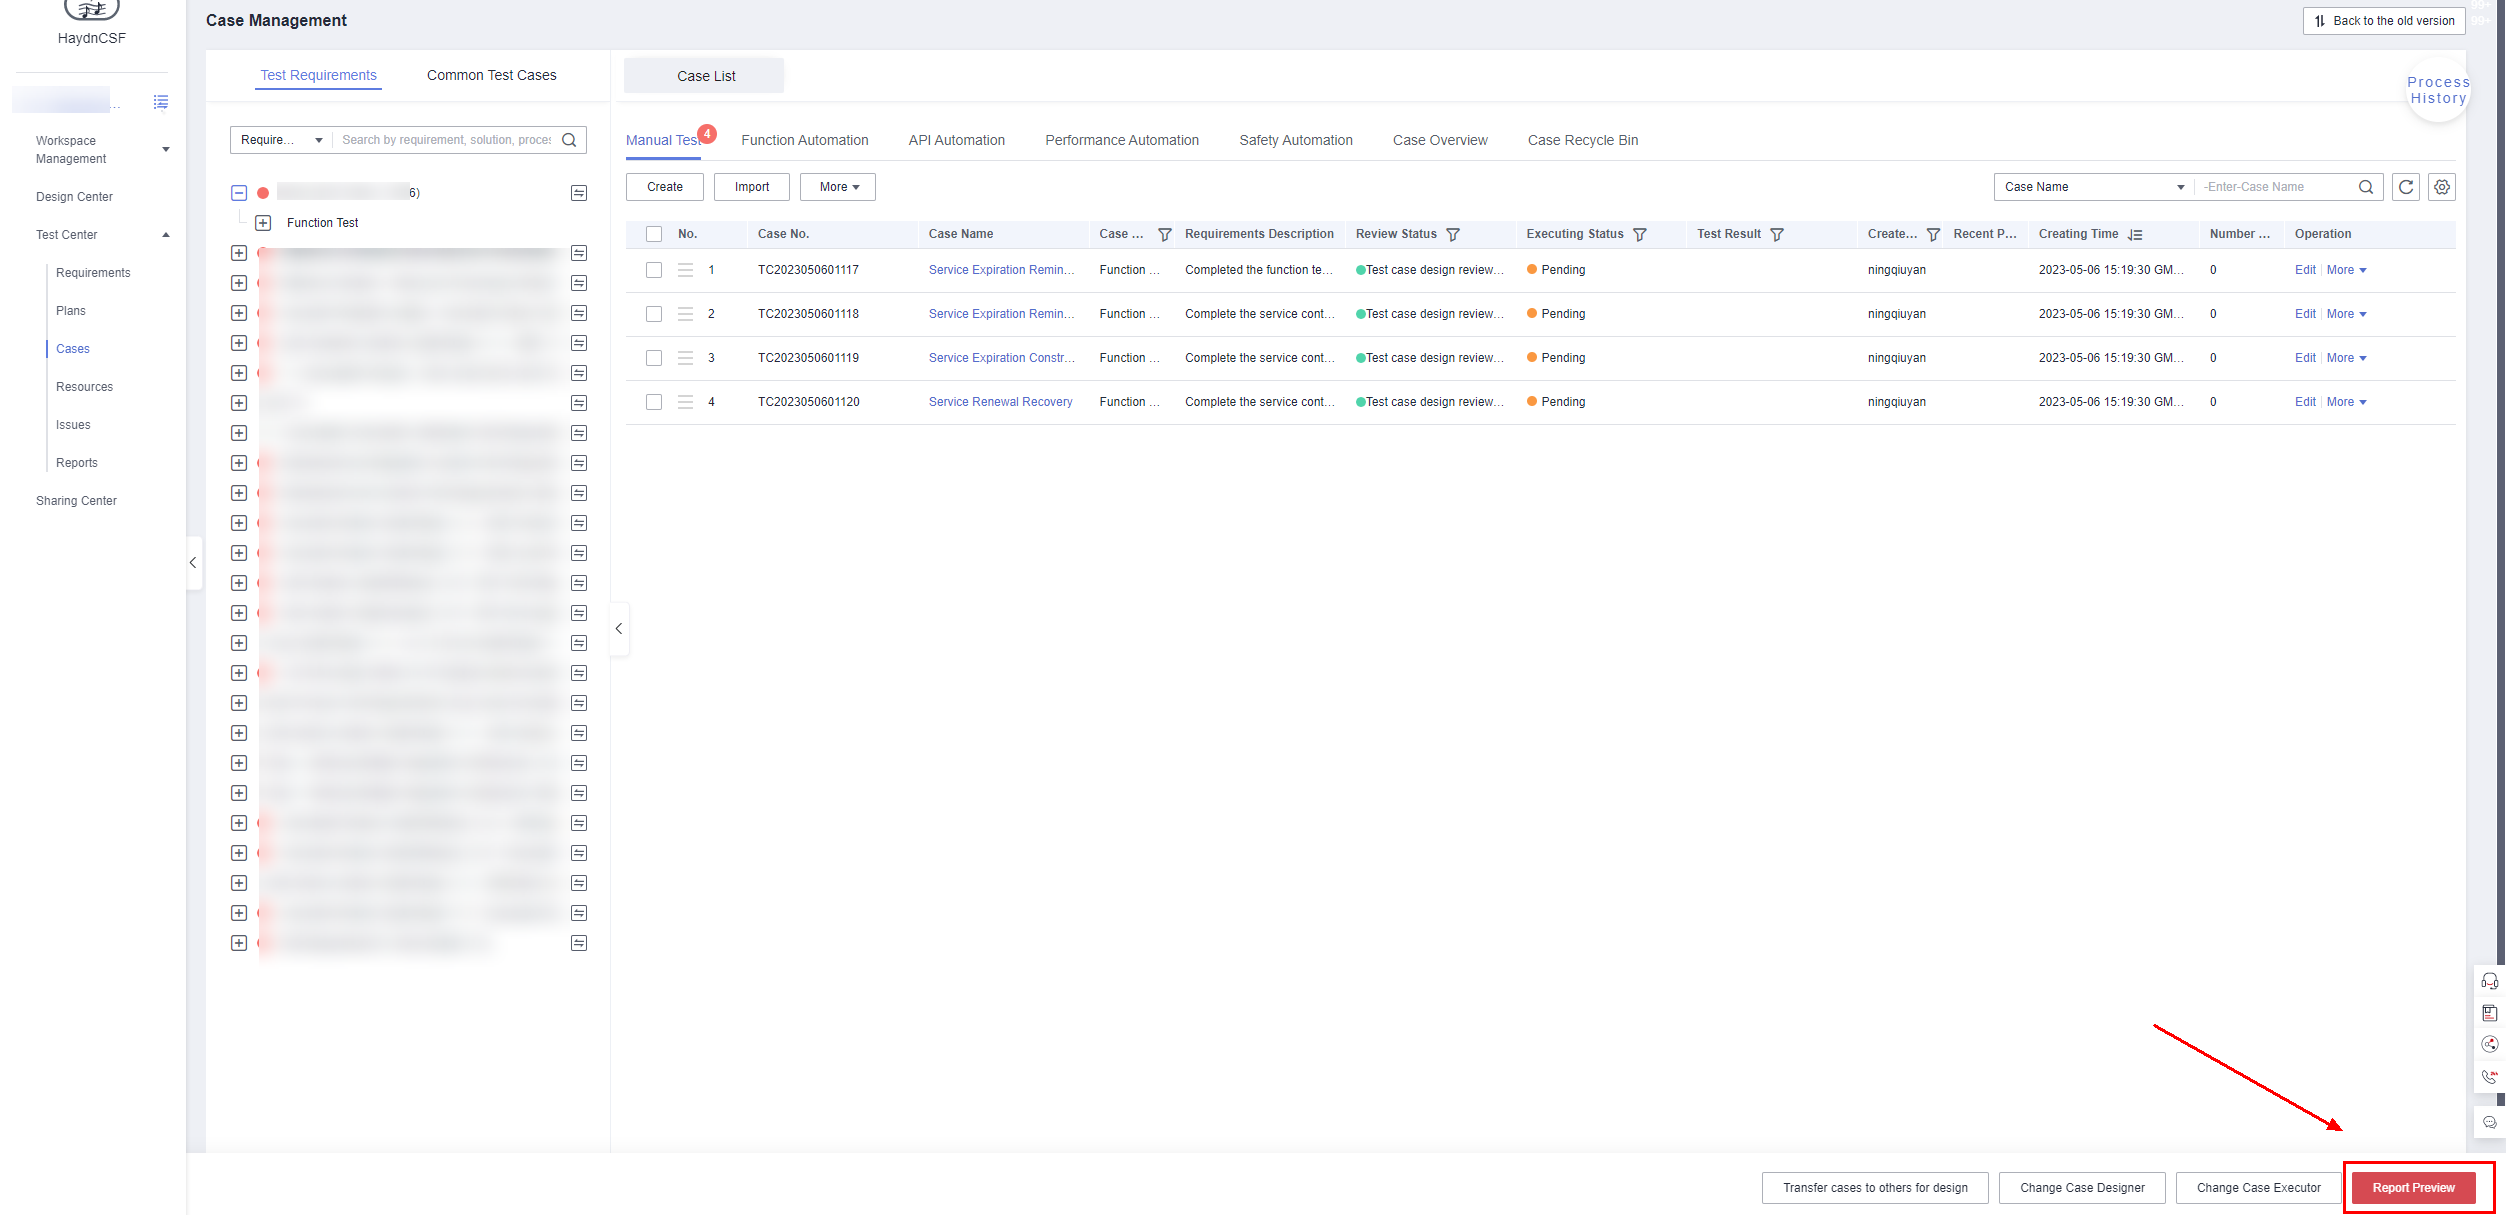 Figure 19 Report preview
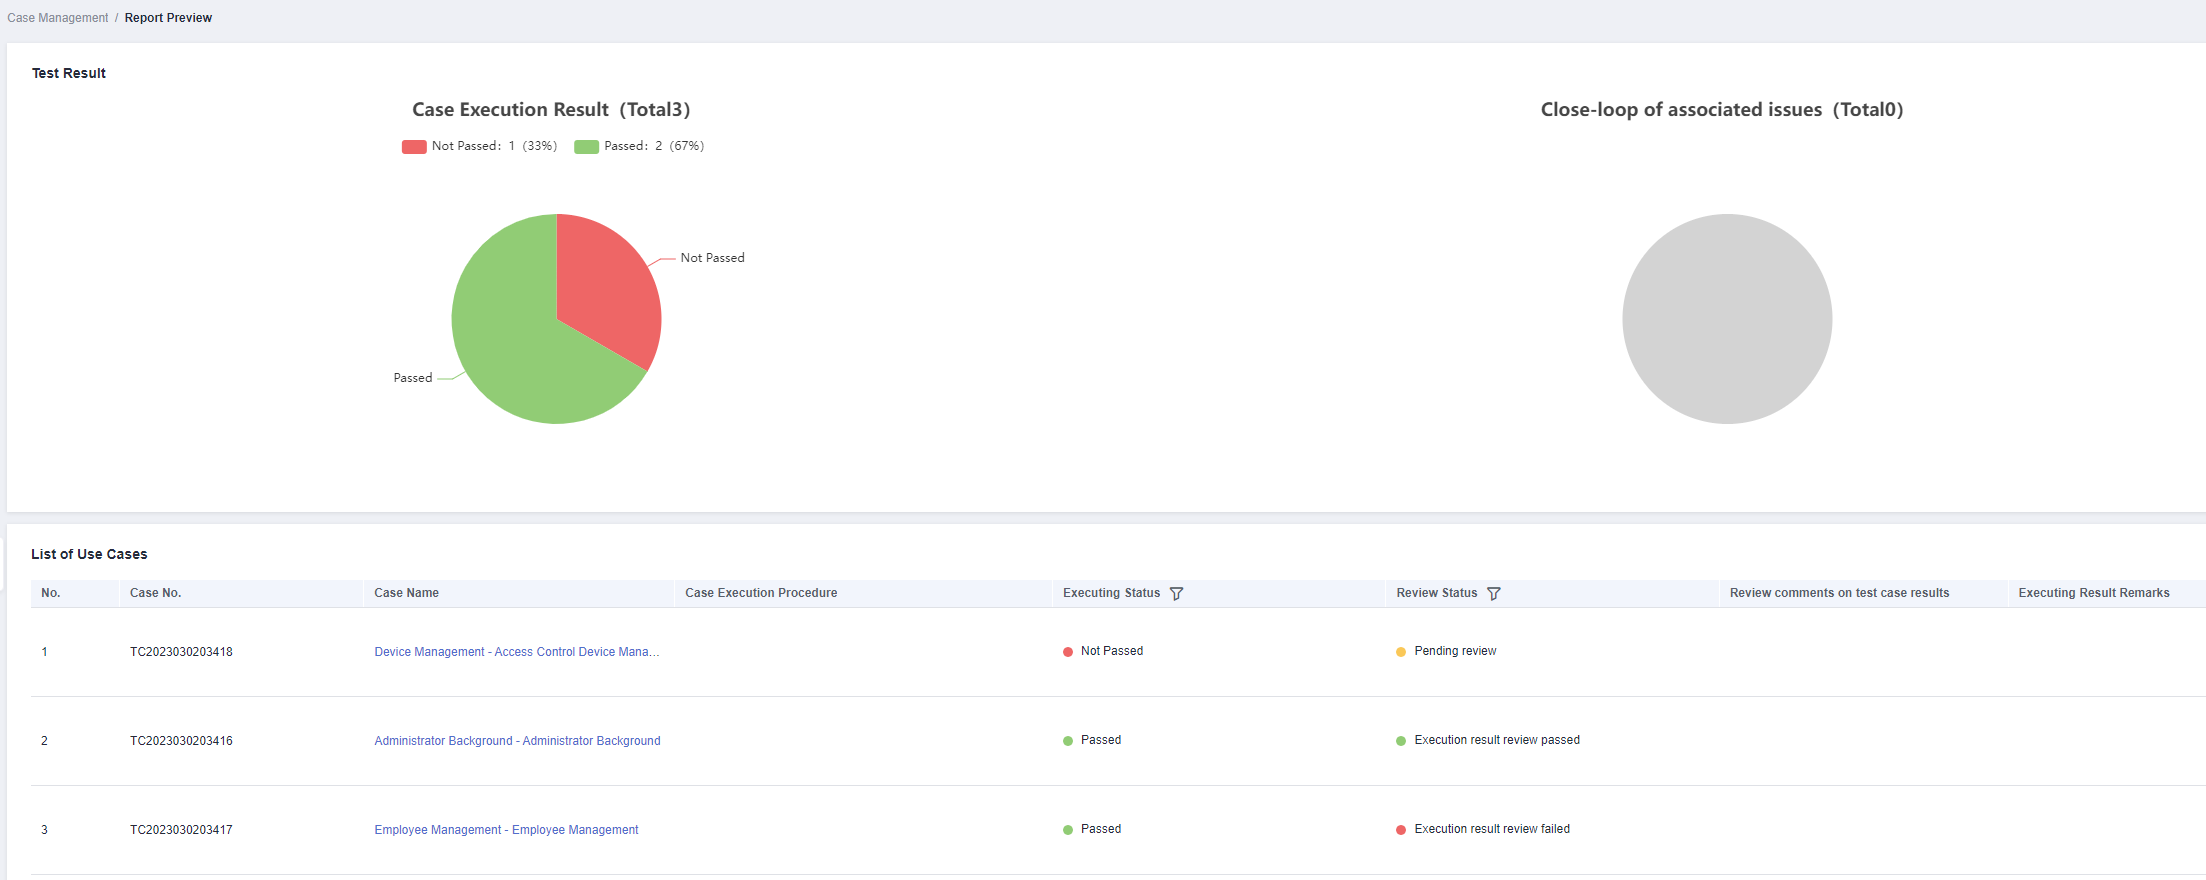
Generating a Report
On the Report Preview page, generate and download a test report.
|
Parameter |
Description |
|---|---|
|
Test Report Name |
Specify the name of the test report. By default, the report name is in the format of "solution name-requirement name-test report". |
|
Test Tool |
(Optional) Enter the tools used for the test, such as CodeArts PerfTest and JMeter. |
|
Test Summary |
(Optional) Enter a test summary, which will be displayed in section 3 "Verification Conclusion" of the report. |
|
Report Generation |
Click Generate Report. The system will generate a report based on the solutions, requirements, and test cases. |
|
Attachments |
(Optional) The uploaded attachments will be included in the report. |
|
Report Submission |
|
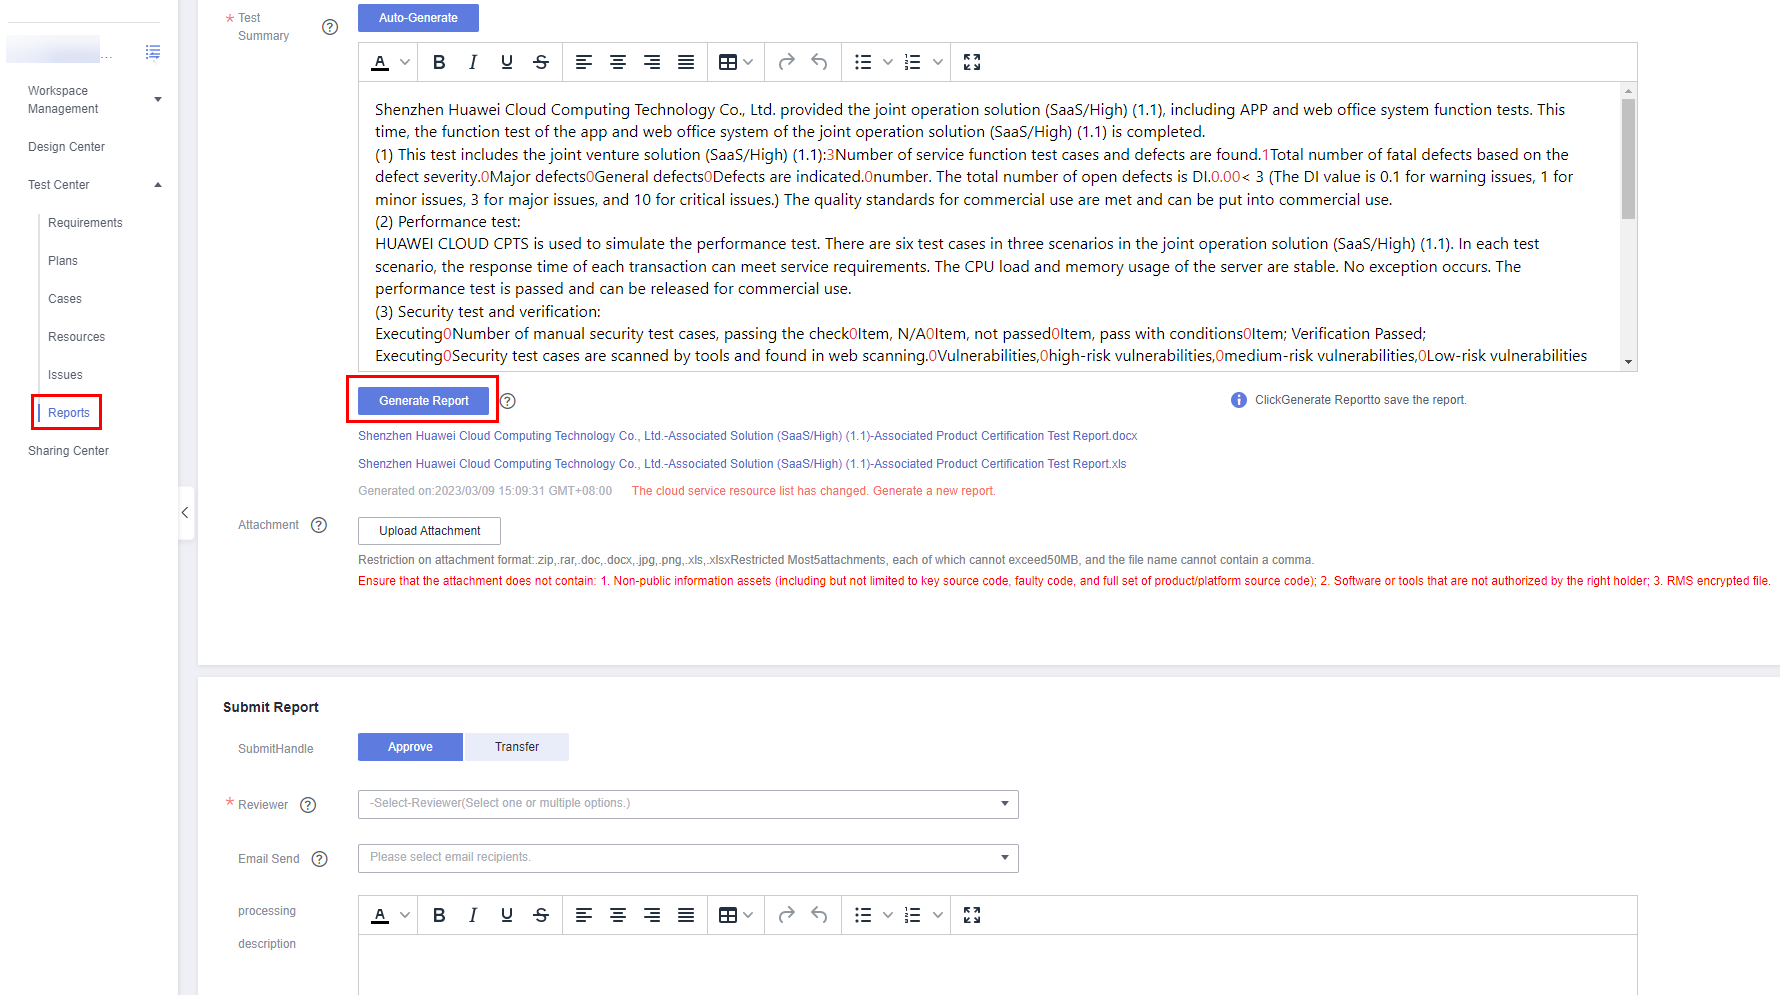
- Only one report can be generated within 5 minutes. Click Generate Report to obtain the latest report before download.
- If the report content is modified after report generation, you need to re-generate a report.
- In the fast solution process, the solution is verified upon report generation. In the common solution process, the report should be submitted to the specified owner for review.
Feedback
Was this page helpful?
Provide feedbackThank you very much for your feedback. We will continue working to improve the documentation.See the reply and handling status in My Cloud VOC.
For any further questions, feel free to contact us through the chatbot.
Chatbot


