Example: Using DAS to Connect to an Instance and Execute SQL Statements
This section describes how to create a pay-per-use GaussDB instance with the minimum specifications and execute basic SQL syntax.
Buying an Instance
- Log in to the management console.
- Click
 in the upper left corner and select a region.
 - Click
 on the left and choose Databases > GaussDB.
 - In the navigation pane on the left, choose GaussDB > Instances.
- Click Buy DB Instance.
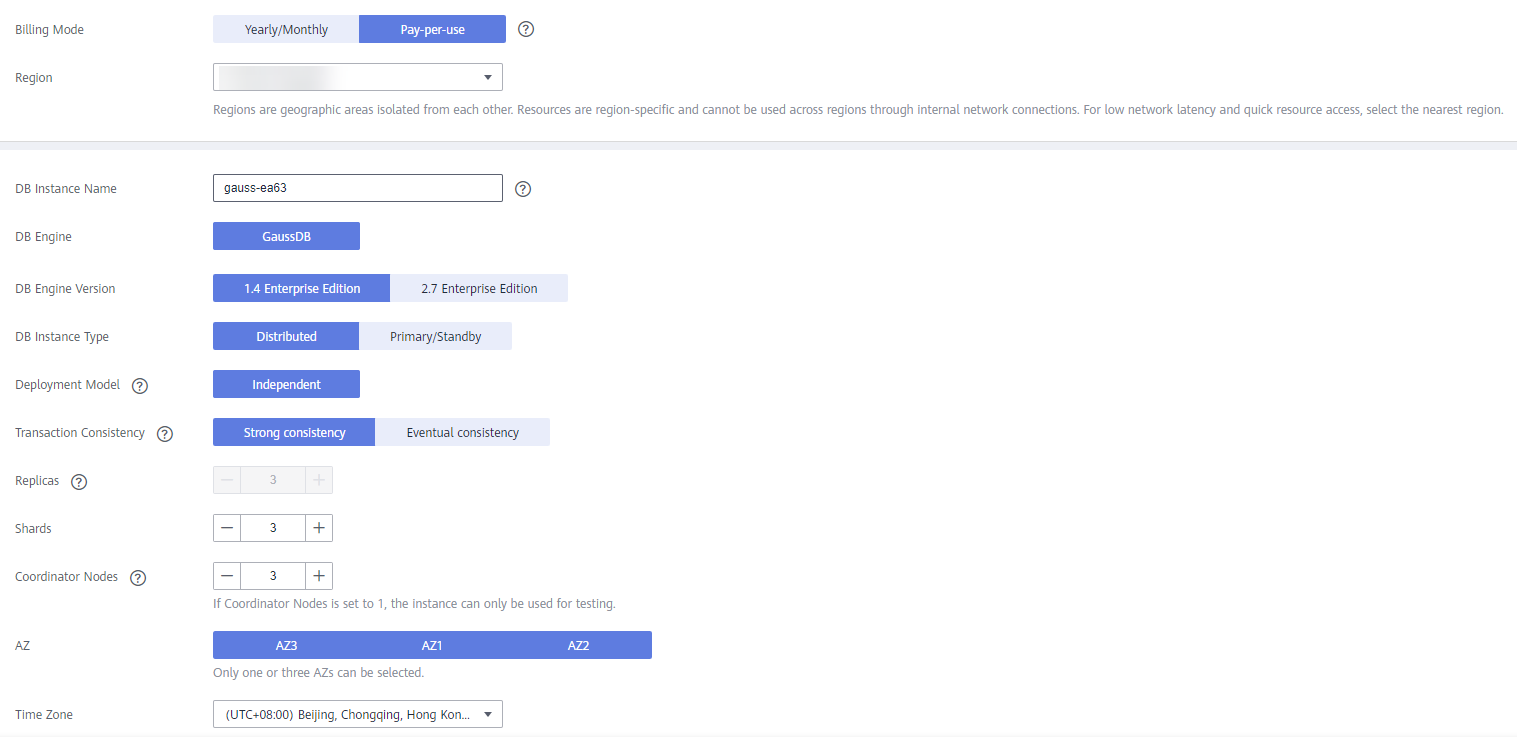
- Configure the basic information, such as the billing mode and instance name.
Figure 1 Billing mode and basic information

- Configure instance specifications.

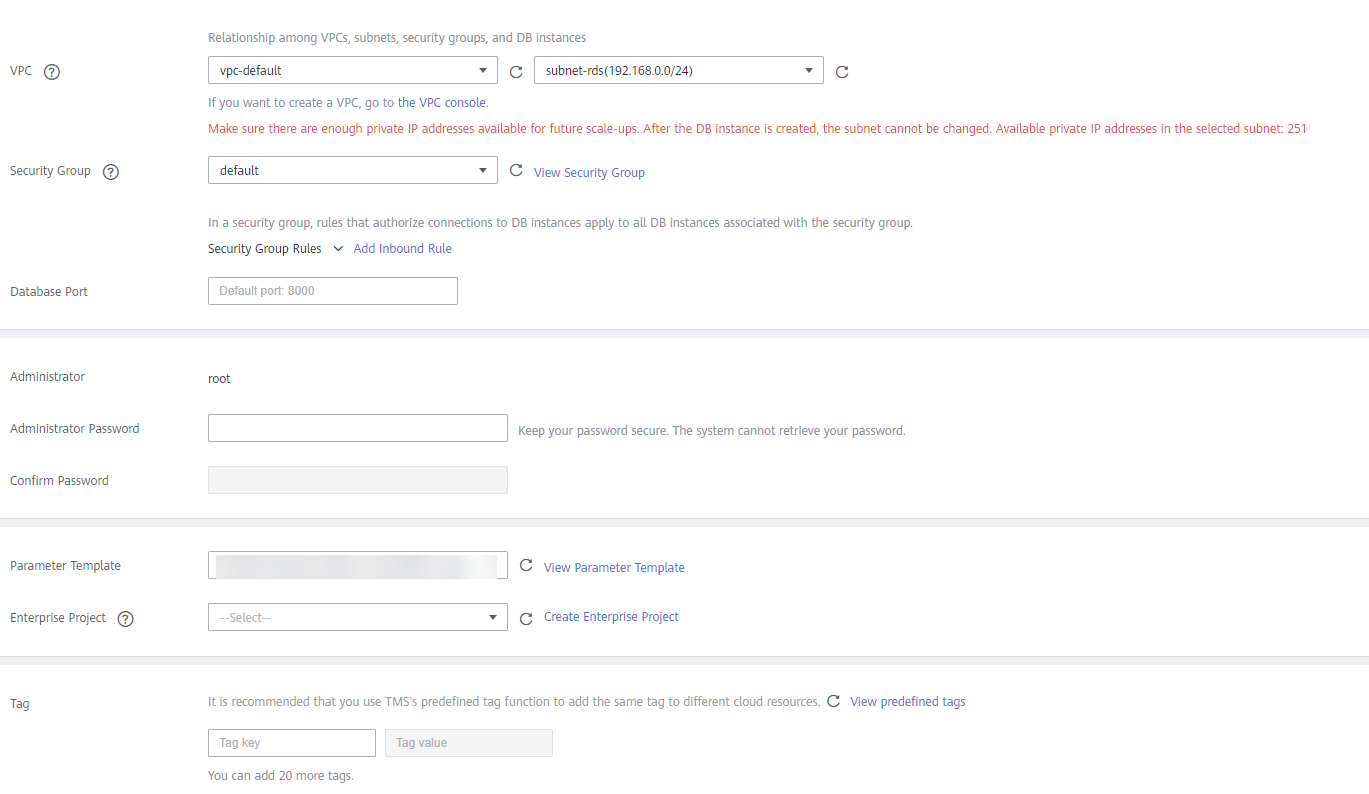
- Select a VPC and security group for the instance and configure the database port.
The VPC you selected must contain sufficient subnets.
Figure 2 Configuring the network and security group
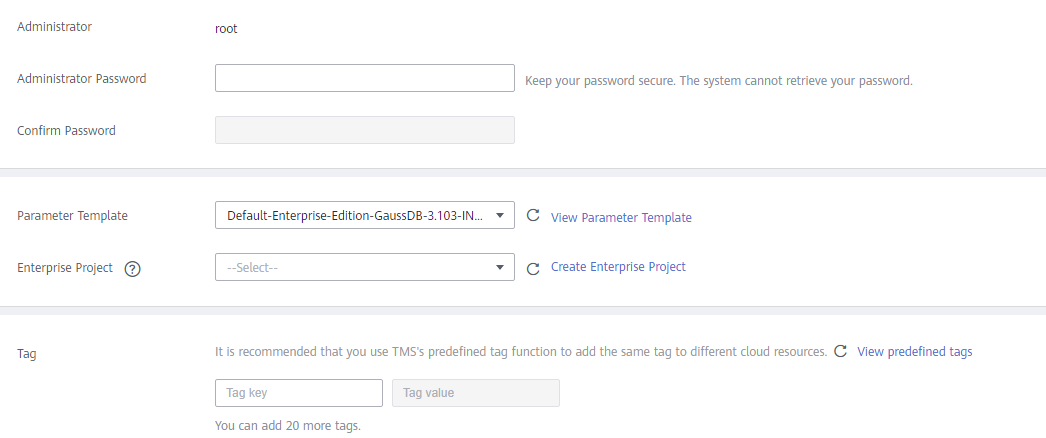
- Configure the administrator password, enterprise project, and parameter template.
Figure 3 Configuring the administrator password, enterprise project, and parameter template

- Click Next, confirm the instance information, and click Submit.
- Go to the instance list.
If status of the instance becomes available, the instance has been created.
Connecting to an Instance Through DAS
- Log in to the management console.
- Click
 in the upper left corner and select a region.
 - Click
 on the left and choose Databases > Data Admin Service.
 - In the navigation pane on the left, choose Development Tool to go to the login list page.
- Click Add Login.

After the database is created, the root user is added by default. You do not need to create a root user.
- Set DB Engine to GaussDB, retain the default value of Source Database, and configure required parameters.
You are advised to enable Collect Metadata Periodically and Show Executed SQL Statements.
If a message is displayed indicating that a connection has been established, go to 9.
- Click Test Connection.
If a message is displayed indicating connection successful, continue with the operation. If a message is displayed indicating connection failed and the failure cause is provided, make modifications according to the error message.
- Click OK.
- Locate the added instance, click Log In in the Operation column.
- Go to the SQL Query page.
Getting Started with SQL
- Create a database user.
Only administrators that are created during the instance installation can access the initial database by default. You can also create other database users.
CREATE USER joe WITH PASSWORD "xxxxxxxxx";
If information similar to the following is displayed, the creation is successful.
Figure 4 Creating a database user
In this case, you have created a user named joe, and the user password is xxxxxxx.
For more information about database users, see Users and Permissions.
- Create a database.
CREATE DATABASE db_tpcds;
If information similar to the following is displayed, the creation is successful.
Figure 5 Creating a database
Switch to the newly created database in the upper left corner.
Figure 6 Switching to the new database
- Create a table.
- Run the following command to create a schema:
- Create a table named mytable that has only one column. The column name is firstcol and the column type is integer.
CREATE TABLE myschema.mytable (firstcol int);
- Insert data to the table.
- View data in the table.
Note:
- By default, new database objects, such as the mytable table, are created in the $user schema. For more information about schemas, see Creating and Managing Schemas.
- For details about how to create a table, see Creating and Managing Tables.
- In addition to the created tables, a database contains many system catalogs. These system catalogs contain information about instance installation as well as the queries and processes running in GaussDB. You can collect information about the database by querying the system catalogs. For details about querying system catalogs, see Querying a System Catalog.
- In the db_tpcds database, run the following statement as user root to grant all permissions of the db_tpcds database to user joe:
GRANT ALL ON DATABASE db_tpcds TO joe;
GRANT USAGE ON schema myschema TO joe;
GRANT ALL ON TABLE myschema.mytable TO joe;
- Log in to the db_tpcds database as user joe.
- After login, insert data into the table and verify the data.
INSERT INTO myschema.mytable values (200);
SELECT * FROM myschema.mytable;
Figure 7 Inserting and verifying data
Feedback
Was this page helpful?
Provide feedbackThank you very much for your feedback. We will continue working to improve the documentation.See the reply and handling status in My Cloud VOC.
For any further questions, feel free to contact us through the chatbot.
Chatbot


