
Getting Started with Git-Based CodeArts Repo
CodeArts Repo is a Git-based online code hosting service for software developers. It is a cloud code repository with functions such as security management, member and permission management, branch protection and merging, online editing, and statistical analysis. The service aims to address issues such as cross-distance collaboration, multi-branch concurrent development, code version management, and security. This topic aims to help you quickly learn how to use Git and CodeArts Repo. If you are already familiar with Git, you can skip this topic.
In this topic, you will lean how to create a cloud repository, clone the cloud repository to the local Git environment using SSH, edit the code locally, and push the changes to the cloud repository. The Java War demo provided by CodeArts Repo will be used here.
Prerequisites
- A project is available. If no project is available, create a project.
- Download and install the Git client.
- Setting SSH key or HTTPS password for CodeArts Repo repository.
- Your network can access CodeArts Repo.
Run the following command on the Git client to check the network connectivity:
ssh -vT git@XXXXXXXX.com
If the command output contains connect to host XXXXXXXX.com port 22: Connection timed out, your network is restricted from accessing CodeArts Repo. Contact your network administrator.
Procedure
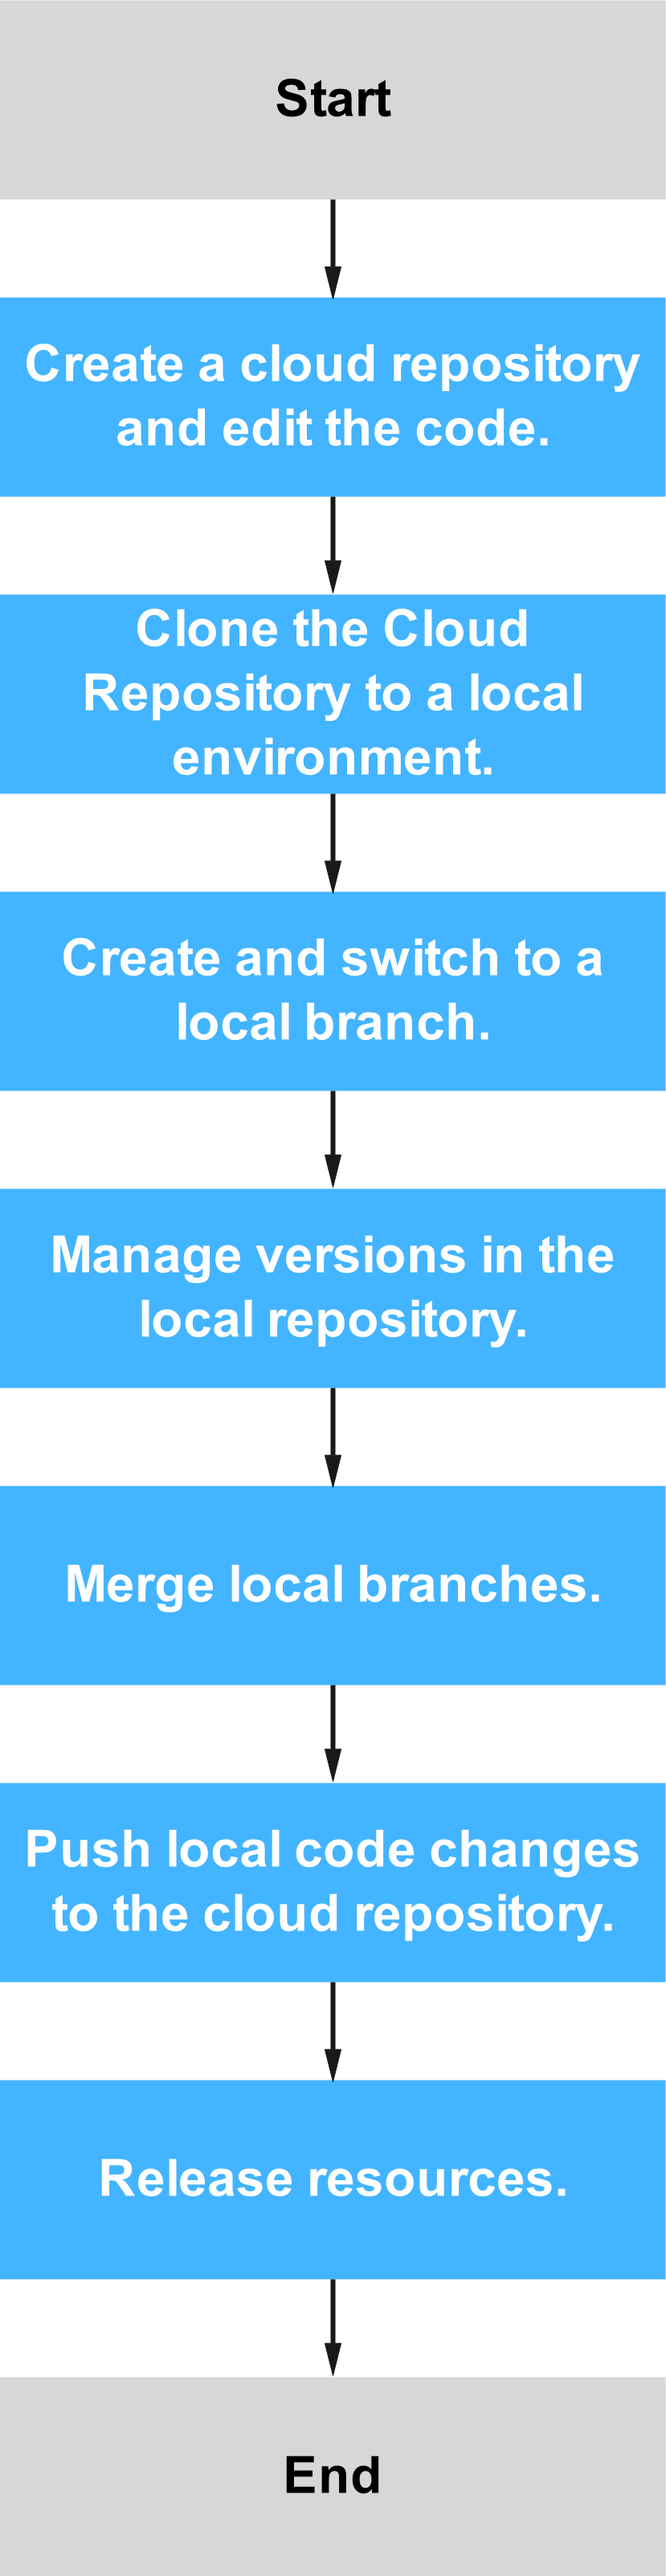
The following operations or knowledge is involved:
Creating a Cloud Repository and Editing the Code
If you have a cloud repository available, skip this section.
You will use the Java War demo to create a repository. The Java War Demo is a template of the Hello World applet.
- Go to a target project and choose Repo from the navigation pane.
- Click
 next to New Repository and select Template Repository from the drop-down list.

- In the Select Template step, search for Java War Demo in the search box, select the template in the result, and click Next.

When you search for a template, the region displayed in the filter control indicates the region where the template is stored. If you use the template to create a repository, the repository will be located in the same region as that of the project to which the repository belongs, not as that of the template.
- In the Basic Information page, specify the repository name and other details, and click OK.
The created repository is displayed on the CodeArts Repo homepage. You can click the repository name to view the files in the repository.
- Edit the code.
CodeArts Repo allows you to edit the code in the cloud.
- On the repository list page, find the repository created in the previous step, and click the repository name.
- Choose the Code tab. In the navigation pane on the left, open the file, and click
 on the right. Edit the text Hello World, enter a commit message, and click OK.

Cloning the Cloud Repository to a Local Environment
You will clone the cloud repository to your local machine. The following uses the Git Bash client as an example.
- Obtain the repository address.
Go to the repository details page and click Clone/Download to obtain the SSH address.
- Open the Git Bash client.
Create a directory on your local machine to store the code repository. In this example, the directory is named git-test. Go to the directory, right-click on an empty area, and open the Git Bash client.
The repository is automatically initialized during clone. You do not need to run the init command.
- Run the following command to clone the cloud repository:
1git clone Repository-address
Replace Repository-address with the SSH address obtained in Step 1.
When you communicate with the cloud repository for the first time, you will be asked whether to save the fingerprint. Enter yes for the communication to proceed.
After the command is executed, go to the git-test directory. If there is a directory with the same name as the cloud repository and the directory contains a hidden .git directory, the clone is successful.
- Run the following command to go to the repository directory:
1cd Repository-name
You will be taken to the master branch by default.

Creating and Switching to a Local Branch
The master branch is the default main branch after the repository is created. It is recommended that you create a branch off the master branch, develop and release code or fix bugs on the derived branch, and commit the changes to the master branch instead of making changes on the master branch directly. This ensures that the code on the master branch is always ready and deployable. In this section, you will create a branch named dev in your local machine and switch to the branch.
- Create a branch.
Open Git Bash, go to the repository directory, and run the following command to create a branch named dev in your local machine:
git branch dev
If no command output is displayed, the branch is created.
- (Optional) View the branches.
Run the following command to check the local repository branches:
1git branch
The command output indicates that there are two branches, master and dev, and you are now on the master branch. The code on the master branch and dev branch is now the same.
- Check out a branch.
Run the following command to switch to the dev branch:
git checkout dev
If (dev) is displayed next to the current path, the checkout is successful. All changes you make in the local repository will be saved to the current branch, namely the dev branch.

Managing Versions in the Local Repository
In this section, you will edit the \src\main\webapp\index.jsp file in the local repository and run the add and commit commands to commit the changes to the local repository.
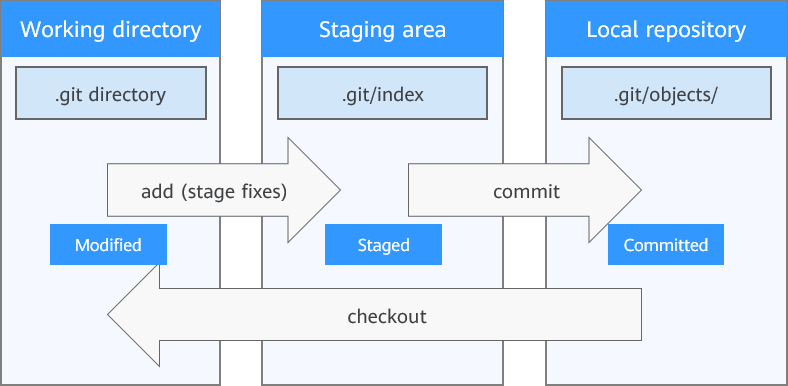
Data in a Git local repository can be in one of the three statuses: modified, staged, and committed. After you edit a file in the repository, the file is in the modified state. You can run the add command to add the changes to the staging area, and the file becomes staged. To commit the staged file to the local repository, run the commit command. A version is generated for each commit, making it possible for you to switch between versions or roll back versions. The following figure shows the basic working process of a Git local repository. There can be multiple branches in one version. Each branch is a unique set of code and can be seen as a subversion.
- Edit the code on the dev branch.
Ensure that operations in Cloning the Cloud Repository to a Local Environment are done. Open the local repository directory, find the \src\main\webapp\index.jsp file, and use any text editor to open the file. You can see the content edited in Creating a Cloud Repository and Editing the Code because by now, the code on the two local repository branches (dev and master) is the same as that in the cloud repository.
Change the content to Hello git!!!, and save and close the file. The changes are saved to the dev branch which is the current branch after the checkout in Creating and Switching to a Local Branch.
- (Optional) View the changes on the current branch.
Run the status command to check the status of the files on the current branch.
1git status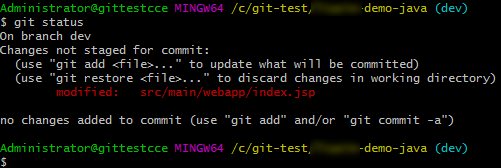
The command output indicates that your changes have not been added to the staging area and have not been committed to the local repository.
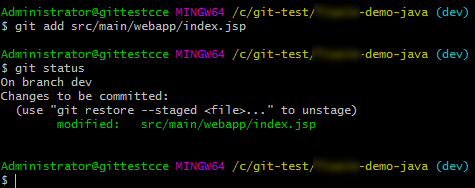
- Stage the changes.
Run the add command to add the changes to the staging area:
1git add .
or
1git add src/main/webapp/index.jsp
The git add. command will stage all changes. You can also stage a specific file by specifying the file path as shown in the second command. If no command output is displayed, the execution is successful. Run the status command again, and you can see the changes have been staged and will go into your next commit.
- Commit the staged changes to the local repository.
Run the commit command, where -m is followed by the commit tag.
1git commit -m Tag
If 1 file changed is displayed, the commit is successful. At this point, the code on the local master branch and the code on the dev branch are different, which means that there are two code versions in the local repository. If you run the checkout command to switch branches, you will see the content of the \src\main\webapp\index.jsp file is different on the two branches.
Merging Local Branches
In the previous sections, you have created a dev branch and edited a file on the branch. In actual development, there are usually multiple dev branches. Before pushing code to the cloud repository, ensure all the edited branches are merged into the master branch in the local repository, so the code on the master branch is of the most complete and latest version.
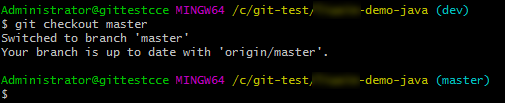
- Run the following command to switch to the master branch:
1git checkout master
- Run the merge command to merge the changes on the dev branch to the master branch.
1git merge dev

Pushing Local Changes to the Cloud Repository
1
|
git push origin master |
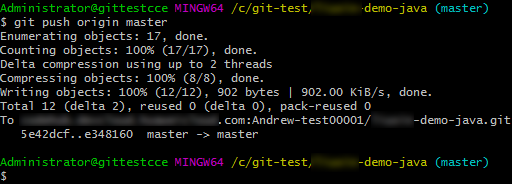
The preceding figure indicates that the push is successful. Go to the repository list in CodeArts Repo, click the corresponding repository name, and check the \src\main\webapp\index.jsp file. You can see the changes made in the local repository, and the file update time and commit message are also changed.
By now, you have learned how to make changes on the local repository and push them to the cloud repository in CodeArts Repo.
Releasing Resources
In this section, you will delete the CodeArts Repo cloud repository and project that you previously created so fees will not be generated for the repository storage.

Deleted projects and repositories cannot be recovered.
- Delete a cloud repository.
- Go to a target project and choose Repo from the navigation pane.
- Click
 on the row of the target repository and select Delete Repository. In the dialog box displayed, enter the repository name as prompted and click OK.
- (Optional) Delete the local repository.
If the local repository is no longer needed, you can delete it by deleting the repository directory to free up storage space.
Feedback
Was this page helpful?
Provide feedbackThank you very much for your feedback. We will continue working to improve the documentation.See the reply and handling status in My Cloud VOC.
For any further questions, feel free to contact us through the chatbot.
Chatbot


