
Creating a Channel
Video can be played on Media Live only after a channel is created.
Prerequisites
- An ingest domain name has been added.
- A live transcoding template has been created, as shown in Creating a Transcoding Template.
- If DRM encryption needs to be enabled for a channel and Interconnection Mode is set to FunctionGraph proxy access to provide the key for interconnecting with DRM, you need to:
- enable FunctionGraph agency in advance by referring to Cloud Resource Authorization
- build a function in FunctionGraph.
Notes
- A tenant can create a maximum of 500 channels. To create more channels, submit a service ticket.
- All channels support only single-bitrate inputs, and multi-bitrate outputs are available only after transcoding.
- RTMP_PUSH channels require RTMP ingest domain names. SRT_PUSH channels require SRT ingest domain names.
SRT_PUSH channels and RTMP_PUSH channels cannot be created at the same time for one domain name.
- To ensure reliability, channels of the SRT_PUSH input type must be able to:
- Support primary and standby URLs. The encoder needs to push streams to both the primary and standby URLs.
- Resume stream push when the stream push by the encoder is interrupted. The recommended interval for resuming stream push is shorter than the duration of one segment.
- When FunctionGraph is used for channel DRM encryption, the FunctionGraph version information is not contained. By default, the latest version is used.
- If the DRM system is faulty, 404 is returned.
- To ensure reliability, if you have configured a standby streaming URL for an HLS_PULL or SRT_PULL channel, and the standby input of an SRT_PUSH channel is pushed, transcoding will be performed in the standby region and generate fees.
Creating a Channel
- Log in to the Live console.
- In the navigation pane on the left, choose Channels under Media Live.
- Click Create Channel. The Create Channel page is displayed.
Configure Basic Info as follows:
- Channel Name: Enter a channel name.
- Channel ID: Enter a channel ID.
- App Name: Application name, which defaults to live and cannot be changed.
- Click Next.
Configure parameters for adding inputs following Table 1.
Table 1 Parameters Parameter
Description
Input Type
Input type of a channel media asset.
Options:
- FLV_PULL: Stream push is not required. The streaming URL provided by the user is directly obtained and used by Media Live to push streams to the origin server.
The streaming URL supports only HTTP.
- RTMP_PUSH: An RTMP ingest domain name needs to be configured for stream push.
- HLS_PULL: Stream push is not required. The streaming URL provided by the user is directly obtained and used by Media Live to push streams to the origin server.
If Input Type is set to HLS_PULL, the media URLs provided users have the following constraints:
- A streaming URL supports only HTTP and HTTPS.
- Encrypted streams are not supported.
- Audio-only streams are not supported.
- Subtitling is not supported.
- SRT_PULL: Stream push is not required. The streaming URL provided by the user is directly obtained and used by Media Live to push streams to the origin server.
- SRT_PUSH: An SRT ingest domain name needs to be configured for stream push.
To ensure reliability, channels of the SRT_PUSH input type must be able to:
- Support primary and standby URLs. The encoder needs to push streams to both the primary and standby URLs.
- Resume stream push when the stream push by the encoder is interrupted. The recommended interval for resuming stream push is shorter than the duration of a segment.
Input Type set to FLV_PULL
Configure the following parameters:
- Primary Input Parameters: URL, indicating the media stream URL obtained from the channel provider. Media Live directly uses the URL to push streams to the origin server.
- Standby Input Parameters:
- Primary/standby Input: You can enable this function to set the standby media stream URL.
- Standby Input URL: Obtain the standby media stream URL from the channel provider.
- Switchover Duration Threshold: When the duration of abnormal channel playback reaches the threshold, the system automatically switches to another URL for stream pull and playback.
- Priority Settings: Select PRIMARY (mainly the primary input URL) or EQUAL (switchover between primary and standby input URLs) as needed.
Input Type set to RTMP_PUSH
Configure the following parameters:
Ingest Domain Name: Select an RTMP ingest domain name from the drop-down list box. If no ingest domain name is available, click Create Ingest Domain Name on the right and add an RTMP ingest domain name on the Add Domain page.
Input Type set to HLS_PULL
Configure the following parameters:
- Max Bandwidth (Optional): A streaming URL provided by a user contains the parameter BANDWIDTH for media files of different bitrates.
- If Max Bandwidth is specified and Media Live pulls a stream using the URL, the media file stream with the highest bitrate and bandwidth lower than the value of Max Bandwidth will be pushed to the origin server.
- If Max Bandwidth is not specified and Media Live pulls a stream using the URL, the media file stream with the largest BANDWIDTH value will be pushed to the origin server.
- Primary Input Parameters: URL, indicating the media stream URL obtained from the channel provider. Media Live directly uses the URL to push streams to the origin server.
- Standby Input Parameters:
- Primary/standby Input: You can enable this function to set the standby media stream URL.
- Standby Input URL: Obtain the standby media stream URL from the channel provider.
- Switchover Duration Threshold: When the duration of abnormal channel playback reaches the threshold, the system automatically switches to another URL for stream pull and playback.
- Priority Settings: Select PRIMARY (mainly the primary input URL) or EQUAL (switchover between primary and standby input URLs) as needed.
- Ad Parameters:
- SCTE-35 Source: SCTE35 signal source of the advertisement. The value can be SEGMENTS or MANIFEST.
- Ad Trigger (Optional): Options are Splice insert, Provider advertisement, Distributor advertisement, Provider placement opportunity, and Distributor placement opportunity.
- Audio Selectors: Up to eight audio selectors can be added. Click Add Audio Selector to add Audio Selector 1. Configure the following parameters:
- Selector Name: Enter an audio selector name using only letters, digits, hyphens (-), and underscores (_). The name of each selector in the same channel must be unique.
- Selector Settings:
PID selection: This mode requires specifying PID.
PID: ID of the audio stream in the input source.
Language selection: This mode requires specifying Language Code and Language Selection Policy.
Language Code: Confirm the language of each audio stream in the source input, select an audio stream, and enter the language code (2–3 lowercase letters) of that audio stream. For example, eng indicates English.
Language Selection Policy: The value LOOSE indicates that the audio stream language is loosely matched with the selected language code. In the example of eng, the audio stream whose language is English in the source input will be preferentially selected. If audio streams in the language represented by the selected language code cannot be found, the audio stream with the lowest PID will be selected. The value STRICT indicates that the audio stream language is strictly matched with the selected language code. In the example of eng, only audio streams in English in the source input will be selected. If audio streams in the language represented by the selected language code cannot be found, a muted segment will be automatically added. When a device uses this audio selector to play a video, the playback is muted.
HLS audio selection: This mode requires specifying Group ID and Name.
Group ID: See the GROUP-ID attribute of the M3U8 audio stream.
Name: See the "Name" attribute of the M3U8 audio stream.
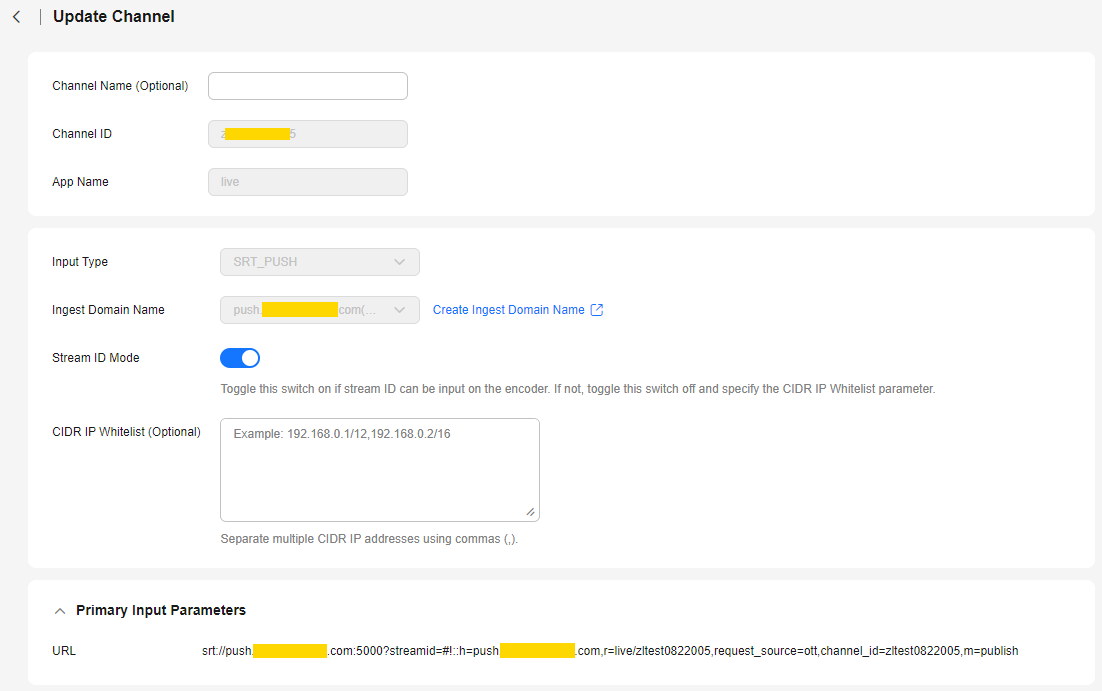
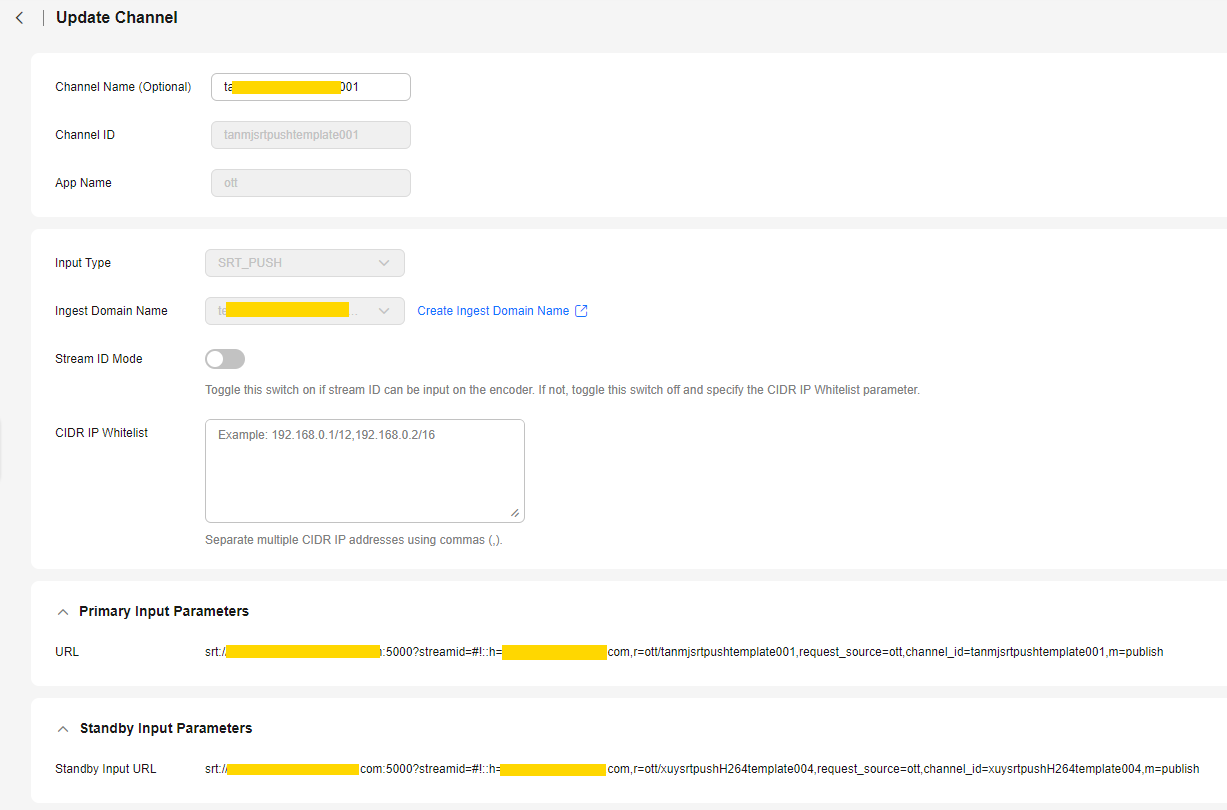
Input Type set to SRT_PUSH
Configure the following parameters:
- Ingest Domain Name: Select an SRT ingest domain name from the drop-down list box. If no ingest domain name is available, click Create Ingest Domain Name on the right and add an SRT ingest domain name on the Add Domain page.
- Stream ID Mode: indicates whether the encoder allows inputting a stream ID. If not, you must specify CIDR IP Whitelist.
- CIDR IP Whitelist (Optional): Enter whitelisted CIDR IP addresses in a maximum of 256 characters. Separate IP addresses using commas (,).
- Ad Parameters:
Ad Trigger (Optional): Options are Splice insert, Provider advertisement, Distributor advertisement, Provider placement opportunity, and Distributor placement opportunity.
- Audio Selectors: Up to eight audio selectors can be added. Click Add Audio Selector to add Audio Selector 1. Configure the following parameters:
- Selector Name: Enter an audio selector name using only letters, digits, hyphens (-), and underscores (_). The name of each selector in the same channel must be unique.
- Selector Settings:
PID selection: This mode requires specifying PID.
PID: ID of the audio stream in the input source.
Language selection: This mode requires specifying Language Code and Language Selection Policy.
Language Code: Confirm the language of each audio stream in the source input, select an audio stream, and enter the language code (2–3 lowercase letters) of that audio stream. For example, eng indicates English.
Language Selection Policy: The value LOOSE indicates that the audio stream language is loosely matched with the selected language code. In the example of eng, the audio stream whose language is English in the source input will be preferentially selected. If audio streams in the language represented by the selected language code cannot be found, the audio stream with the lowest PID will be selected. The value STRICT indicates that the audio stream language is strictly matched with the selected language code. In the example of eng, only audio streams in English in the source input will be selected. If audio streams in the language represented by the selected language code cannot be found, a muted segment will be automatically added. When a device uses this audio selector to play a video, the playback is muted.
Input Type set to SRT_PULL
Configure the following parameters:
- Primary Input Parameters: URL, indicating the media stream URL obtained from the channel provider. Media Live directly uses the URL to push streams to the origin server.
- SRT Minimum Latency (Optional): stream pull latency when the channel type is SRT_PULL
- Stream ID (Optional): stream ID of the streaming URL when the channel type is SRT_PULL
- Standby Input Parameters:
- Primary/standby Input: You can enable this function to set the standby media stream URL.
- Standby Input URL: Obtain the standby media stream URL from the channel provider.
- Switchover Duration Threshold: When the duration of abnormal channel playback reaches the threshold, the system automatically switches to another URL for stream pull and playback.
- Priority Settings: Select PRIMARY (mainly the primary input URL) or EQUAL (switchover between primary and standby input URLs) as needed.
- Ad Parameters:
Ad Trigger (Optional): Options are Splice insert, Provider advertisement, Distributor advertisement, Provider placement opportunity, and Distributor placement opportunity.
- Audio Selectors: Up to eight audio selectors can be added. Click Add Audio Selector to add Audio Selector 1. Configure the following parameters:
- Selector Name: Enter an audio selector name using only letters, digits, hyphens (-), and underscores (_). The name of each selector in the same channel must be unique.
- Selector Settings:
PID selection: This mode requires specifying PID.
PID: ID of the audio stream in the input source.
Language selection: This mode requires specifying Language Code and Language Selection Policy.
Language Code: Confirm the language of each audio stream in the source input, select an audio stream, and enter the language code (2–3 lowercase letters) of that audio stream. For example, eng indicates English.
Language Selection Policy: The value LOOSE indicates that the audio stream language is loosely matched with the selected language code. In the example of eng, the audio stream whose language is English in the source input will be preferentially selected. If audio streams in the language represented by the selected language code cannot be found, the audio stream with the lowest PID will be selected. The value STRICT indicates that the audio stream language is strictly matched with the selected language code. In the example of eng, only audio streams in English in the source input will be selected. If audio streams in the language represented by the selected language code cannot be found, a muted segment will be automatically added. When a device uses this audio selector to play a video, the playback is muted.
- FLV_PULL: Stream push is not required. The streaming URL provided by the user is directly obtained and used by Media Live to push streams to the origin server.
- Click Next.
Table 2 shows Output Settings.
Table 2 Parameters Item
Parameter
Description
Audio Output
Add Audio Output
This parameter (optional) is displayed when the input type is HLS_PULL, SRT_PULL, or SRT_PUSH.
You can bind an audio selector in Audio Output and set the language and stream name to be displayed in either of the following cases:
- The actual audio language and stream name are not displayed during channel output playback.
- You need to change the language and stream name of the audio.
Note: Each Audio Output allows binding only one audio selector, and the audio selector of each Audio Output must be unique. Therefore, Audio Output configurations cannot outnumber audio selectors.
Specifically, click Add Audio Output and add Audio Output 1 by configuring the following parameters:
- Audio Output Name: Enter a name consisting of letters, digits, hyphens (-), and underscores (_). Each audio output name of the same channel must be unique.
- Selector Name: Select a configured audio selector from the drop-down list box. The audio selector of each audio output must be unique.
- Language Code Control: This setting changes only the displayed audio language, not the actual one.
Options:
- Follow input: If the output audio of the selected audio selector has a language, the language code and stream name of the output audio will be used. Otherwise, the language code and stream name configured here will be used. The default value is recommended.
- User-defined: You can customize the language code and stream name of the output audio.
- Language Code: Enter a language code consisting of two or three lowercase letters. For example, eng indicates English.
- Stream Name: (optional) stream name displayed on the GUI
Transcoding Settings
Transcoding Template
Select one or more created Media Live transcoding templates (see Creating a Transcoding Template) from the drop-down list box.
Other
Catch-Up TV and Time-Shifted Viewing
Enabling this function requires setting Startover Window, that is, the duration of the catch-up TV content that can be viewed of a channel.
Unit: second.
For details, see Obtaining a Catch-Up TV/Time-Shifted Viewing URL.
NOTE:- The OBS path for storing live recordings is OBS address/push_domain/AppName/Channelid.
- After deleting channel A, use the ingest domain name, App Name, and channel ID of channel A to create channel B. If the recordings of channel A are not completely aged, the catch-up TV URL created by channel B can be used to view the recordings of channel A. The recordings of channel A cannot be viewed when they are completely aged.
Output Segment Parameters
Segment Duration
Duration of a single segment. The value defaults to 4s and must be an integer multiple of the GOP duration.
The value ranges from 1 to 10, in second.
CAUTION:Exercise caution when changing the segment duration, as this operation will affect the time-shifted viewing of catch-up TV content.
Output Group Settings
NOTE:You can click
 on the right to add multiple output types.
Output Protocol
Protocol for output transcoded video.
Options:
- HLS
- DASH
- MSS
HLS
Configure the following parameters:
- Ad Marker (Optional): advertisement marker
- Live Playlist Window Duration: duration (in second) returned by the live playlist
- Distribution URL: Select a streaming domain name from the first drop-down list box and enter a playback address in the second drop-down list box. After both are assembled, a streaming URL is generated.
Example for HLS: https://live-play.example.com/{channelld}/hls/{unique_string}/index.m3u8
Streaming URLs support HTTPS. You need to configure an HTTPS certificate by referring to HTTPS Certificates.
NOTICE:- If Input Type is set to RTMP_PUSH or SRT_PUSH in 4, the streaming domain name configured here and the ingest domain name configured in Input Type must be in the same region.
- If Input Type is set to FLV_PULL, HLS_PULL, or SRT_PULL in 4 and multiple output types have been set, the streaming domain names of all output types must be in the same region.
- Neither encrypted nor unencrypted MSS streams (H.265) can be output.
- DRM Encryption: To enable DRM encryption, configure the parameters in Table 3.
NOTICE:
- If DRM encryption needs to be enabled for a channel and Interconnection Mode is set to FunctionGraph proxy access to provide the key for interconnecting with DRM, you need to:
enable FunctionGraph agency in advance by referring to Cloud Resource Authorization
build a function in FunctionGraph.
- If the DRM system is faulty, 404 is returned.
- If DRM encryption needs to be enabled for a channel and Interconnection Mode is set to FunctionGraph proxy access to provide the key for interconnecting with DRM, you need to:
DASH
Configure the following parameters:
- Ad Marker (Optional): advertisement marker
- Manifest Window Duration: duration (in second) returned by the live playlist
- Streaming Delay: timelapse before live content can be played. The value (in second) ranges from 1 to 120 and defaults to 20.
- Minimum Update Period: minimum waiting time before the player requests to update the list. The value (in second) ranges from 1 to 120 and defaults to 2.
- Minimum Buffer Time: smallest amount of available content that the player must reserve in the buffer. The value (in second) ranges from 1 to 120 and defaults to 10.
- Distribution URL: Select a streaming domain name from the first drop-down list box and enter a playback address in the second drop-down list box. After both are assembled, a streaming URL is generated.
Example for DASH: https://live-play.example.com/{channelId}/dash/{unique_string}/index.mpd
Streaming URLs support HTTPS. You need to configure an HTTPS certificate by referring to HTTPS Certificates.
NOTICE:- If Input Type is set to RTMP_PUSH or SRT_PUSH in 4, the streaming domain name configured here and the ingest domain name configured in Input Type must be in the same region.
- If Input Type is set to FLV_PULL, HLS_PULL, or SRT_PULL in 4 and multiple output types have been set, the streaming domain names of all output types must be in the same region.
- Neither encrypted nor unencrypted MSS streams (H.265) can be output.
- DRM Encryption: To enable DRM encryption, configure the parameters in Table 3.
NOTICE:
- If DRM encryption needs to be enabled for a channel and Interconnection Mode is set to FunctionGraph proxy access to provide the key for interconnecting with DRM, you need to:
enable FunctionGraph agency in advance by referring to Cloud Resource Authorization
build a function in FunctionGraph.
- If the DRM system is faulty, 404 is returned.
- If DRM encryption needs to be enabled for a channel and Interconnection Mode is set to FunctionGraph proxy access to provide the key for interconnecting with DRM, you need to:
MSS
Configure the following parameters:
- Manifest Window Duration: duration (in second) returned by the live playlist
- Distribution URL: Select a streaming domain name from the first drop-down list box and enter a playback address in the second drop-down list box. After both are assembled, a streaming URL is generated.
Example for MSS: https://live-play.example.com/{channelId}/mss/{unique_string}.ism/Manifest
Streaming URLs support HTTPS. You need to configure an HTTPS certificate by referring to HTTPS Certificates.
NOTICE:- If Input Type is set to RTMP_PUSH or SRT_PUSH in 4, the streaming domain name configured here and the ingest domain name configured in Input Type must be in the same region.
- If Input Type is set to FLV_PULL, HLS_PULL, or SRT_PULL in 4 and multiple output types have been set, the streaming domain names of all output types must be in the same region.
- Neither encrypted nor unencrypted MSS streams (H.265) can be output.
- DRM Encryption: To enable DRM encryption, configure the parameters in Table 3.
NOTICE:
- If DRM encryption needs to be enabled for a channel and Interconnection Mode is set to FunctionGraph proxy access to provide the key for interconnecting with DRM, you need to:
enable FunctionGraph agency in advance by referring to Cloud Resource Authorization
build a function in FunctionGraph.
- If the DRM system is faulty, 404 is returned.
- If DRM encryption needs to be enabled for a channel and Interconnection Mode is set to FunctionGraph proxy access to provide the key for interconnecting with DRM, you need to:
Table 3 DRM configuration Parameter
Description
Resource ID
Content resource ID provided by the DRM system
SPEKE Version
AWS SPEKE version. Currently, only version 1.0 is supported.
For details, see SPEKE. This protocol must comply with license requirements.
DRM System
DRM encryption type.
Constraints:
- The HLS output protocol supports FairPlay.
- The DASH output protocol supports Widevine, PlayReady, and PlayReady + Widevine.
- The MSS protocol supports only PlayReady.
Encryption Level
DRM encryption level. The encryption key needs to be obtained from the DRM vendor. Options:
- content: Each channel has one specific DRM encryption key.
- profile: Each stream of a channel has one specific DRM encryption key.
Constraints: HLS and DASH streams support both preceding encryption modes, while MSS streams support only content encryption.
Interconnection Mode
Mode of interconnecting with a DRM system. Options:
- HTTPS direct access: Enter an HTTPS URL to obtain the DRM system. HTTP URLs cannot be used.
Key and Value in the header are used to verify the accuracy and validity of the URL used for obtaining the DRM system. These two fields are optional. To add them, click Add a Header and specify Header Key and Header Value. A maximum of five groups of Key and Value can be added, but each Key must be unique.
- FunctionGraph proxy access: You can build a function using FunctionGraph to package the obtained Key and Value. Key and Value can be dynamically obtained using functions. Other token authentication methods are also supported.
This mode requires enabling FunctionGraph agency (see Cloud Resource Authorization) to authorize Media Live to call FunctionGraph functions.
This mode requires specifying the Function parameter and selecting a function name from the drop-down list box.
NOTICE:When FunctionGraph is used for channel DRM encryption, the FunctionGraph version information is not contained. By default, the latest version is used.
URL
- URL of the key for DRM encryption.
- HTTPS direct access requires entering an HTTPS URL.
- If FunctionGraph proxy access is selected, the URL is automatically filled in and cannot be changed.
- Click Finish. A new line of channel content is displayed on the Channels page.
- Click Start in the Operation column to start the channel.
Managing Channels
After creating a channel, you can perform the following operations as required:
- Starting a channel
After a channel is created, click Start in the Operation column to start the channel.
- Stopping a channel
- Modifying a channel
To modify a channel, click Manage in the Operation column and modify the configuration items of the channel. If the channel to be modified has been started, the channel automatically restarts after the modification. The restart takes about 30 seconds. During the channel restart, media streams will be interrupted. After the channel is restarted, media streams automatically resume.
- Deleting a channel
To delete a channel, stop the channel and click Delete in the Operation column. If there is an ongoing live-to-VOD task in the channel, the channel cannot be deleted until the task is completed.
Feedback
Was this page helpful?
Provide feedbackThank you very much for your feedback. We will continue working to improve the documentation.See the reply and handling status in My Cloud VOC.
For any further questions, feel free to contact us through the chatbot.
Chatbot


