
NodePort
Scenario
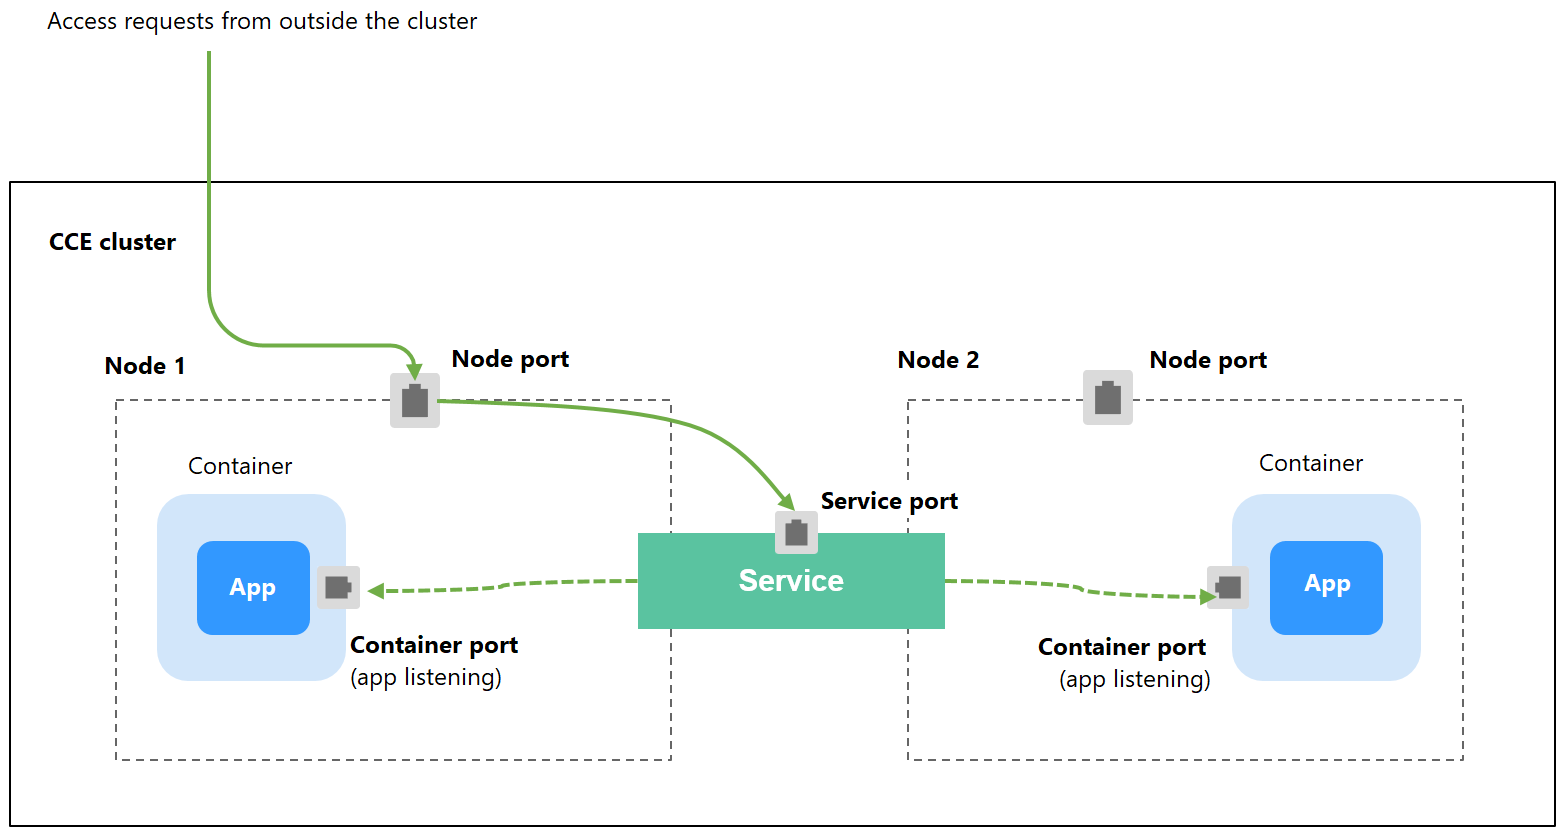
A Service is exposed on each node's IP address at a static port (NodePort). When you create a NodePort Service, Kubernetes automatically allocates an internal IP address (ClusterIP) of the cluster. When clients outside the cluster access <NodeIP>:<NodePort>, the traffic will be forwarded to the target pod through the ClusterIP of the NodePort Service.
Notes and Constraints
- By default, a NodePort Service is accessed within a VPC. To use an EIP to access a NodePort Service through public networks, bind an EIP to the node in the cluster in advance.
- After a Service is created, if the affinity setting is switched from the cluster level to the node level, the connection tracing table will not be cleared. Do not modify the Service affinity setting after the Service is created. To modify it, create a Service again.
- In VPC network mode, when container A is published through a NodePort service and the service affinity is set to the node level (that is, externalTrafficPolicy is set to local), container B deployed on the same node cannot access container A through the node IP address and NodePort service.
- When a NodePort service is created in a cluster of v1.21.7 or later, the port on the node is not displayed using netstat by default. If the cluster forwarding mode is iptables, run the iptables -t nat -L command to view the port. If the cluster forwarding mode is IPVS, run the ipvsadm -Ln command to view the port.
Creating a NodePort Service
- Log in to the CCE console and click the cluster name to access the cluster console.
- In the navigation pane, choose Services & Ingresses. In the upper right corner, click Create Service.
- Configure intra-cluster access parameters.
- Service Name: Specify a Service name, which can be the same as the workload name.
- Service Type: Select NodePort.
- Namespace: namespace that the workload belongs to.
- Service Affinity: For details, see externalTrafficPolicy (Service Affinity).
- Cluster level: The IP addresses and access ports of all nodes in a cluster can access the workload associated with the Service. Service access will cause performance loss due to route redirection, and the source IP address of the client cannot be obtained.
- Node level: Only the IP address and access port of the node where the workload is located can access the workload associated with the Service. Service access will not cause performance loss due to route redirection, and the source IP address of the client can be obtained.
- Selector: Add a label and click Confirm. The Service will use this label to select pods. You can also click Reference Workload Label to use the label of an existing workload. In the dialog box that is displayed, select a workload and click OK.
- Ports
- Protocol: protocol used by the Service.
- Service Port: port used by the Service. The port number ranges from 1 to 65535.
- Container Port: listener port of the workload. For example, Nginx uses port 80 by default.
- Node Port: You are advised to select Auto. You can also specify a port. The default port ranges from 30000 to 32767.
- Click OK.
Using kubectl
You can configure Service access using kubectl. This section uses an Nginx workload as an example to describe how to configure a NodePort Service using kubectl.
- Use kubectl to access the cluster. For details, see Connecting to a Cluster Using kubectl.
- Create and edit the nginx-deployment.yaml and nginx-nodeport-svc.yaml files.
The file names are user-defined. nginx-deployment.yaml and nginx-nodeport-svc.yaml are merely example file names.
vi nginx-deployment.yaml
apiVersion: apps/v1
kind: Deployment
metadata:
  name: nginx
spec:
  replicas: 1
  selector:
    matchLabels:
      app: nginx
  template:
    metadata:
      labels:
        app: nginx
    spec:
      containers:
      - image: nginx:latest
        name: nginx
      imagePullSecrets:
      - name: default-secret
vi nginx-nodeport-svc.yaml
apiVersion: v1 kind: Service metadata: labels: app: nginx name: nginx-nodeport spec: ports: - name: service nodePort: 30000 # Node port. The value ranges from 30000 to 32767. port: 8080 # Port for accessing a Service. protocol: TCP # Protocol used for accessing a Service. The value can be TCP or UDP. targetPort: 80 # Port used by a Service to access the target container. This port is closely related to the applications running in a container. In this example, the Nginx image uses port 80 by default. selector: # Label selector. A Service selects a pod based on the label and forwards the requests for accessing the Service to the pod. In this example, select the pod with the app:nginx label. app: nginx type: NodePort # Service type. NodePort indicates that the Service is accessed through a node port. - Create a workload.
kubectl create -f nginx-deployment.yaml
If information similar to the following is displayed, the workload has been created.
deployment "nginx" created
kubectl get po
If information similar to the following is displayed, the workload is running.
NAME                     READY     STATUS             RESTARTS   AGE
nginx-2601814895-qhxqv   1/1       Running            0          9s
- Create a Service.
kubectl create -f nginx-nodeport-svc.yaml
If information similar to the following is displayed, the Service is being created.
service "nginx-nodeport" created
kubectl get svc
If information similar to the following is displayed, the Service has been created.
# kubectl get svc
NAME             TYPE        CLUSTER-IP     EXTERNAL-IP   PORT(S)          AGE
kubernetes       ClusterIP   10.247.0.1     <none>        443/TCP          4d8h
nginx-nodeport   NodePort    10.247.30.40   <none>        8080:30000/TCP   18s
- Access the Service.
By default, a NodePort Service can be accessed by using Any node IP address:Node port.
The Service can be accessed from a node in another cluster in the same VPC or in another pod in the cluster. If a public IP address is bound to the node, you can also use the public IP address to access the Service. Create a container in the cluster and access the container by using Node IP address:Node port.
# kubectl get node -owide
NAME           STATUS   ROLES    AGE    INTERNAL-IP    EXTERNAL-IP   OS-IMAGE                KERNEL-VERSION                CONTAINER-RUNTIME
10.100.0.136   Ready    <none>   152m   10.100.0.136   <none>        CentOS Linux 7 (Core)   3.10.0-1160.25.1.el7.x86_64   docker://18.9.0
10.100.0.5     Ready    <none>   152m   10.100.0.5     <none>        CentOS Linux 7 (Core)   3.10.0-1160.25.1.el7.x86_64   docker://18.9.0
# kubectl run -i --tty --image nginx:alpine test --rm /bin/sh
If you do not see a command prompt, try pressing Enter.
/ # curl 10.100.0.136:30000
<!DOCTYPE html>
<html>
<head>
<title>Welcome to nginx!</title>
<style>
    body {
        width: 35em;
        margin: 0 auto;
        font-family: Tahoma, Verdana, Arial, sans-serif;
    }
</style>
</head>
<body>
<h1>Welcome to nginx!</h1>
<p>If you see this page, the nginx web server is successfully installed and
working. Further configuration is required.</p>

<p>For online documentation and support please refer to
<a href="http://nginx.org/">nginx.org</a>.<br/>
Commercial support is available at
<a href="http://nginx.com/">nginx.com</a>.</p>

<p><em>Thank you for using nginx.</em></p>
</body>
</html>
/ #
Feedback
Was this page helpful?
Provide feedbackThank you very much for your feedback. We will continue working to improve the documentation.See the reply and handling status in My Cloud VOC.
For any further questions, feel free to contact us through the chatbot.
Chatbot


