
Deploying a Microservice Using a Software Package
Scenarios
ServiceStage allows you to quickly deploy microservices in containers (such as CCE) or VMs (such as ECS), and supports source code deployment, JAR/WAR package deployment, and Docker image package deployment. In addition, ServiceStage allows you to deploy, upgrade, roll back, start, stop, and delete applications developed in different programming languages, such as Java, PHP, Node.js, and Python.
In this practice, backend components developed in Java and frontend components developed in Node.js are used.
User Story
- Frontend component: weathermapweb, which is developed in Node.js.
- Backend components: weather, fusionweather, forecast, and edge-service, which are developed based on Java.
The procedures for deploying a microservice are as follows:
Creating and Deploying a Backend Application Component
You need to create and deploy four application components (weather, forecast, fusionweather, and edge-service), which correspond to the four software packages generated by the backend build jobs.
- Log in to ServiceStage.
- Choose Application Management. The application list is displayed.
- Choose More > Create Component in the Operation column of the application created in Creating an Application, for example, weathermap.
- In the Basic Information area, set the following mandatory parameters. Retain the default values for other parameters.
Parameter
Description
Component Name
Enter the name of the corresponding backend component (for example, weather).
Component Version
Click Generate. By default, the version number is generated based on the time when you click Generate. The format is yyyy.mmdd.hhmms, where s is the ones place of the second in the timestamp. For example, if the timestamp is 2022.0803.104321, the version number is 2022.0803.10431.
Application
Select the application created in Creating an Application, for example, weathermap.
Environment
Select the environment created in Creating an Environment, for example, env-test.
Namespace
Select default to isolate component instances.
- In the Component Package area, set the following mandatory parameters. Retain the default values for other parameters.
Parameter
Description
Stack
Select Java.
Source Code/Software Package
Select JAR package.
Upload Method
- Select OBS.
- Click Select Software Package and select the uploaded software package of the corresponding component by referring to Table 1.
- Click OK.
- In the Build Job area, set the following mandatory parameters. Retain the default values for other parameters.
Parameter
Description
Organization
Select the organization created in Creating an Organization.
An organization is used to manage images generated during component build.
Build
Select Use current environment to use the CCE cluster in the deployment environment to which the component belongs to build an image.
In the current environment, masters and nodes in the CCE cluster must have the same CPU architecture. Otherwise, the component build fails.
Namespace
Select default to isolate build data.
- Click Next.
- In the Resources area, set Instances for each component and retain the default values for other parameters.
Component Name
Instances
weather
2
forecast
1
fusionweather
1
edge-service
1
- Bind the ServiceComb engine.
After a component is deployed, the microservice will be registered with the ServiceComb engine. All components must be registered with the same ServiceComb engine.
- Choose Cloud Service Settings > Microservice Engine.
- Click Bind Microservice Engine.
- Select the managed ServiceComb engine in the current environment.
- Click OK.
- (Optional) Choose Container Settings > Environment Variable > Add Environment Variable. Then add environment variables for the weather, forecast, and fusionweather components by referring to the following table.
Type
Name
Variable/Variable Reference
Add manually
MOCK_ENABLED
- true: If no EIP is bound to the ECS node in the CCE cluster created in Preparing Resources or the node cannot access the public network, set this parameter to true. The weather data used by the application is simulated data.
- false: If an EIP has been bound to the ECS node in the CCE cluster created in Preparing Resources and the node can access the public network, set this parameter to false or do not set this parameter. The weather data used by the application is real-time data.
Figure 1 Adding a backend component environment variable
- Click Create and Deploy.
Setting the Access Mode of the edge-service Component
- Click
 in the upper left corner to return to the Application Management page.
 - Click the application created in Creating an Application (for example, weathermap). The Overview page is displayed.
- In the Component List area, locate the row that contains edge-service and click View Access Mode in the External Access Address column.
- Click Add Service in the TCP/UDP Route Configuration area and set parameters by referring to the following table.
Parameter
Description
Service Name
Retain the default value.
Access Mode
Select Public network access.
Access Type
Select Elastic IP address.
Service Affinity
Retain the default value.
Protocol
Select TCP.
Container Port
Enter 3010.
Access Port
Select Automatically generated.
Figure 2 Setting the access mode of the edge-service component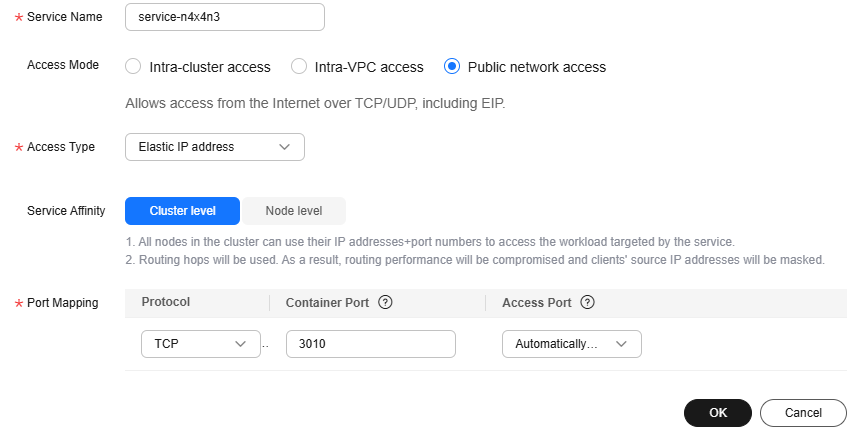
- Click OK to generate an access address and record it.
Figure 3 Generating and recording the edge-service access address

Creating and Deploying a Frontend Component
- Click
 in the upper left corner to return to the Application Management page.
 - Choose More > Create Component in the Operation column of the application created in Creating an Application, for example, weathermap.
- In the Basic Information area, set the following mandatory parameters. Retain the default values for other parameters.
Parameter
Description
Component Name
Enter the frontend component name weathermapweb.
Component Version
Click Generate. By default, the version number is generated based on the time when you click Generate. The format is yyyy.mmdd.hhmms, where s is the ones place of the second in the timestamp. For example, if the timestamp is 2022.0803.104321, the version number is 2022.0803.10431.
Application
Select the application created in Creating an Application, for example, weathermap.
Environment
Select the environment created in Creating an Environment, for example, env-test.
Namespace
Select default to isolate component instances.
- In the Component Package area, set the following mandatory parameters. Retain the default values for other parameters.
Parameter
Description
Stack
Select Node.js.
Source Code/Software Package
Select ZIP package.
Upload Method
- Select OBS.
- Click Select Software Package and select the uploaded software package of component weathermapweb by referring to Table 1.
- Click OK.
- In the Build Job area, set the following mandatory parameters. Retain the default values for other parameters.
Parameter
Description
Organization
An organization is used to manage images generated during component build.
Select the organization created in Creating an Organization.
Build
Select Use current environment to use the CCE cluster in the deployment environment to which the component belongs to build an image.
In the current environment, masters and nodes in the CCE cluster must have the same CPU architecture. Otherwise, the component build fails.
Namespace
Select default to isolate build data.
- Click Next to add an environment variable.
- Choose Container Settings > Environment Variable.
- Click Add Environment Variable to configure environment variables.
Type
Name
Variable/Variable Reference
Add manually
SERVICE_ADDR
Access address generated in Setting the Access Mode of the edge-service Component.
Figure 4 Adding an environment variable of a frontend component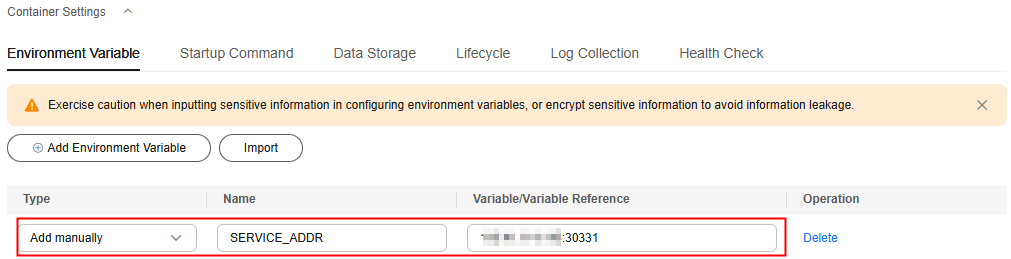
- Click Create and Deploy.
Confirming the Deployment Result
- Click
 in the upper left corner to return to the Application Management page.
 - Choose Cloud Service Engine > Microservice Catalog.
- Select the ServiceComb engine where the microservice application is deployed from the Microservice Engine drop-down list.
- Select the application (for example, weathermap) created in Creating an Application from Microservice List.
If the number of instances of each microservice is the same as listed in the following table, the deployment is successful.
Component Name
Instances
weather
2
forecast
1
fusionweather
1
edge-service
1
Adding a Frontend Component Access Mode
- Choose Application Management.
- Click the application created in Creating an Application (for example, weathermap). The Overview page is displayed.
- In the Component List area, locate the row that contains weathermapweb and click View Access Mode in the External Access Address column.
- Click Add Service in the TCP/UDP Route Configuration area and set parameters by referring to the following table.
Parameter
Description
Service Name
Retain the default value.
Access Mode
Select Public network access.
Access Type
Select Elastic IP address.
Service Affinity
Retain the default value.
Protocol
Select TCP.
Container Port
Enter 3000.
Access Port
Select Automatically generated.
Figure 5 Adding a frontend component access mode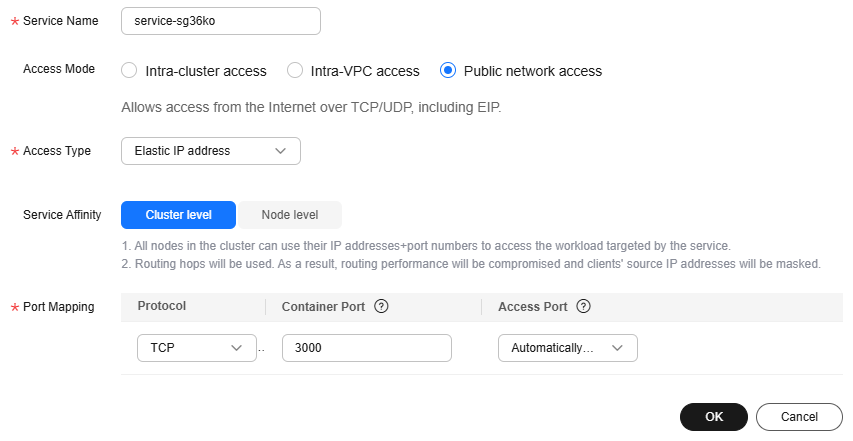
- Click OK.
Figure 6 Access address

Accessing an Application
- Click
 in the upper left corner to return to the Application Management page.
 - Click the application created in Creating an Application (for example, weathermap). The Overview page is displayed.
- In the Component List area, locate the row that contains weathermapweb and click View Access Mode in the External Access Address column.
If the following page is displayed, the weather forecast microservice application is successfully deployed.
Figure 7 Application deployed successfully

- The data is real-time data.
- When you access the application for the first time, it takes some time for the weather system to be ready. If the preceding page is not displayed, refresh the page.
Feedback
Was this page helpful?
Provide feedbackThank you very much for your feedback. We will continue working to improve the documentation.See the reply and handling status in My Cloud VOC.
For any further questions, feel free to contact us through the chatbot.
Chatbot


