
Developing a Custom Authorizer
Creating a Function Backend for Frontend Authentication
Develop a custom authentication function with a custom backend for access authentication.
- Log in to the ROMA Connect console. On the Instances page, click View Console next to a specific instance.
- Create an integration application.
- In the navigation pane on the left, choose Integration Applications. In the upper right corner of the page, click Create Integration Application.
- In the dialog box displayed, set Name and click OK.
- In the navigation pane on the left, choose API Connect > Custom Backends. On the Backends tab page, click Create Backend.
- On the Create Backend page, set backend parameters and click Create.
Figure 1 Custom backend configuration
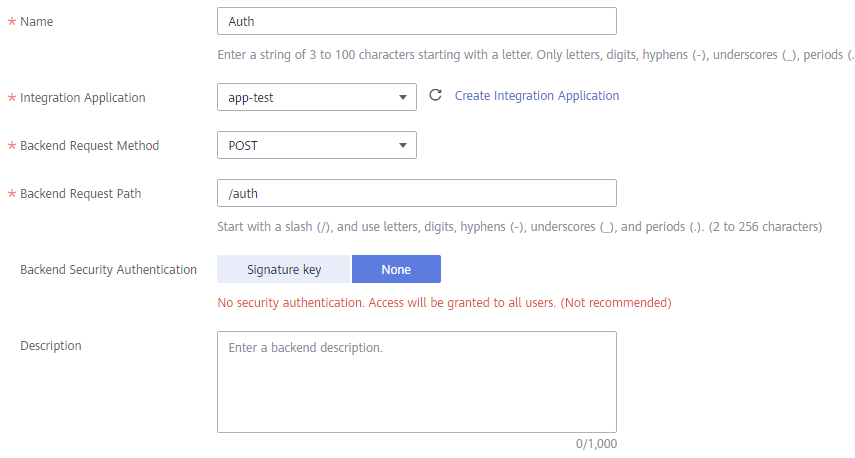
Table 1 Backend configuration Parameter
Description
Name
Backend name.
Integration Application
Select the integration application created in 2.
Backend Request Method
The backend request method must be POST.
Backend Request Path
Enter the request path of the backend, for example, /getUserInfo/userId.
Backend Security Authentication
Backend authentication mode. Select None.
Description
Enter a description of the backend.
Advanced Settings
Retain the default settings in the Advanced Settings area.
After the backend is created, the online IDE of the backend is automatically displayed. The backend type is data backend by default.
- Develop a custom authentication function.
In the upper left corner of the online IDE, choose File > New Function Backend > Frontend Custom Authentication Example. In the dialog box displayed, click OK, and then compile a function script for security authentication.
Modify the authentication parameter name and value in the example. In this practice, the authentication parameter is header x-auth of the API request. When the value of x-auth is user1:xxxx, the authentication is successful.
function execute(data) { data = JSON.parse(data) body = data.body if (body["headers"]["x-auth"] === 'user1:xxxx') { result = { "status": "allow", "context": { "user_name":"user1" } } } else { result = { "status": "deny", "context": { "error_code":"1001", "error_message":"incorrect token input" } } } return result } - After editing the function, click Save in the upper right corner of the page to save the backend configuration.
- Click Deploy in the upper right corner of the page. In the dialog box displayed, click Yes to deploy the function backend.
Creating a Frontend Custom Authorizer
- In the navigation pane on the left, choose API Connect > API Policies. On the Custom Authorizers tab, click Create Custom Authorizer.
- On the page displayed, configure custom authorization.
Figure 2 Custom authorizer configuration
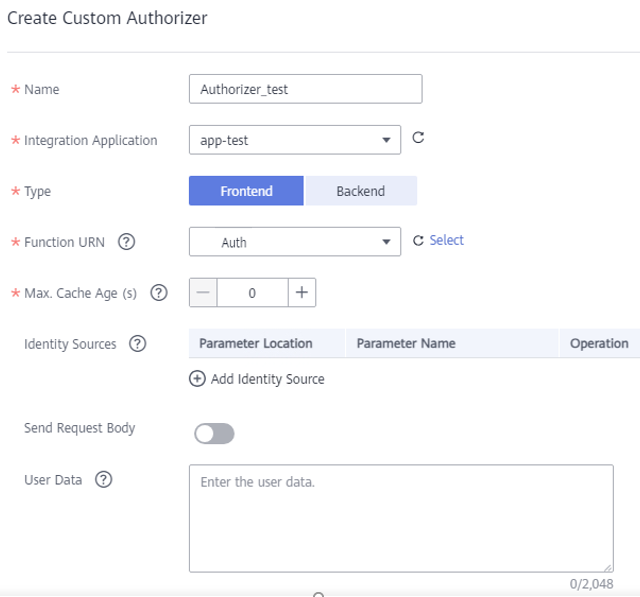
Table 2 Parameters for creating a frontend custom authorizer Parameter
Description
Name
Custom authorizer name.
Integration Application
Select the integration application created in 2.
Type
Select Frontend.
Function URN
Select the Function backend created in Creating a Function Backend for Frontend Authentication.
Max. Cache Age (s)
Retain the default settings.
Identity Sources
Retain the default settings.
Send Request Body
Retain the default settings.
User Data
Retain the default settings.
- Click OK.
Feedback
Was this page helpful?
Provide feedbackThank you very much for your feedback. We will continue working to improve the documentation.See the reply and handling status in My Cloud VOC.
For any further questions, feel free to contact us through the chatbot.
Chatbot


