
SSO to Applications Through SAML
Introduction
Security Assertion Markup Language (SAML), developed by the Security Services Technical Committee of OASIS, is an open-source standard data format based on XML. SAML exchanges authentication and authorization data between different security domains, meeting the SSO requirements of web applications.
Learn about the following terms and authorization process related to SAML.
- Terms
Table 1 Terms Term
Description
IdP
Identity provider (IdP): collects and stores user identity information, such as usernames and passwords, and authenticates users during login.
SP
Service provider (SP), which establishes a trust relationship with an IdP and uses the user information provided by the IdP to provide services.
SSO
Single sign-on (SSO): allows users to access a trusted service provider (SP) through a specific redirect URL in OneAccess.
- Authorization process
- A user accesses a web application using a browser.
- The web application generates a SAML authentication request.
- The web application system sends the redirection URL to the user's browser. The redirect URL contains the encoded SAML authentication request, which should be submitted to the SSO service.
- The IdP decodes the SAML request.
- The IdP authenticates the user. If the authentication is successful, the IdP generates a SAML response, encodes it, and then returns it to the user's browser. The response contains the username of the authenticated user.
- The browser forwards the SAML response to the assertion consumer service (ACS) URL of the web application.
- The web application uses the public key of the IdP to verify the SAML response. If the verification is successful, ACS redirects the user to the target website.
- The user is redirected to the target URL and logged in to the web application.
This section describes how to integrate an application with OneAccess using the SAML protocol.
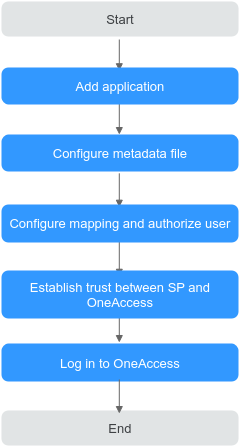
Configuration Process
Prerequisite
You have permissions to access the administrator portal.
Adding an Application
Add an application in the administrator portal, and configure the application's metadata file to establish a trust. The application serves as an SP. Use an existing enterprise account to log in to Huawei Cloud. For details, see Logging In to the Huawei Cloud Through User Portal.
- Log in to the administrator portal.
- On the top navigation bar, choose Resources > Applications.
- Click Add Custom Application in the Custom Applications section, set the logo and application name, and click Save.
Configuring a Metadata File
Upload the metadata file of the SP or manually configure the metadata. If the metadata has changed, update it so that users can log in to the application through OneAccess.
- Click the application added in Adding an Application and click the application icon on the application information page.
- In the General Information area, click
 next to Authentication to enable authentication, select SAML, and click Save.
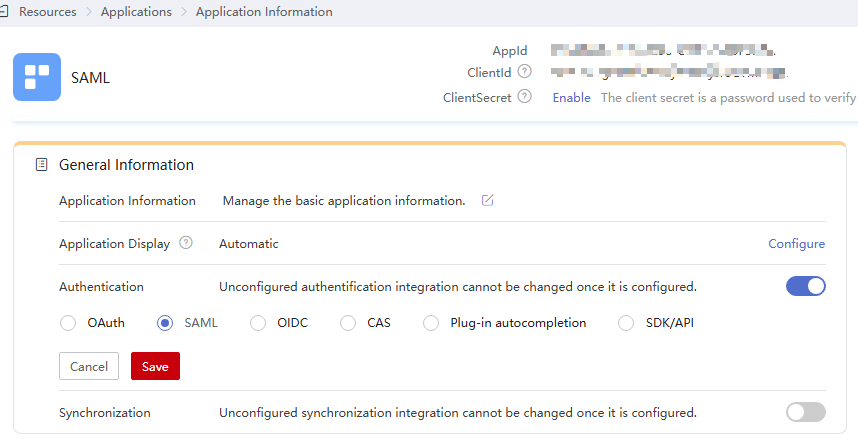

The protocol cannot be changed once specified.
- In the General Information area, click Configure next to Authentication. On the Parameters tab page, configure the metadata file. You can upload a file or configure the parameters.

To avoid information leakage, do not include sensitive information in the configuration parameters.
- Uploading a file
- Click Select File and select the metadata file of the SP.
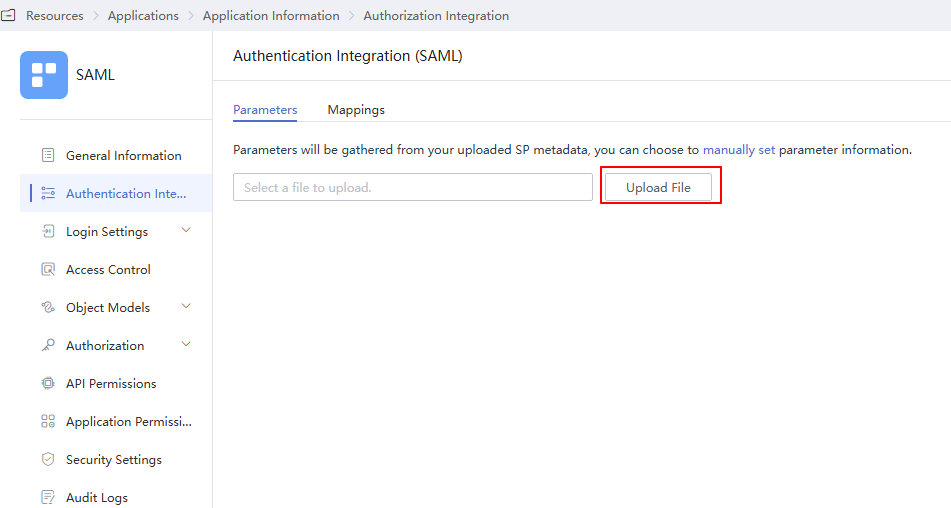
- If a message displays indicating that the upload is successful, the system has extracted the metadata.
- If a message displays indicating that the file format is incorrect and only XML files are supported, check the file format and upload the metadata file again or configure the parameters.
- For details about how to obtain the metadata of the application, see the application's documentation.
- Click Select File and select the metadata file of the SP.
- Configuring parameters
- On the Parameters tab page, click manually set.
- Set the required parameters according to the metadata file of the application, and click Save.
Table 2 Authentication parameters Parameter
Mandatory
Description
SP Entity ID
Yes
Unique identifier of the SP. Enter the value of Entity ID displayed in the SP metadata file.
ACS URL
Yes
SP callback URL that receives a response when OneAccess authentication is successful. Enter the value of AssertionConsumerService displayed in the SP metadata file.
Name ID
Yes
Select a user attribute or account attribute. The attribute value will be used as the subject of the assertion.
NameID Format
Yes
Username format supported by the SP. Enter the value of NameIDFormat displayed in the SP metadata file.
Audience URI
No
Audience for which the SAML assertion is intended. By default, this field is the same as SP Entity ID.
Single Logout URL
No
URL to which users will be redirected after logging out of their sessions in OneAccess.
Default Relay State
No
Default value used during IdP-initiated authentication.
ForceAuth
Yes
Default value: No. If this option is enabled, users will be authenticated again as required by the SP.
Response Signature
Yes
Default value: No. This option indicates whether to sign SAML responses using the IdP's certificate.
Assertion Signature
Yes
Enabled by default. Assertion requires the IdP's signing certificate. Enter the WantAssertionsSigned value in the SP metadata file.
Digital Signature Algorithm
Yes
Algorithm used to sign SAML responses or assertions. By default, RSA_SHA256 is used.
Digital Digest Algorithm
Yes
Algorithm used to create digests for SAML responses or assertions. By default, SHA256 is used.
Assertion Encryption
Yes
Default value: No. This option indicates whether to encrypt assertions.
Request Signature Validation
Yes
Enabled by default. This option indicates whether to sign SAML requests. Enter the value of AuthnRequestsSigned displayed in the SP metadata file.
Signature Certificate Validation
Yes
SP public key certificate, which is used to verify SAML request signatures. Enter the content of use="signing" displayed in the SP metadata file.
- Uploading a file
Configuring Mappings and Authorizing Users
- Configure attributes that need to be returned to the application after successful authentication.
If you have configured the required mapping using Name ID in Configuring a Metadata File, skip this step.
On the Authentication Settings page, click the Mappings tab, and click Add Mapping to add an attribute mapping.Table 3 Mapping parameters Parameter
Description
Application Attribute
Mandatory. User attribute that OneAccess will return to the application after successful authentication.
Mapping Type
Mandatory. The mapping type determines the returned attribute value.
Friendly Name
Mandatory. Enter the same value as the Application Attribute.
Attr Name Format
Mandatory. Format of data returned in accordance with the SAML protocol.
- Then authorize specific users to access the application.
In the left pane, choose Authorization > Application Accounts. Then click the button for adding accounts to authorize specific users to access the application. To authorize access using a policy, see the descriptions about the application account authorization policy in Configuring an Application.
For details about how to configure login, access control, and object models, see Configuring an Application.
Establishing a Trust Between the SP and OneAccess
Configure the metadata file of OneAccess in the SP server to establish a trust on OneAccess.
- Download the metadata file of OneAccess.
- Log in to the administrator portal.
- In the top navigation pane, choose Settings > Service Settings.
- Click IDP.
- On the IdP configuration page, click Download IDP Metadata in the upper right. The metadata file is automatically saved.
- Upload the metadata file to the SP server. For details, see the SP's documentation.
- Obtain the metadata file of the SP. For details, see the SP's documentation.
Logging In as a User
Log in to the user portal as one of the authorized users, and click the target application to check whether you can access it.
Feedback
Was this page helpful?
Provide feedbackThank you very much for your feedback. We will continue working to improve the documentation.See the reply and handling status in My Cloud VOC.
For any further questions, feel free to contact us through the chatbot.
Chatbot


