
SSO Access to Applications Through OAuth 2.0
Introduction
OAuth 2.0 is an open standard that allows users to authorize third-party applications to access their information stored on a specific resource server without sharing usernames and passwords with the third-party applications.
The overall authorization process is as follows:
- When a user accesses a third-party application, the application sends an authorization request to OneAccess. If the user agrees to authorize the application, OneAccess redirects the user to the application with an authorization code.
- The application uses the authorization code to invoke OneAccess' API to obtain an access token.
- The application uses the obtained access token to invoke other APIs of OneAccess to obtain user information. The token must be valid.
This section describes how to integrate an application with OneAccess using the OAuth protocol.
Configuration Process
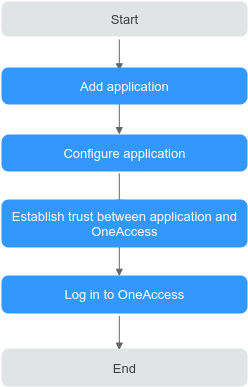
Prerequisite
You have permissions to access the administrator portal.
Adding an Application
Add an application in the administrator portal, and configure authentication information to establish a trust on it.
- Log in to the administrator portal.
- On the top navigation bar, choose Resources > Applications.
- Click Add Custom Application in the Custom Applications section, set the logo and application name, and click Save.
Configuring the Application
Configure the application in OneAccess so that users can log in to the application through OneAccess. For details, see authentication configuration, mapping configuration, and user authorization.
- Authentication configuration
- Click the application added in Adding an Application and click the application icon on the application information page.
- In the General Information area, click
 next to Authentication to enable authentication, select OAuth, and click Save.
The protocol cannot be changed once specified.
Figure 1 Selecting an authentication protocol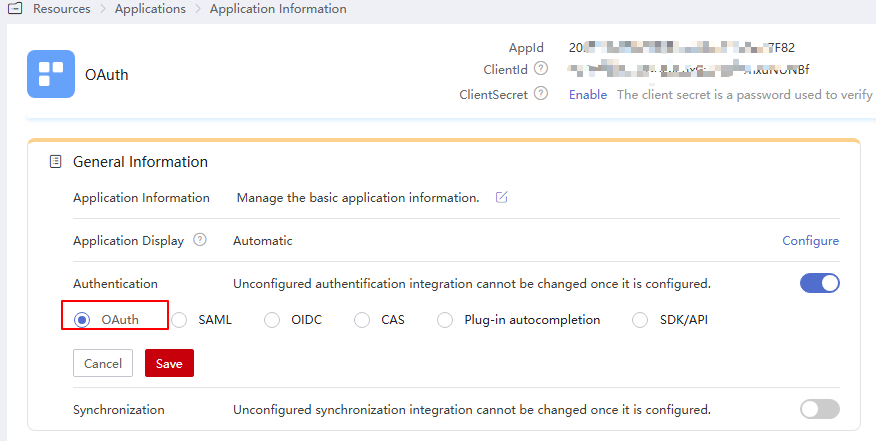
- In the General Information area, click Configure next to Authentication to access the OAuth configuration page.
To avoid information leakage, do not include sensitive information in the configuration parameters.
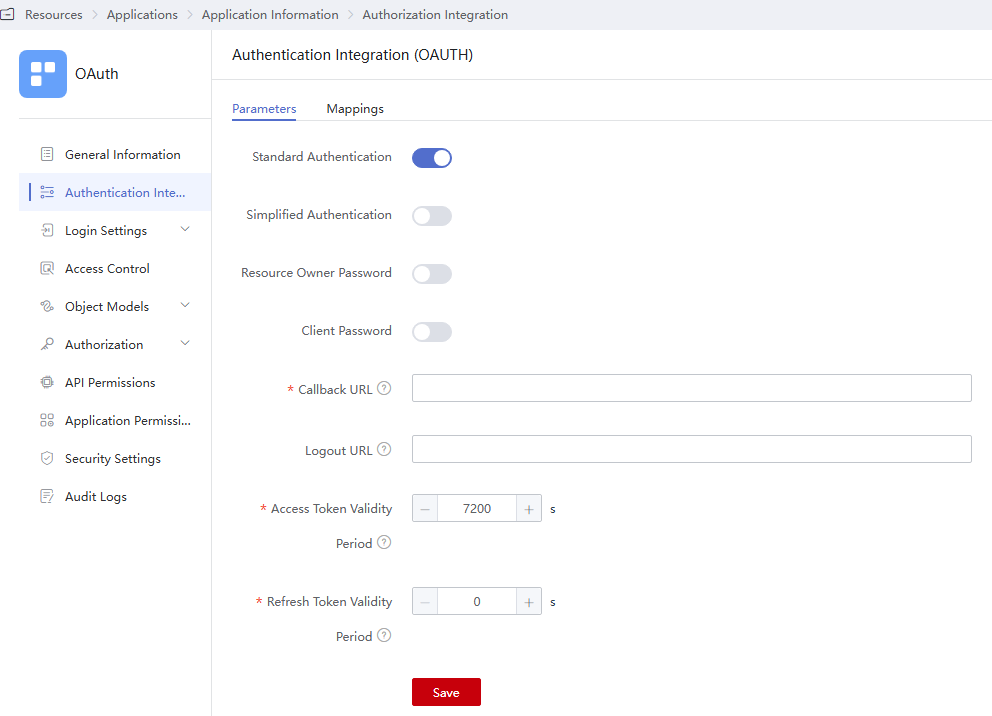
Table 1 Authentication parameters Parameter
Description
Standard Authentication
Enabled by default. It is the most widely used and most secure authentication mode, and is suitable for web applications that have backends. In this mode, the authorization code is transferred at the frontend, and the token is stored at the backend to prevent leakage. All communications with the resource server are completed at the backend. For details about the standard authorization mode, see Introduction.
Simplified Authentication
Disabled by default. It is suitable for web applications that do not have backends and must store tokens at the frontend in low security scenarios. Different from the standard authorization mode, this mode does not involve authorization codes.
Resource Owner Password
Disabled by default. This mode is suitable for scenarios where users have high trust in clients. Users provide their usernames and passwords to the clients to apply for tokens.
Client Password
Disabled by default. This mode is suitable for applications that do not have frontends. In this mode, clients initiate token requests.
Callback URL
Mandatory. (Required) Callback URL to be visited after successful authorization. Enter a trusted domain name, and separate multiple domain names using commas (,) if any. The application home page is recommended, for example, https://example.com.
Logout URL
(Optional) Logout URL to be visited after a user logs out of their session.
Access Token Validity Period
Validity period of the access token in seconds. The default value is 7200 seconds, that is, 2 hours.
Refresh Token Validity Period
Validity period of the refresh token. The default value is 0, indicating that the refresh token is not supported. When the access token of a user expires, the user can use their refresh token to obtain a new access token.
NOTE:The prerequisite for automatic token update is that the validity period of the refresh token is longer than that of the access token.
- (Optional) Mapping configuration On the Authentication Settings page, click the Mappings tab, and click Add Mapping to add an attribute mapping.
Table 2 Mapping parameters Parameter
Description
Application Attribute
Mandatory. User attribute that OneAccess will return to the application after successful authentication.
Mapping Type
Mandatory. The mapping type determines the returned attribute value.
- Authorizing users
In the left pane, choose Authorization > Application Accounts. Then click the button for adding accounts to authorize specific users to access the application. To authorize access using a policy, see the descriptions about the application account authorization policy in Configuring an Application.
For details about how to configure login, access control, and object models, see Configuring an Application.
Establishing a Trust Between the Application and OneAccess
Configure authorization information for OneAccess in the application to establish a trust on OneAccess.
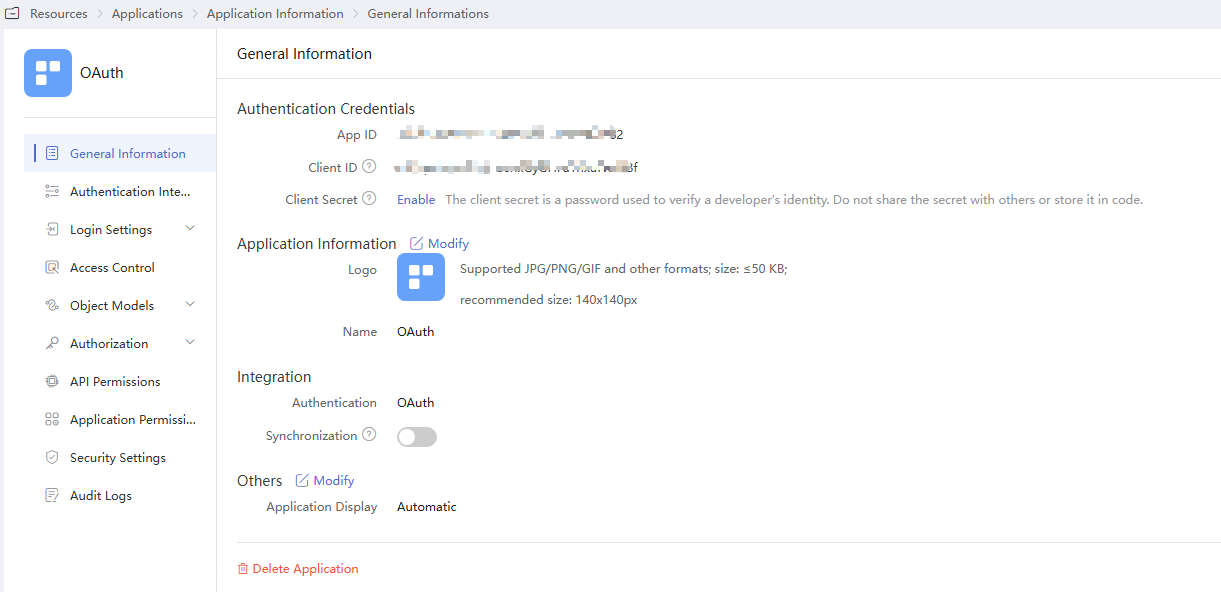
- Obtain the Client ID and ClientSecret of the application in OneAccess.
Click the application added in Adding an Application, click the application icon on the application information page, and obtain the Client ID and ClientSecret.
- Click Enable to generate a client secret.
- Client secret is an important credential used to verify the identity of a developer. Do not provide the client secret to other developers nor store it in code.
- If you reset the client secret, the new client secret takes effect immediately, and all APIs that use the old client secret become invalid. Exercise caution when performing this operation.
- OneAccess does not store the client secret. Keep it properly after obtaining it.
- Obtain the authentication information in OneAccess.
- Log in to the administrator portal.
- In the top navigation pane, choose Settings > Service Settings.
- Click OIDC.
- On the OIDC page, view the authentication address.
- Obtain the authorization information of the application. For details, see the application provider's documentation.
Logging In as a User
Log in to the user portal as one of the authorized users, and click the target application to check whether you can access it.
Feedback
Was this page helpful?
Provide feedbackThank you very much for your feedback. We will continue working to improve the documentation.See the reply and handling status in My Cloud VOC.
For any further questions, feel free to contact us through the chatbot.
Chatbot


