Manual Scheduling
- Log in to the GaussDB management console. On the Instances page, click the name of the target instance to go to the Basic Information page.
- Locate the Advanced Features field and click View and Modify. On the displayed page, set the value of Advanced compression to on. For details, see Viewing and Modifying Advanced Features.
- Connect to the database and run the following command to enable ILM: For details about how to connect to the database, see Using gsql to Connect to an Instance.
alter database set ilm = on;

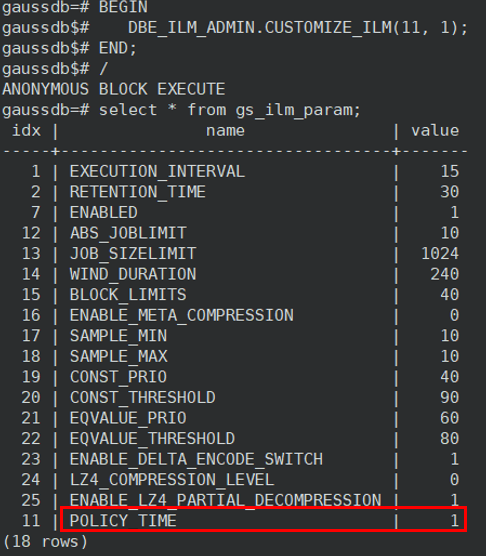
- Change the ILM time unit to seconds.
This step is mainly for accelerating testing. By default, ILM uses days as the time unit. When you run manual compression, the first scheduling only records a timestamp, and the second scheduling performs the actual compression. The interval between the two must exceed the cold data threshold to trigger compression. Using seconds as the time unit shortens this waiting period.
- Change the ILM time unit to seconds.
BEGIN
DBE_ILM_ADMIN.CUSTOMIZE_ILM(11, 1);
END;
/
- Check the modification result.
select * from gs_ilm_param;

- Change the ILM time unit to seconds.
- Adjust the maximum amount of data that can be compressed in a single scheduling task.
In this example, the limit is changed to 4 GB.
BEGIN DBE_ILM_ADMIN.CUSTOMIZE_ILM(13, 4096); END; / - Create a table with an ILM policy.
- Method 1: Add the policy when creating the table.
The clause 3 DAYS OF NO MODIFICATION defines the threshold for identifying cold data.
CREATE TABLE t (
       id1 int,
       id2 int,
       id3 int,
       id4 int)
WITH (orientation=row, compression=no, storage_type=astore)
ILM ADD POLICY ROW STORE COMPRESS ADVANCED
ROW AFTER 3 DAYS OF NO MODIFICATION;
- Method 2: Create the table first, and then add the policy.
CREATE TABLE t (
       id1 int,
       id2 int,
       id3 int,
       id4 int)
WITH (orientation=row, compression=no, storage_type=astore);
ALTER TABLE t ILM ADD POLICY ROW STORE COMPRESS ADVANCED
ROW AFTER 3 DAYS OF NO MODIFICATION;
- Method 1: Add the policy when creating the table.
- Run the following command to insert data into the table:
insert into t (id1, id2 ,id3 , id4) select s, s, s, s from generate_series(1, 1000000) AS s;
- Run the following command to check the original size of table t, and record the result as size1. In this example, size1 = 42 MB.
\d+

- Execute compression.
- Run the following command:
declare v_taskid number; begin dbe_ilm.execute_ilm('public','t',v_taskid,NULL,'ALL POLICIES',2); end; / - Wait for 10 seconds and run the command in 9.a again.
- Check the compression result.
select * from gs_adm_ilmresults order by task_id desc limit 2;
You can view the compression results in the gs_adm_ilmresults table. In this example, 13,664,840 bytes of space were saved.

- Run the following command:
- Verify reusable space. The saved space obtained in 9 may not be fully reusable. To evaluate the real compression ratio, insert the same dataset again and check the space usage of table t.
- Insert data.
insert into t select * from t;
- Check the size of table t, and record the result as size2. In this example, size2 = 71 MB.
\d+

- Insert data.
- Compare the space usage of table t after the first and second data insertions to calculate the compression ratio.
Compression ratio = size1/(size2 – size1) = 42/(71 – 42) = 1.45
Feedback
Was this page helpful?
Provide feedbackThank you very much for your feedback. We will continue working to improve the documentation.See the reply and handling status in My Cloud VOC.
For any further questions, feel free to contact us through the chatbot.
Chatbot


