Repartitioning a Windows System Disk Through Volume Shrink
If you need a new partition but have no more disks available, you can shrink from the end of an existing volume to free up unallocated space and then use the space to create a new volume.

- You can shrink a raw partition or a partition that uses NTFS.
- Shrinking a volume that contains data (such as database files) may damage the data.
- When you shrink a volume, the system automatically moves files to other locations on the disk to free up space. There is no need to reformat the disk to shrink the partition.
Prerequisites
You are advised to back up data before shrinking volumes to prevent any data loss caused by misoperations.
- For details about disk backups, see Cloud Backup and Recovery User Guide.
- For details about disk snapshots, see Creating a Snapshot.
Procedure
The following operations are based on Windows Server 2019.
- Remotely log in to the ECS.
For how to log in to an ECS, see How Do I Log In to My ECS?
- On the Windows Server desktop, right-click
 and choose Disk Management from the shortcut menu.
 - In the Disk Management window, choose Action > Rescan Disks to view disk information.
Figure 1 Rescan Disks

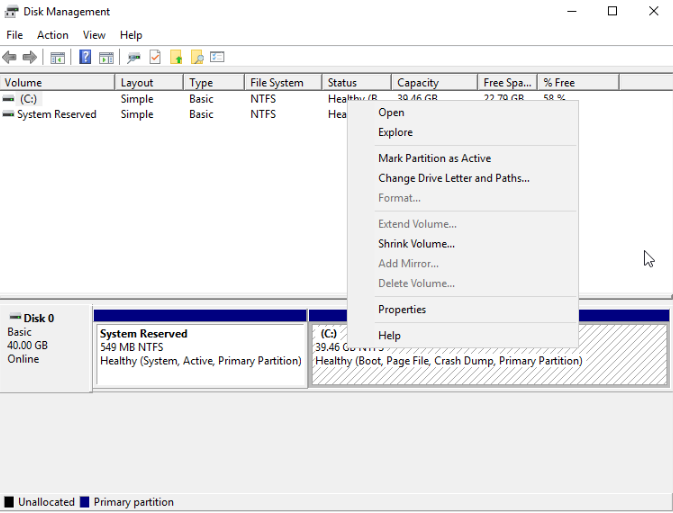
- Right-click the target volume (volume C in this example) and choose Shrink Volume... from the shortcut menu.
Figure 2 Shrink Volume

- On the displayed Shrink C: page, enter the amount of space to shrink and click Shrink.

- Enter the amount of space to shrink in MB indicates the size of the unallocated space after the shrink. Its default value is the same as the value of Size of available shrink space in MB. Change it as required.
- Total size after shrink in MB indicates the remaining size of the volume (volume C in this example) after the shrink.
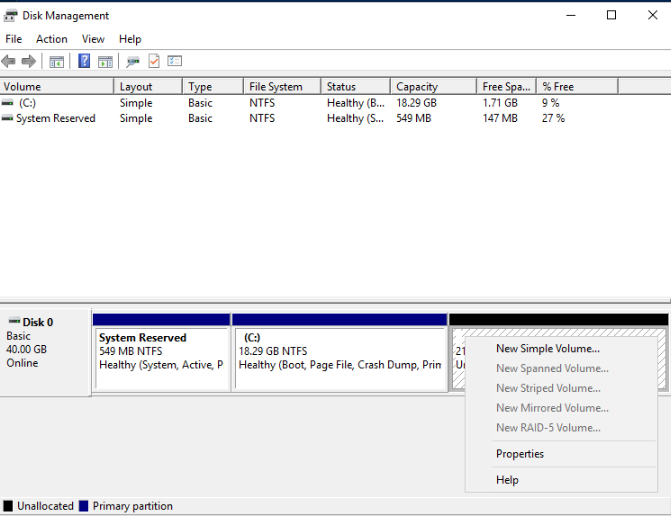
After the shrink is complete, unallocated space is displayed to the right of volume C.
- Right-click the unallocated space and choose New Simple Volume... from the shortcut menu.
Figure 3 New Simple Volume

- Click Next as prompted and retain the default settings until the formatting is complete.
You can now see new volume D.
Figure 4 New Volume
Feedback
Was this page helpful?
Provide feedbackThank you very much for your feedback. We will continue working to improve the documentation.See the reply and handling status in My Cloud VOC.
For any further questions, feel free to contact us through the chatbot.
Chatbot


