Deploying a MySQL InnoDB Cluster on ECSs
Read/write splitting is a common database optimization technology. It separates read operations from write operations by routing them to different database instances. This significantly improves data throughput and database service performance and prevents the service system from being unavailable due to individual faults. You can build an HA database cluster across multiple ECSs and use the proxy service to implement flexible scheduling and read/write splitting.
Background
When setting up a MySQL service cluster, you can use ECSs in multiple AZs to avoid service interruptions caused by node faults in a single AZ. This practice uses four ECSs to set up a MySQL HA database cluster. One ECS functions as the proxy node, one ECS as the primary node (with read and write permissions configured), and two ECSs as the standby nodes (with read-only permissions configured).
Prerequisites
- You have purchased four ECSs (using Huawei Cloud EulerOS 2.0 as an example) within the same VPC. The proxy, primary, and standby nodes belong to three subnets. All the four ECSs already have EIPs bound.
- The primary node and two standby nodes already have the MySQL service of the same version installed. If the MySQL service is not installed, see Deploying a Database > Overview.

Procedure
- Configure the nodes.
- Remotely log in to the primary and standby MySQL nodes. For details, see Login Overview (Linux).
- Create a MySQL user for each MySQL node for cluster communication. The usernames and passwords must be the same for three nodes.
You are advised to set a strong password that contains more than eight characters, including uppercase letters, lowercase letters, digits, and special characters.
# Enter the password of user root.
sudo mysql -uroot -p \
-e "CREATE USER '<username>'@'%' IDENTIFIED BY '<password>';" \
-e "GRANT ALL PRIVILEGES ON *.* TO '<username>'@'%' WITH GRANT OPTION;" \
-e "FLUSH PRIVILEGES;"
- Add the content below to the MySQL configuration file /etc/my.cnf on each MySQL node. The value of server_id must be unique for each node.
# Set the hostname to the IP address of each node.
report_host=192.168.x.x
# Set enforce_gtid_consistency to ON to guarantee consistency across nodes.
enforce_gtid_consistency=ON
gtid_mode=ON
# Set the service ID of each node. The value must be a unique positive integer.
server_id=1
# Set the maximum number of connections on each node. Ensure that the value set for each node is the same.
max_connections=1024
# Disable storage engines other than InnoDB.
disabled_storage_engines="MyISAM,BLACKHOLE,FEDERATED,ARCHIVE,MEMORY"
- Restart the MySQL service on the three MySQL nodes the configuration.
sudo systemctl restart mysqld
- Create a cluster.
- Remotely log in to the proxy node. For details, see Login Overview (Linux).
- Install mysql-shell and mysql-router on the proxy node.
# Add the official MySQL source.
sudo rpm -Uvh https://repo.mysql.com/mysql84-community-release-el8-1.noarch.rpm
# Install mysql-shell and mysql-router.
sudo dnf install -y mysql-shell mysql-router mysql-community-client
- Connect to the primary MySQL node using MySQL Shell. In the following command, replace username with the MySQL username and IP with the IP address of the primary node. After executing the command, enter the password and save it as prompted.
mysqlsh --js <username>@<IP>:3306

- Initialize MySQL nodes. In the following command, replace <username> and <IP> with the MySQL username and IP address of the node to be initialized, respectively. Perform this step for each MySQL node.
dba.configureInstance('<username>@<IP>:3306')
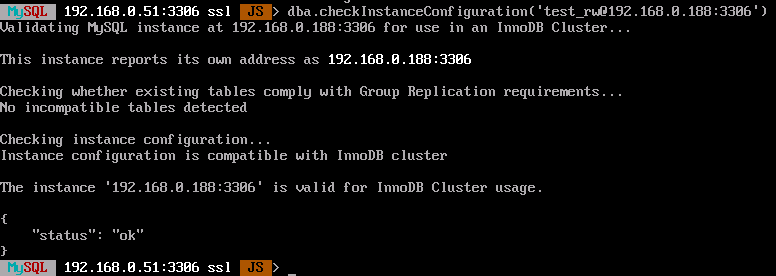
- Check whether each node can be added to the cluster. In the following command, replace <username> and <IP> with the MySQL username and IP address of the node, respectively.
dba.checkInstanceConfiguration('<username>@<IP>:3306')If the node can be added to the cluster, the information similar to the following (status is ok) is displayed.
- Create a cluster. In the following command, replace cluster_name with a custom cluster name.
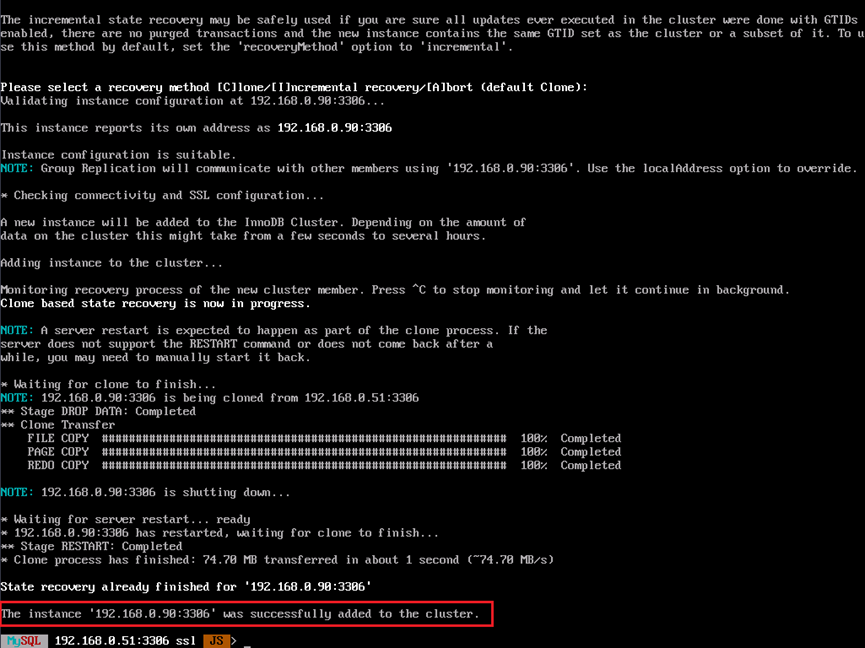
var cluster = dba.createCluster('<cluster_name>') - Add standby nodes to the cluster. In the following command, replace username with the MySQL username and IP with the IP address of the standby node. Perform this step for each standby node. The default value of recovery method is Clone.
cluster.addInstance('<username>@<IP>:3306')If the following information is displayed, the standby nodes are added successfully.
- Check the cluster status.
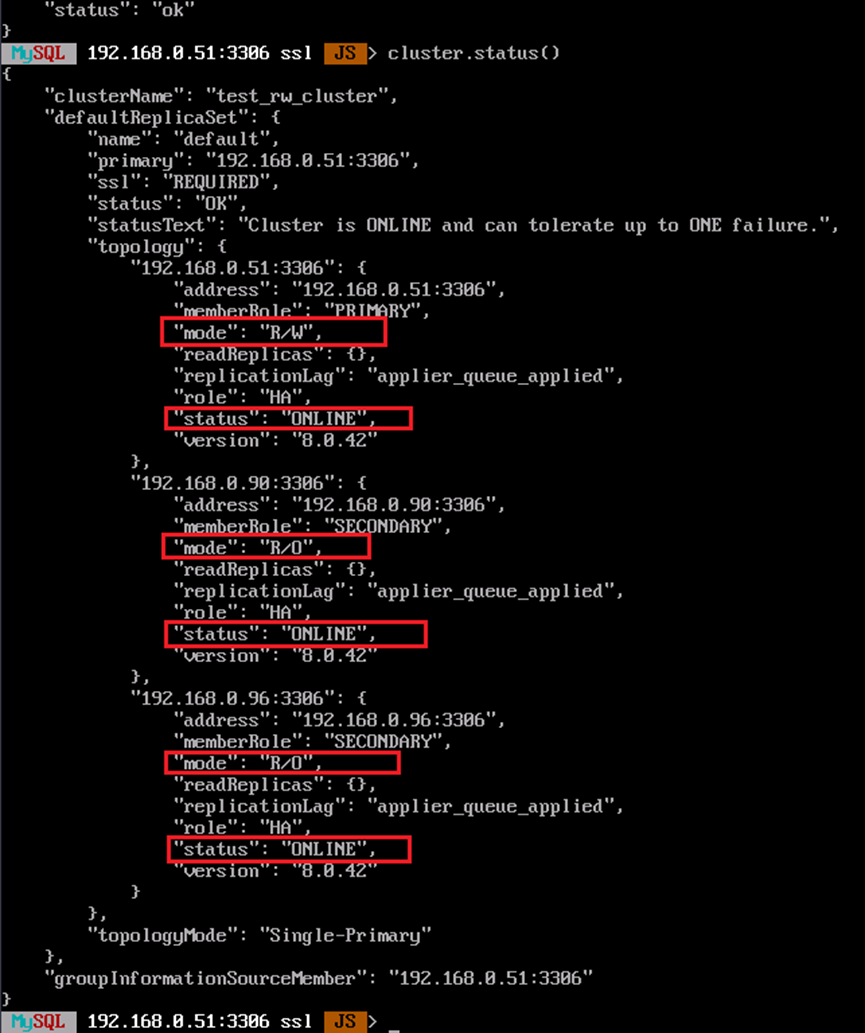
cluster.status()
If the following information is displayed, the cluster has been created.
- After the configuration is complete, enter \q to exit mysqlsh.

- Configure the proxy node.
- Remotely log in to the proxy node. For details, see Login Overview (Linux).
- Initialize proxy settings. In the following command, replace username with the MySQL username and IP with the IP address of the primary node. After executing commands, enter the password as prompted.
sudo mysqlrouter --bootstrap <username>@<IP>:3306 --directory /mnt/mysqlrouter \
--conf-bind-address 0.0.0.0 --user=mysqlrouter

- Edit the mysqlrouter service file.
The default directory is /mnt/mysqlrouter. If the directory is changed, you need to change the paths of ExecStart and ExecStop accordingly.
sudo tee /usr/lib/systemd/system/mysqlrouter.service <<-'EOF'
[Unit]
Description=MySQL Router Service
After=network.target

[Service]
User=mysqlrouter
Group=mysqlrouter
Type=forking
ExecStart=/mnt/mysqlrouter/start.sh
ExecStop=/mnt/mysqlrouter/stop.sh
Restart=on-failure
StandardOutput=journal

[Install]
WantedBy=multi-user.target
EOF
- Start the service.
# Refresh the service file.
sudo systemctl daemon-reload
# Start mysqlrouter.
sudo systemctl start mysqlrouter.service
# Set mysqlrouter to automatically start upon system startup.
sudo systemctl enable mysqlrouter.service
# Check the service status.
sudo systemctl status mysqlrouter.service
- (Optional) Verify whether the cluster is available.
Simulate a fault on the primary MySQL node to check whether the cluster can automatically switch services to another node.
- Remotely log in to the proxy node. For details, see Login Overview (Linux).
- Use the MySQL client to connect to the proxy node. In the following command, replace <username> with the MySQL username. After executing the command, enter the MySQL password.
mysql -h127.0.0.1 -P6450 -u<username> -p
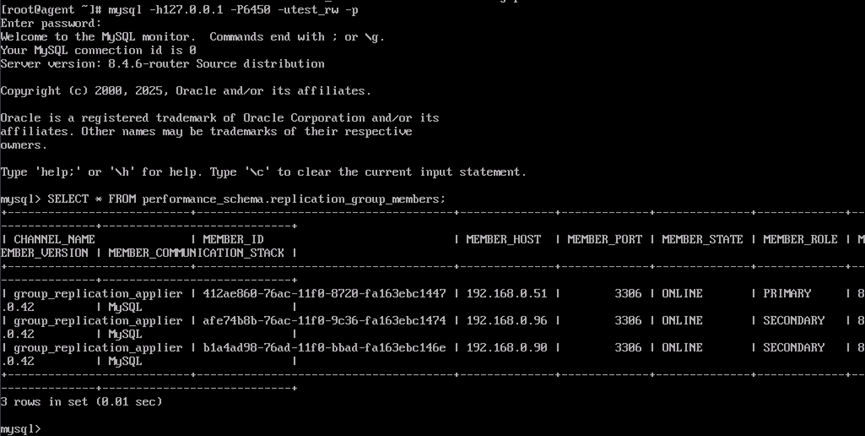
- Run the SQL statement to check the cluster status. The result shows that three nodes are online, one of which is the primary node.
SELECT * FROM performance_schema.replication_group_members;
- Run SQL statements to add a test database and test table.
-- 1. Create a database.
CREATE DATABASE test_db;

-- 2. Use the database.
USE test_db;

-- 3. Create the test_table table.
CREATE TABLE test_table (
    id INT AUTO_INCREMENT PRIMARY KEY, -- Auto-increment primary key
    name VARCHAR(100) NOT NULL,        -- Name
    age INT NOT NULL
);

-- 4. Add records to test_table.
INSERT INTO test_table (name, age) VALUES
('A', 5),
('B', 25);

-- 5. (Optional) View the information added to test_table.
select * from test_table;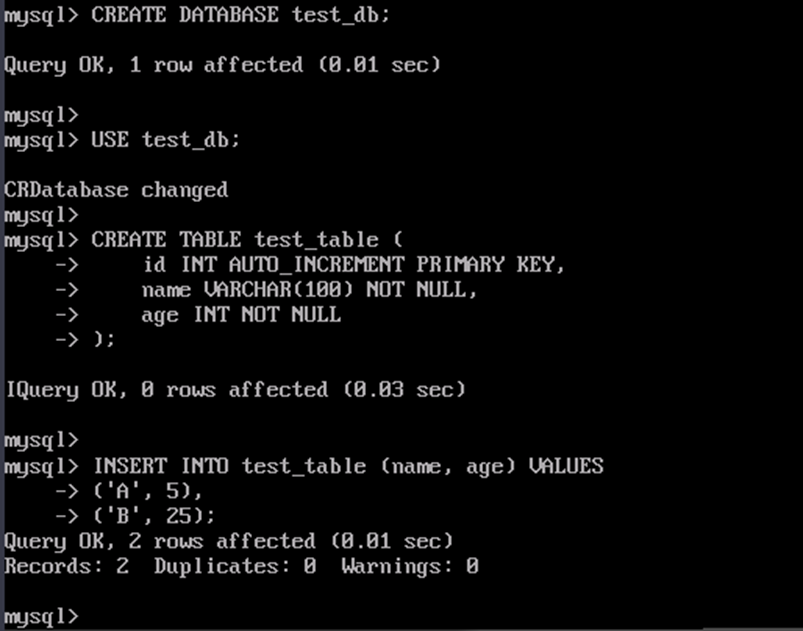
- Stop the primary MySQL node to simulate a breakdown.
- After the primary MySQL node is stopped, run the SQL statement again to check the cluster status. There are two nodes online, and the standby node has been automatically switched to the primary node.
SELECT * FROM performance_schema.replication_group_members;

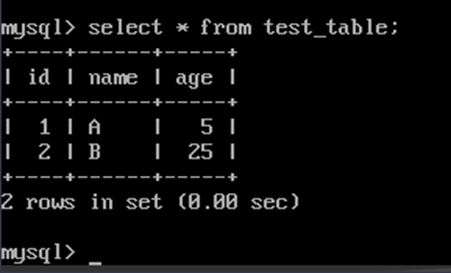
- Run the SQL statement to check whether any data is lost:
select * from test_table;
- Start the primary MySQL node.
- Run the SQL statement to check the cluster status. The result shows that three nodes are online and the primary node is automatically added to the cluster.
SELECT * FROM performance_schema.replication_group_members;

- (Optional) Add nodes to the cluster.
In a MySQL cluster, if you need to expand the cluster or handle node breakdown, you can connect to the cluster using mysql-shell and run the addInstance command to add nodes. Data will be automatically synchronized to the new nodes.

- If more than half of the cluster nodes break down, the cluster will be unavailable. You are advised to set the total number of nodes to an odd number to ensure availability.
- Before adding nodes to the cluster, repeat sub-steps 2 to 4 in step 1 to configure them.
- Remotely log in to the proxy node. For details, see Login Overview (Linux).
- Use mysql-shell to connect to any node in the cluster and use the MySQL client to connect to the proxy node. In the following command, replace <username> with the MySQL username and <IP> with the node IP address. After executing the command, enter the MySQL password.
mysqlsh --js <username>@<IP>:3306

- Obtain the cluster.
var cluster = dba.getCluster()
- Add a node to the cluster. In the following command, replace <username> with the MySQL username and <IP> with the node IP address.
cluster = dba.addInstance('<username>@<IP>:3306')Run the following command to check the cluster status. You can view the status of the new node.
cluster.status()
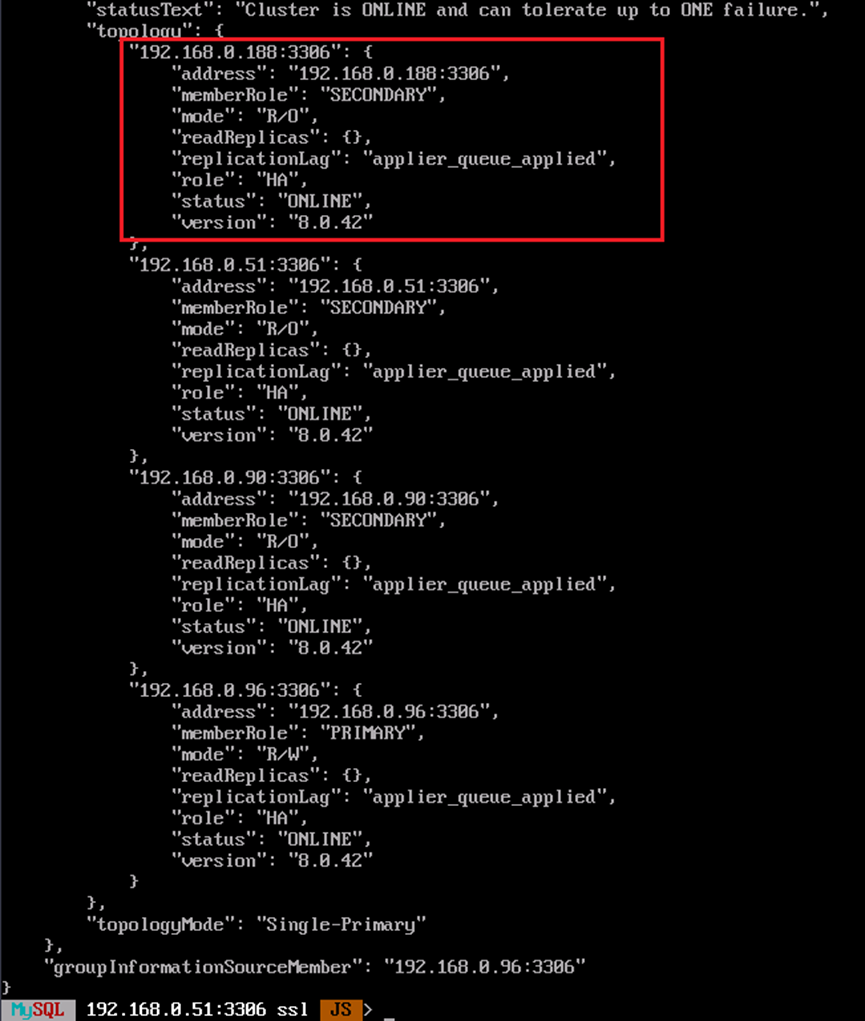

You can remove a node from the cluster. In the following command, replace <username> and <IP> with the information about the node to be removed.
cluster.removeInstance('<username>@<IP>:3306')Information similar to the following is displayed:

- (Optional) Specify the primary node of the cluster.
If the primary node in a MySQL cluster fails, the system automatically elects a new primary node from the remaining standby nodes. If you need to manually specify the primary node, connect to the cluster using mysql-shell and run the setPrimaryInstance command to set the primary node.
- Remotely log in to the proxy node. For details, see Login Overview (Linux).
- Use mysql-shell to connect to any node in the cluster and use the MySQL client to connect to the proxy node. In the following command, replace <username> with the MySQL username and <IP> with the node IP address. After executing the command, enter the MySQL password.
mysqlsh --js <username>@<IP>:3306

- Obtain the cluster.
var cluster = dba.getCluster()
- Set the primary node for the cluster. In the following command, replace <username> with the MySQL username and <IP> with the node IP address.
cluster.setPrimaryInstance ('<username>@<IP>:3306')The configuration is successful if information similar to the following is displayed:

Feedback
Was this page helpful?
Provide feedbackThank you very much for your feedback. We will continue working to improve the documentation.See the reply and handling status in My Cloud VOC.
For any further questions, feel free to contact us through the chatbot.
Chatbot


