Migrating Data from MRS Kafka to DLI
This section describes how to use the CDM data synchronization function to migrate data from MRS Kafka to DLI.
Prerequisites
- You have created a DLI SQL queue. For details about how to create a DLI queue, see Creating a Queue.

When you create a queue, set its Type to For SQL.
- You have created an MRS security cluster that contains the Kafka component. For details about how to create an MRS cluster, see Purchasing a Custom Cluster.
- In this example, the version of the MRS cluster is 3.1.0.
- You have enabled Kerberos authentication for the MRS cluster.
- You have created a CDM cluster. For details about how to create a cluster, see Creating a CDM Cluster.

- If the destination data source is an on-premises database, you need the Internet or Direct Connect. When using the Internet, ensure that an EIP has been bound to the CDM cluster, the security group of CDM allows outbound traffic from the host where the off-cloud data source is located, the host where the data source is located can access the Internet, and the connection port has been enabled in the firewall rules.
- If the data source is MRS or GaussDB(DWS), the network must meet the following requirements:
i. If the CDM cluster and the cloud service are in different regions, a public network or a dedicated connection is required for enabling communication between the CDM cluster and the cloud service. If the Internet is used for communication, ensure that an EIP has been bound to the CDM cluster, the host where the data source is located can access the Internet, and the port has been enabled in the firewall rules.
ii. If the CDM cluster and the cloud service are in the same region, VPC, subnet, and security group, they can communicate with each other by default. If the CDM cluster and the cloud service are in the same VPC but in different subnets or security groups, you must configure routing rules and security group rules.
For details about how to configure routes, see Configure routes. For details about how to configure security groups, see section Security Group Configuration Examples.
iii. The cloud service instance and the CDM cluster belong to the same enterprise project. If they do not, you can modify the enterprise project of the workspace.
In this example, the VPC, subnet, and security group of the CDM cluster are the same as those of the MRS cluster.
Step 1: Prepare Data
- Create a Kafka topic for the MRS cluster and send messages to the topic.
- Log in to MRS Manager by referring to Accessing FusionInsight Manager.
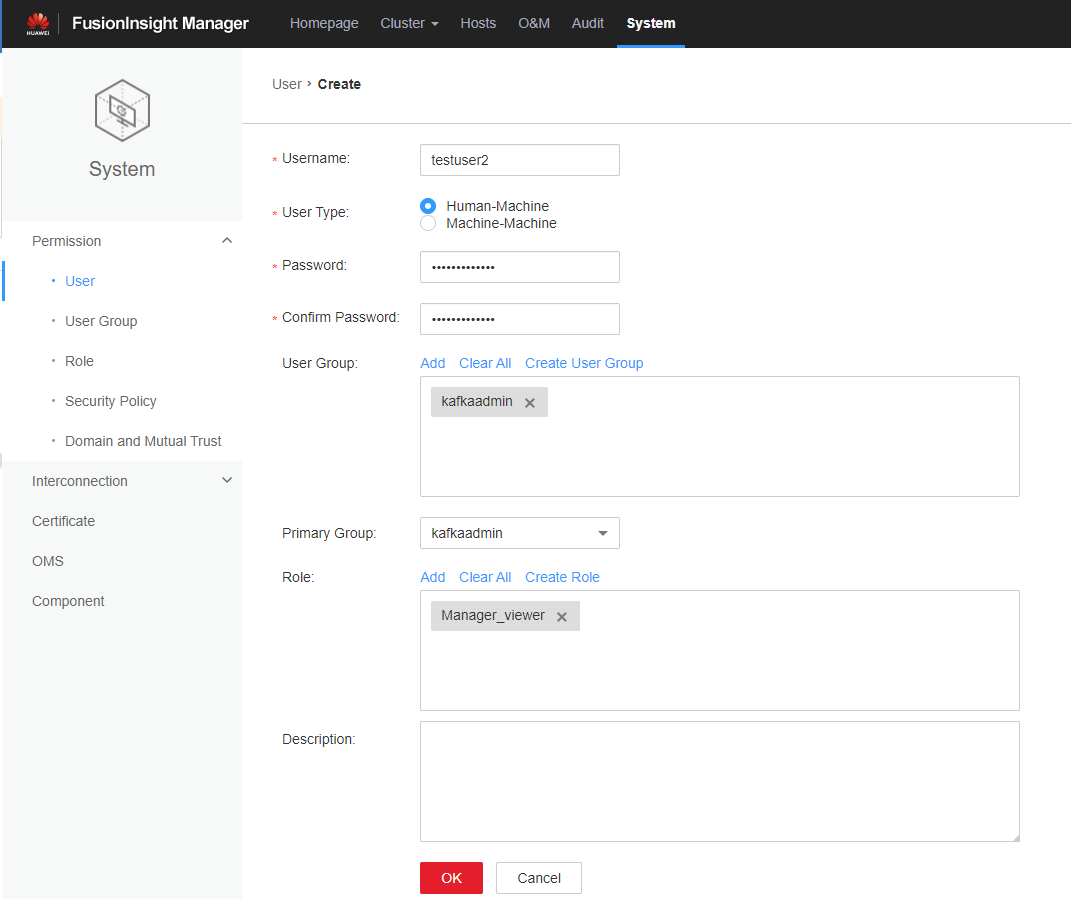
- On MRS Manager, click System in the top navigation pane. On the page displayed, choose Permission > User from the left navigation pane. On the displayed page, configure the following parameters:
- Username: Enter a username. In this example, enter testuser2.
- User Type: Select Human-Machine.
- Password and Confirm Password: Enter the password of the current user and enter it again.
- User Group and Primary Group: Select kafkaadmin.
- Role: Select Manager_viewer.
Figure 1 Creating a Kafka user
- On the MRS Manager console, choose Cluster > Name of the desired cluster > Service > ZooKeeper > Instance. On the displayed page, obtain the IP address of the ZooKeeper instance.
- On the MRS Manager console, choose Cluster > Name of the desired cluster > Service > Kafka > Instance. On the displayed page, obtain the IP address of the Kafka instance.
- Download and install the Kafka client by referring to Installing an MRS Client. For example, the Kafka client is installed in the /opt/kafkaclient directory on the active MRS node.
- Go to the client installation directory as user root.
Example command: cd /opt/kafkaclient
- Run the following command to set environment variables:
- Run the following command to authenticate the user created in 2 since Kerberos authentication has been enabled for the cluster:
kinit <Username in 2>
Example command: kinit testuser2
- Run the following command to create a Kafka topic named kafkatopic:
kafka-topics.sh --create --zookeeper IP address 1 of the node where the ZooKeeper role is:2181,IP address 2 of the node where the ZooKeeper role is:2181,IP address 3 of the node where the ZooKeeper role is:2181/kafka --replication-factor 1 --partitions 1 --topic kafkatopic
In this command, IP address of the node where the ZooKeeper role is deployed is that of the ZooKeeper instance obtained in 3.
- Run the following command to send a test message to kafkatopic:
kafka-console-producer.sh --broker-list IP address 1 of the node where the Kafka role is::21007;IP address 2 of the node where the Kafka role is::21007;IP address 3 of the node where the Kafka role is::21007 --topic kafkatopic --producer.config /opt/kafkaclient/Kafka/kafka/config/producer.properties
In this command, IP address of the node where the Kafka role is deployed in that of the Kafka instance obtained in 4.
The content of the test message is as follows:{"PageViews":5, "UserID":"4324182021466249494", "Duration":146,"Sign":-1}
- Create a database and table on DLI.
- Log in to the DLI management console and click SQL Editor. On the displayed page, set Engine to spark and Queue to the created SQL queue.
Enter the following statement in the editing window to create a database. The following example creates the migrated DLI database testdb. For details about the syntax for creating a DLI database, see Creating a Database.
create database testdb;
- Create a table in the database. For details about the table creation syntax, see Creating a DLI Table Using the DataSource Syntax.
CREATE TABLE testdlitable(value STRING);
- Log in to the DLI management console and click SQL Editor. On the displayed page, set Engine to spark and Queue to the created SQL queue.
Step 2: Migrate Data
- Create a CDM connection to MRS Kafka.
- Create a connection to link CDM to the data source MRS Kafka.
- Log in to the CDM console, choose Cluster Management. On the displayed page, locate the created CDM cluster, and click Job Management in the Operation column.
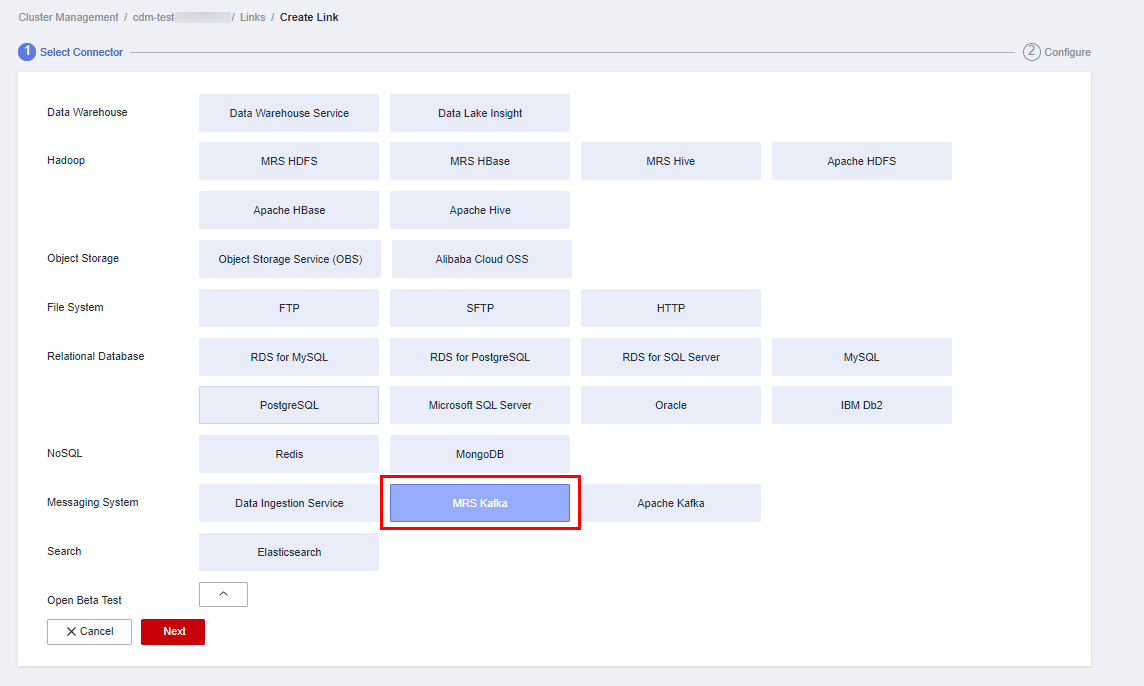
- On the Job Management page, click the Links tab and click Create Link. On the displayed page, select MRS Kafka and click Next.
Figure 2 Selecting the MRS Kafka connector
- Configure the connection. The following table describes the required parameters.
Table 1 MRS Kafka connection configurations Parameter
Value
Name
Name of the MRS Kafka data source, for example, source_kafka.
Manager IP
Manager IP address of the cluster. The value is automatically specified after you click Select next to the text box and select the MRS Kafka cluster.
Username
Name of the MRS Kafka user created in 2.
Password
Password of the MRS Kafka user.
Authentication Method
KERBEROS if Kerberos authentication is enabled for the MRS cluster; SIMPLE if the MRS cluster is a common cluster
In this example, set this parameter to KERBEROS.
For more details about the parameters, see Link to Kafka.Figure 3 Configuring the MRS Kafka connection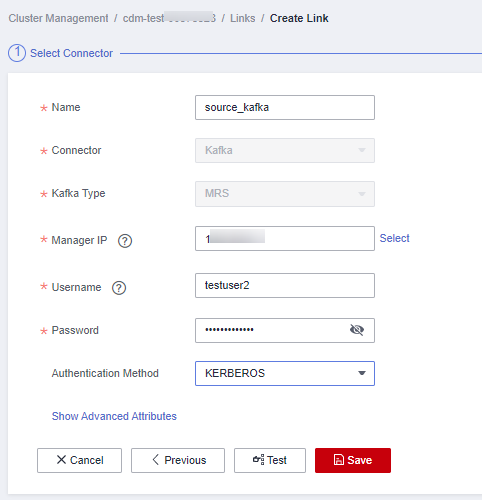
- Click Save to complete the configuration.
- Create a connection to link CDM to DLI.
- Log in to the CDM console, choose Cluster Management. On the displayed page, locate the created CDM cluster, and click Job Management in the Operation column.
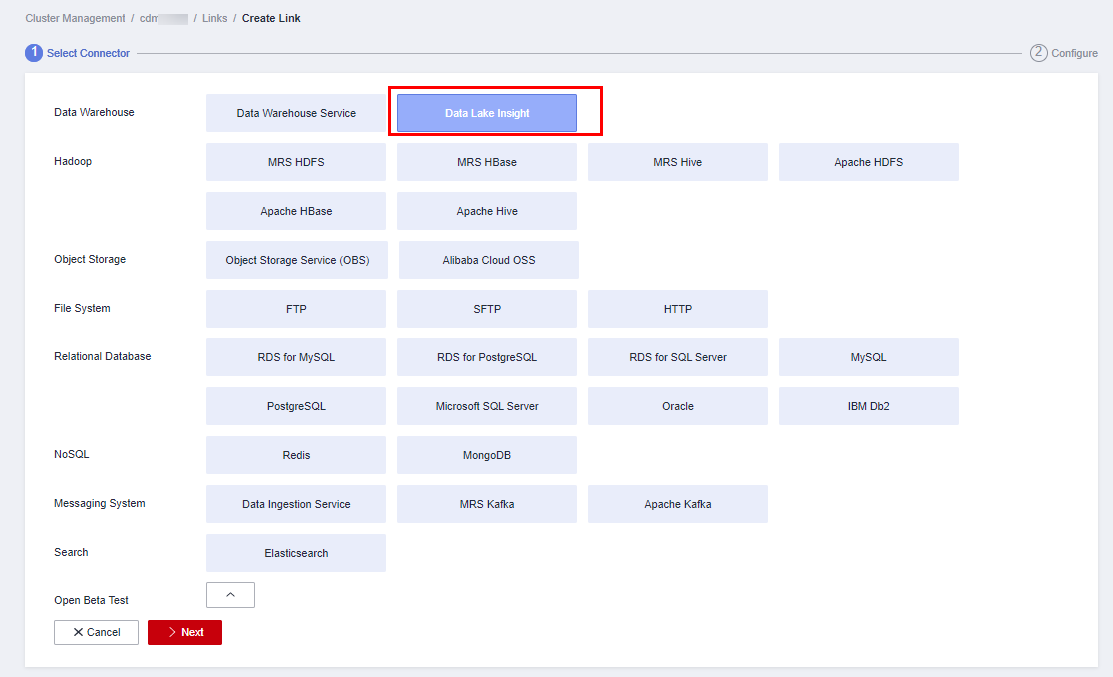
- On the Job Management page, click the Links tab, and click Create Link. On the displayed page, select Data Lake Insight and click Next.
Figure 4 Selecting the DLI connector
- Configure the connection parameters. For details about parameter settings, see Link to DLI.
Figure 5 Configuring connection parameters
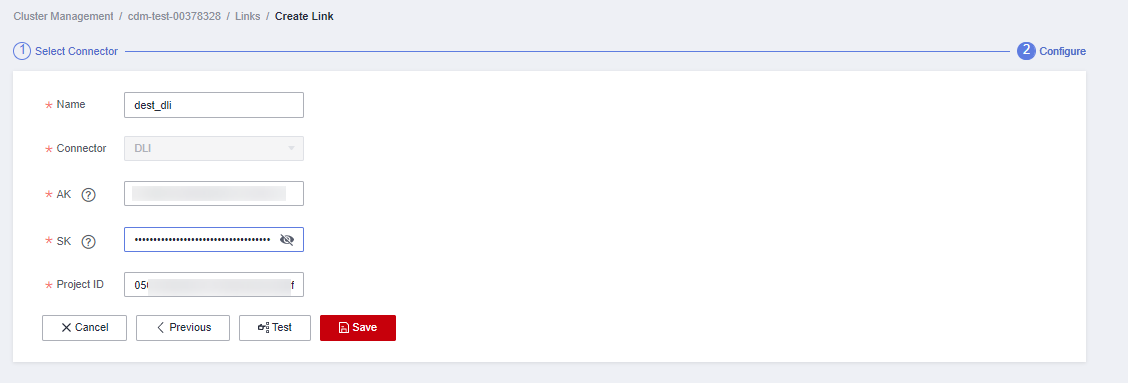
- After the configuration is complete, click Save.
- Create a connection to link CDM to the data source MRS Kafka.
- Create a CDM migration job.
- Log in to the CDM console, choose Cluster Management. On the displayed page, locate the created CDM cluster and click Job Management in the Operation column.
- On the Job Management page, choose the Table/File Migration tab and click Create Job.
- On the Create Job page, specify job information.
Figure 6 Configuring the CDM job
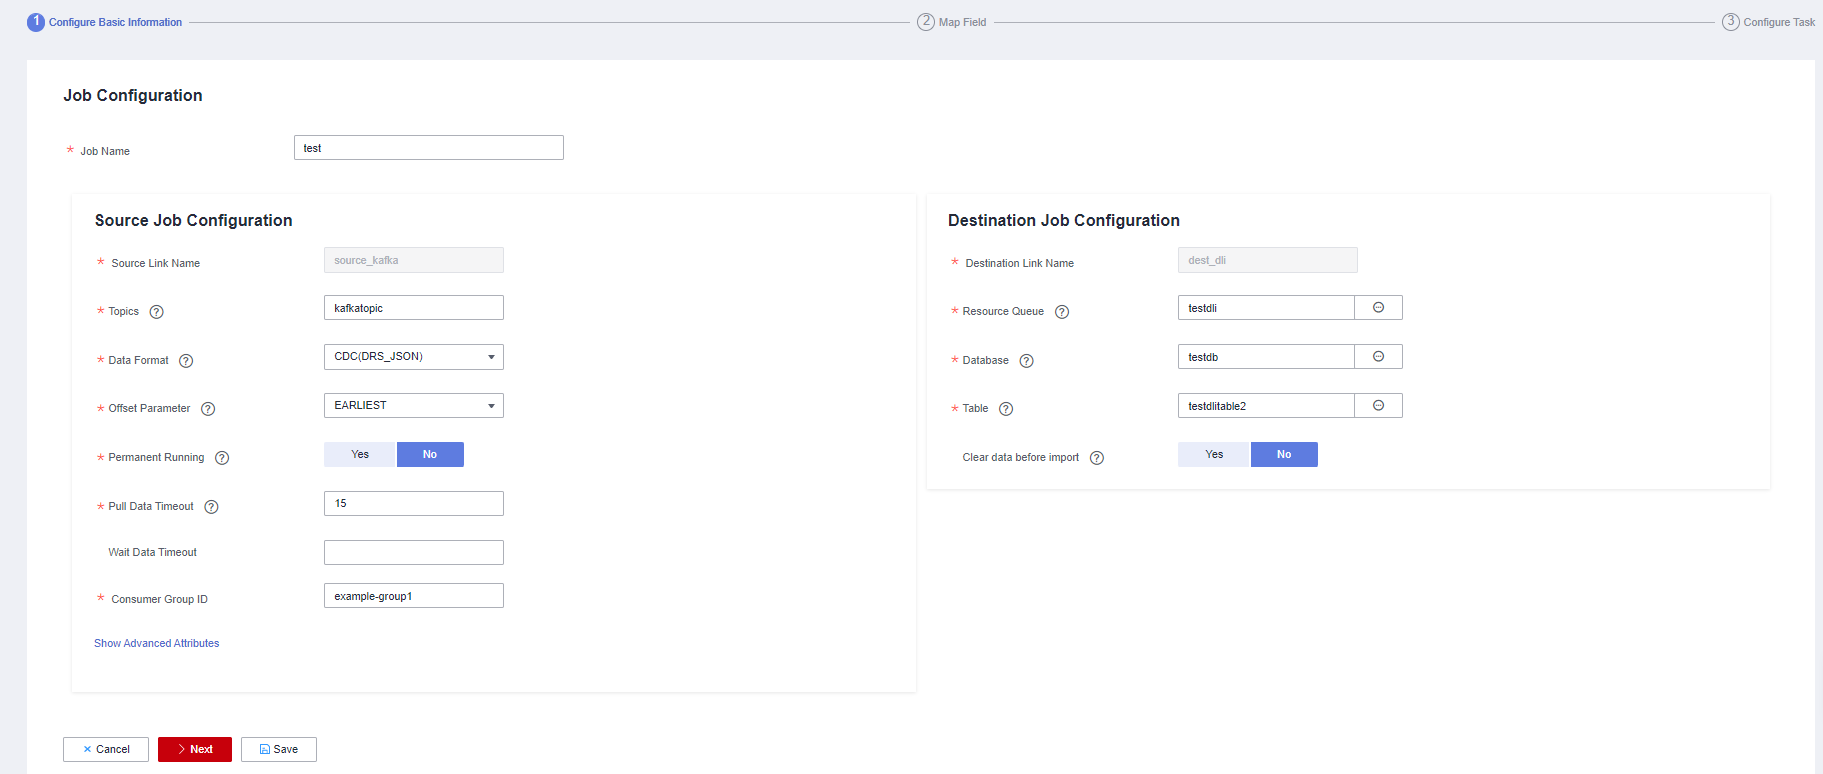
- Job Name: Name of the data migration job, for example, test
- Set parameters required for Source Job Configuration.
Table 2 Source job configuration parameters Parameter
Value
Source Link Name
Select the name of the data source created in 1.a.
Topics
Name of the topics you want to migrate to DLI. You can select one or more topics. Example: kafkatopic.
Data Format
Select the message format as needed. In this example, CDC (DRS_JSON) is selected, indicating that the source data will be parsed in DRS_JSON format.
Offset Parameter
Initial offset when data is pulled from Kafka. In this example, select EARLIEST. Available values are as follows:
- Latest: Maximum offset, indicating that the latest data will be extracted
- Earliest: Minimum offset, indicating that the earliest data will be extracted
- Submitted: Data that has been submitted
- Time Range: Data within a specified time range
Permanent Running
Whether a job runs permanently. In this example, set this parameter to No.
Pull Data Timeout
Maximum minutes allowed for a continuous data pulling. In this example, set this parameter to 15.
Wait Data Timeout
(Optional) Maximum seconds allowed for waiting data reading. In this example, leave this parameter empty.
Consumer Group ID
Consumer group ID. The default Kafka message group ID example-group1 is used.
For details about parameter settings, see From Apache Kafka.
- Set parameters required for Destination Job Configuration.
Table 3 Destination job configuration parameters Parameter
Value
Destination Link Name
Select the DLI data source connection created in 1.b.
Resource Queue
Select a created DLI SQL queue.
Database
Select a created DLI database. In this example, database testdb created in Create a database and table on DLI is selected.
Table
Select the name of a table in the database. In this example, table testdlitable created in Create a database and table on DLI is selected.
Clear data before import
Whether to clear data in the destination table before data import. In this example, set this parameter to No.
If this parameter is set to Yes, data in the destination table will be cleared before the task is started.
For details about parameter settings, see To DLI.
- Click Next. The Map Field page is displayed. CDM automatically matches the source and destination fields.
- If the field mapping is incorrect, you can drag the fields to adjust the mapping.
- If the type is automatically created at the migration destination, you need to configure the type and name of each field.
- CDM allows for field conversion during migration. For details, see Field Conversion.
Figure 7 Field mapping
- Click Next and set task parameters. Generally, retain the default values of all parameters.
In this step, you can configure the following optional functions:
- Retry Upon Failure: If the job fails to be executed, you can determine whether to automatically retry. Retain the default value Never.
- Group: Select the group to which the job belongs. The default group is DEFAULT. On the Job Management page, jobs can be displayed, started, or exported by group.
- Scheduled Execution: For details about how to configure scheduled execution, see Scheduling Job Execution. Retain the default value No.
- Concurrent Extractors: Enter the number of extractors to be concurrently executed. Retain the default value 1.
- Write Dirty Data: Specify this parameter if data that fails to be processed or filtered out during job execution needs to be written to OBS. Before writing dirty data, create an OBS link. You can view the data on OBS later. In this example, retain the default value No so that dirty data is not recorded.
- Click Save and Run. On the Job Management page, you can view the job execution progress and result.
Figure 8 Job progress and execution result

Step 3: Query Results
select * from testdlitable;
Feedback
Was this page helpful?
Provide feedbackThank you very much for your feedback. We will continue working to improve the documentation.See the reply and handling status in My Cloud VOC.
For any further questions, feel free to contact us through the chatbot.
Chatbot


