Using CSMS to Automatically Rotate Security Passwords
This section describes how to use FunctionGraph and CSMS to periodically generate and rotate strong security passwords, thereby ensuring security compliance. You need to use a timer trigger, generate and store a new password, and use an API to obtain the latest secret and update the password of the target object. You will also learn about how to create an agency and configure the password rotation function, including parameter settings, environment variable settings, and code examples. In addition, this section demonstrates how to debug a function, create a trigger, and view secrets and their values.
Process

The process is as follows:
- When a timer expires, a scheduled triggering event is published.
- After receiving the event, FunctionGraph replaces the placeholder in the secret template with a new random password, and stores the password in the secret, which is considered as a new version of the secret.
- Applications periodically call APIs or SDKs to obtain the latest secret version.
- CSMS retrieves and decrypts the secret ciphertext and securely returns the information stored in the secret to the application through the secret management API.
- After receiving the decrypted secret, applications use the new password for future access by using it to update the target object (such as the database or server).
Constraints
- CSMS is available in the region.
- FunctionGraph is available in the region.
Creating an Agency
- Log in to the management console.
- Click
 on the left and choose to access the Users page.
 - In the navigation pane on the left, choose Agencies.
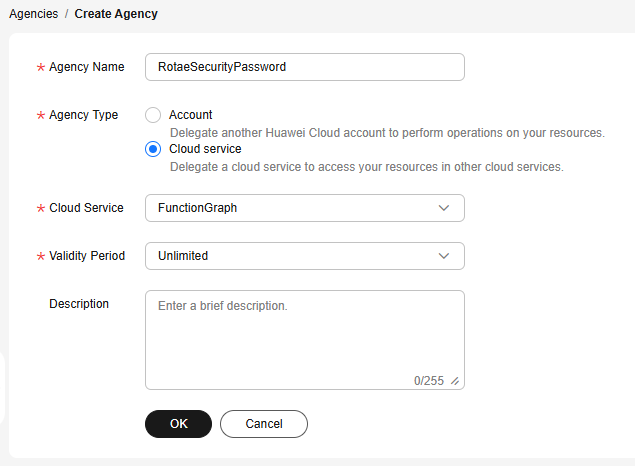
- Click Create Agency and configure the parameters as shown in Figure 2. Table 1 describes the parameters.
Table 1 Agency parameters Parameter
Description
Agency Name
Set this parameter as required.
Agency Type
Select Cloud service.
Cloud Service
Choose FunctionGraph.
Validity Period
Set this parameter based on the application scenario of the function. If the function needs to be executed for a long time, choose Unlimited.
Description
Set this parameter as needed.
- Click OK. In the displayed dialog box, click Authorize.
- Select CSMS FullAccess and KMS CMKFullAccess.
Figure 3 Selecting permissions

- Click Next and select a scope based on your service requirements.
Figure 4 Selecting a scope

- Click OK.
Creating a Password Rotation Function
- Log in to the management console.
- Click
 on the left and choose .
 - Click Create Function in the upper right corner and configure the parameters as shown in Figure 5. Table 2 describes the parameters.
Table 2 Basic parameters Parameter
Description
Region
Select the region where the function is deployed.
Project
Select the project where the function is deployed.
Function Name
Enter a custom function name.
Agency
Enter the name set in Creating an Agency.
Enterprise Project
If you have enabled enterprise projects, select one for you to add a function to it.
If you have not enabled enterprise projects, this parameter will not be displayed. Skip this step. For details about how to enable an enterprise project, see Enabling Enterprise Center.
Runtime
Select a language for writing the function. Currently, Python is supported.
NOTE:Only Python 3.6, 3.9, and 3.10 are supported.
- Click Create Function.
- Choose the Configuration tab. In the navigation pane on the left, choose Environment Variables. Click Add and add environment variables in the variable configuration row. Table 2 describes the parameters. Then, click Save.
Table 3 Environment variables Parameter
Description
Example
region
Project name which is based on the region, for example, if the region is CN North-Beijing4, the project name should be cn-north-4. To obtain your region, click your username in the upper right corner of the page, and choose My Credentials from the drop-down list.
cn-north-4
secret_name
Name of the secret to be rotated
NOTE:A secret must have been created.
rds-functionGraph-rotate
secret_content
Secret template which is specified using braces ({}), for example, the secret template is {"password":"password_placeholder"}. In this case, password_placeholder is the placeholder, which will be replaced by a secure password after the function is executed. The new content will be saved in the secret after the replacement.
NOTE:If multiple placeholders exist in a template, more than one password will be generated and replaced in sequence.
{"password":"password_placeholder"}
password_length
Password length. The value ranges from 8 to 128. The default value is 16.
16
password_format
Password format. The default value is 2. Possible values are as follows:
1. Digits and letters
2. Digits, letters, and special characters (~!@#%^*-_=+?)
3. Only digits
4. Only letters
2
- Choose the Code tab, add the following password rotation function to the editing window, and click Deploy.
# -*- coding:utf-8 -*-
import json
import secrets
import string
import requests
import inspect

def handler (event, context):
    global secret_content
    global password_length
    global password_format
    global kms_endpoint
    global region
    global secret_name
    global headers
    region = context.getUserData('region')
    secret_name = context.getUserData('secret_name')
    password_length = 16 if context.getUserData('password_length') is None else int(context.getUserData('password_length'))
    password_format = 2 if context.getUserData('password_format') is None else int(context.getUserData('password_format'))
    secret_content = context.getUserData('secret_content')
    headers = {
        'Content-Type': 'application/json',
        'x-Auth-Token': context.getToken()
    }
    try:
        new_content = replace_old_content(secret_content)
        # check region, if pass, return kms endpoint
        kms_endpoint = check_region(region)
        return update(context, new_content)
    except Exception as e:
        print("ERROR: %s" % e)
        return 'FAILED'

# replace "password_placeholder" in secret_content by new password
def replace_old_content(content):
    while content.find("password_placeholder") != -1:
        password = generate_password()
        while password.find("password_placeholder") != -1:
            password = generate_password()
        content = content.replace("password_placeholder", password, 1)
    return content

def generate_password():
    special_chars = "~!@#%^*-_=+?"
    # password format(default is 2):
    # 1.support letters and digits; 2.support letters, digits and special chars(~!@#%^*-_=+?);
    # 3.only support digits; 4.only support letters
    format_mapping = {
        1: string.ascii_letters + string.digits,
        2: string.ascii_letters + string.digits + special_chars,
        3: string.digits,
        4: string.ascii_letters
    }
    if password_length < 8 or password_length > 128:
        raise Exception("invalid password_length: %s, the password length range must be between 8-128." % password_length)
    try:
        support_chars = format_mapping[password_format]
        password = ''.join([secrets.choice(support_chars) for _ in range(password_length)])
        return password
    except:
        raise Exception("invalid password_format: %s." % password_format)

def check_region(region):
    endpoint_mapping = {
        'cn-north-1': 'cn-north-1.myhuaweicloud.com',
        'cn-north-2': 'cn-north-2.myhuaweicloud.com',
        'cn-north-4': 'cn-north-4.myhuaweicloud.com',
        'cn-north-7': 'cn-north-7.myhuaweicloud.com',
        'cn-north-9': 'cn-north-9.myhuaweicloud.com',
        'cn-east-2': 'cn-east-2.myhuaweicloud.com',
        'cn-east-3': 'cn-east-3.myhuaweicloud.com',
        'cn-south-1': 'cn-south-1.myhuaweicloud.com',
        'cn-south-2': 'cn-south-2.myhuaweicloud.com',
        'cn-southwest-2': 'cn-southwest-2.myhuaweicloud.com',
        'ap-southeast-1': 'ap-southeast-1.myhuaweicloud.com',
        'ap-southeast-2': 'ap-southeast-2.myhuaweicloud.com',
        'ap-southeast-3': 'ap-southeast-3.myhuaweicloud.com',
        'af-south-1': 'af-south-1.myhuaweicloud.com',
        'la-north-2': 'la-north-2.myhuaweicloud.com',
        'la-south-2': 'la-south-2.myhuaweicloud.com',
        'na-mexico-1': 'na-mexico-1.myhuaweicloud.com',
        'sa-brazil-1': 'sa-brazil-1.myhuaweicloud.com'
    }
    try:
        endpoint = endpoint_mapping[region]
        kms_endpoint = '%s.%s' % ('kms', endpoint)
        return kms_endpoint
    except:
        raise Exception("invalid region: %s" % region)

def check_csms_resp(resp):
    if resp.status_code in (200, 201, 204):
        return
    caller_function_name = inspect.stack()[1].function
    json_resp = json.loads(resp.text)
    if 'error_msg' in json_resp:
        error_message = 'function:%s , reason: %s' % (
            caller_function_name, json_resp['error_msg'])
        raise Exception(error_message)
    error_message = 'function:%s , reason: %s' % (
        caller_function_name, resp.text)
    raise Exception(error_message)

def update(context, new_content):
    project_id = context.getProjectID()
    url = 'https://%s/v1/%s/secrets/%s/versions' % (kms_endpoint, project_id, secret_name)
    payload = {'secret_string': new_content}
    payload = json.dumps(payload)
    resp = requests.post(url, headers=headers, data=payload)
    check_csms_resp(resp)
    return 'SUCCESS'
Debugging
Debug the created FunctionGraph. For details, see Online Debugging.
Creating a Trigger
Create a trigger. For details, see Using a Timer Trigger.
Viewing a Secret
- Log in to the DEW console.
- In the navigation pane on the left, choose .
- Search for the secret created in Creating a Password Rotation Function.
- Click the secret to view its details, including current and historical versions.
Figure 6 Viewing secret details

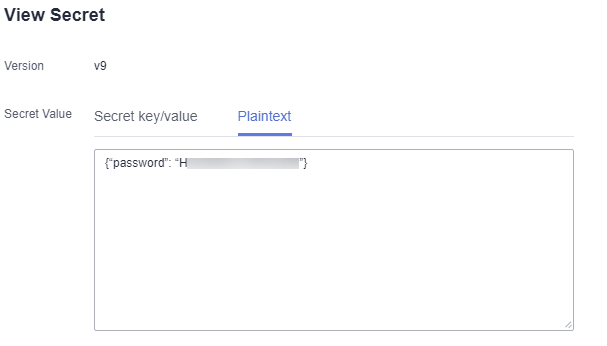
- In the Version, locate the secret, and click View Secret in the Operation column to view the password.
Figure 7 Viewing a secret value

Feedback
Was this page helpful?
Provide feedbackThank you very much for your feedback. We will continue working to improve the documentation.See the reply and handling status in My Cloud VOC.
For any further questions, feel free to contact us through the chatbot.
Chatbot


