CFW Best Practices
Enabling EIP Protection
- Log in to the management console.
- Click
in the upper left corner of the management console and select a region or project.
- In the navigation pane, click
and choose . The Dashboard page will be displayed, as shown in Dashboard, as shown in Figure 1.
- In the navigation pane, choose Assets > EIPs. The EIPs page is displayed.
In the upper right corner of the page, click Synchronize Asset to import your EIPs to the list and refresh the EIP list.
- Currently, IPv6 addresses cannot be protected.
- Enable EIP protection.
- Enable protection for a single EIP. In the row of the EIP, click in the Operation column.
- Enable protection for multiple EIPs. Select the EIPs to be protected and click Enable Protection above the table.
- On the page that is displayed, check the information and click OK. Then the Protection Status changes to Protected.
After EIP protection is enabled, the default access control policy is Allow.
Enabling Intrusion Prevention
- Log in to the management console.
- Click
in the upper left corner of the management console and select a region or project.
- In the navigation pane, click
and choose . The Dashboard page will be displayed, as shown in Dashboard, as shown in Figure 3.
- In the navigation pane, choose Intrusion Prevention.
On the Intrusion Prevention page, select the Protection Mode.
- Observe: Attacks are detected and recorded in logs.
- Block: Attacks and abnormal IP address access are automatically intercepted.
- Interception mode-loose: The protection granularity is coarse. In this mode, only attacks with high threat and high certainty are blocked.
- Interception mode-moderate: The protection granularity is medium. This mode meets protection requirements in most scenarios.
- Interception mode-strict: The protection granularity is fine-grained, and all attack requests are intercepted. You are advised to configure false alarm masking rules after the service has been running for a period of time, then enable the strict mode.
Figure 4 Intrusion prevention- Currently, only the interception mode of the Hillstone engine supports loose, moderate, and strict modes.
Configuring an Inbound Access Policy
- Log in to the management console.
- Click
in the upper left corner of the management console and select a region or project.
- In the navigation pane, click
and choose . The Dashboard page will be displayed, as shown in Dashboard, as shown in Figure 5.
- In the navigation pane on the left, choose Access Control > Access Policies. See Access policies.
- Click Add Rule. Configure parameters in the Add Rule dialog box.
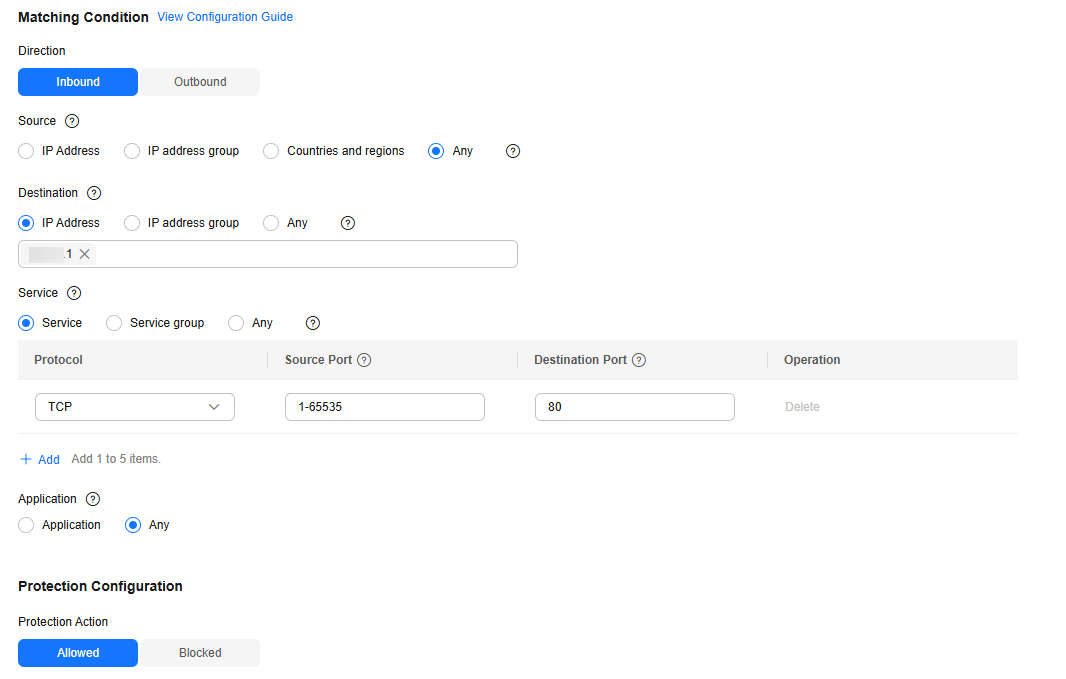
- Add a protection rule to allow certain traffic. In the Add Rule dialog box, configure the source and destination addresses and ports, set Protocol to TCP or a specific protocol, and set Action to Allow.
Figure 7 Configuring a policy to allow inbound traffic
The source and destination addresses can be set to IP addresses or IP address groups.
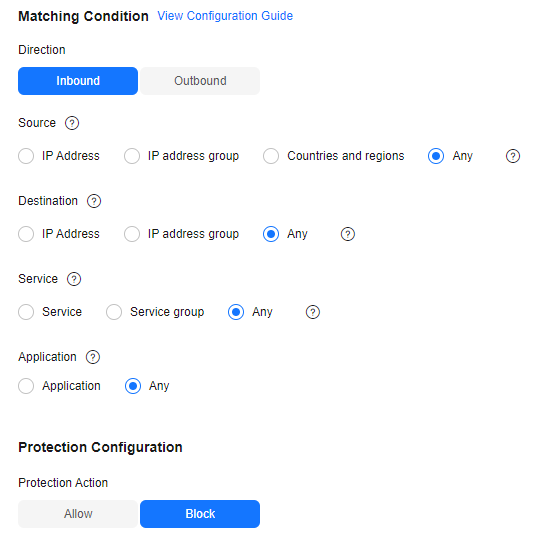
- Add a rule to block all traffic. In the Add Rule dialog box, set the addresses to 0.0.0.0/0 and Action to Block. Ensure that the rule has the lowest priority.
- Add a protection rule to allow certain traffic. In the Add Rule dialog box, configure the source and destination addresses and ports, set Protocol to TCP or a specific protocol, and set Action to Allow.
Configuring an Outbound Access Policy
- Log in to the management console.
- Click
in the upper left corner of the management console and select a region or project.
- In the navigation pane, click
and choose . The Dashboard page will be displayed, as shown in Dashboard, as shown in Figure 8.
- In the navigation pane on the left, choose Access Control > Access Policies. See Access policies.
- Click Add Rule. Configure parameters in the Add Rule dialog box.
- In the Add Rule dialog box, configure the source and destination addresses and ports, set Protocol to TCP or a specific protocol, and set Action to Allow.
Figure 10 Configuring a policy to allow outbound traffic
The source and destination addresses can be set to IP addresses or IP address groups.
- In the Add Rule dialog box, configure the source and destination addresses and ports, set Destination to Domain name, set Protocol to TCP or a specific protocol, and set Action to Allow.
Figure 11 Configuring a policy to allow outbound traffic (domain name specified)Figure 12 Configuring a policy to allow outbound traffic (domain name specified)
CFW supports access control policies based on domain names.
- In the Add Rule dialog box, configure the source and destination addresses and ports, set Protocol to TCP or a specific protocol, and set Action to Block.
Figure 13 Configuring a policy to block outbound traffic
- In the Add Rule dialog box, configure the source and destination addresses and ports, set Protocol to TCP or a specific protocol, and set Action to Allow.
Checking Network Traffic
After EIP protection is enabled, you can view the network traffic.
- Log in to the management console.
- Click
in the upper left corner of the management console and select a region or project.
- In the navigation pane, click
and choose . The Dashboard page will be displayed, as shown in Dashboard, as shown in Figure 14.
- In the navigation pane, choose Traffic Analysis. Check the Internet inbound and outbound traffic, attack trend, and frequently accessed IP addresses.
Figure 15 Internet access
- Click the Server Originated Access tab. Check server originated traffic and the attack trend.
Figure 16 Server originated access
Auditing Logs
After enabling EIP protection and basic intrusion prevention, you check logs.
- Log in to the management console.
- Click
in the upper left corner of the management console and select a region or project.
- In the navigation pane, click
and choose . The Dashboard page will be displayed, as shown in Dashboard, as shown in Figure 17.
- In the navigation pane, choose Log Audit. On the Attack Event Logs tab, check the details about attack events in the past week.
Figure 18 Attack event logs
- Click the Access Control Logs tab and check the access control information in the past week. To modify the access control settings of an IP address, configure its access control policy or add it to the blacklist/whitelist.
Figure 19 Access control logs
- Click the Traffic Logs tab and check the bytes and packets in the past week.
Figure 20 Traffic logs
Feedback
Was this page helpful?
Provide feedbackFor any further questions, feel free to contact us through the chatbot.
Chatbot