Allowing Outbound Traffic from Cloud Resources Only to a Specified Domain Name
Application Scenarios
To prevent sensitive data leakage or external attacks, you need to restrict the Internet domain names that can be accessed by cloud resources.
Use CFW to implement refined management and control on cloud resources and allow access traffic from all EIPs to a specified domain name. (Wildcard domain name *.example.com is used as an example).
Configuring CFW to Allow Cloud Resources to Access a Specified Domain Name
- Purchase the CFW standard or professional edition. For details, see Purchasing CFW.
- In the navigation pane on the left, click
 and choose . The Dashboard page will be displayed.
 - (Optional) Switch to another firewall instance. Select a firewall from the drop-down list in the upper left corner of the page.
- Enable protection for an EIP.
- In the navigation pane, choose . The EIPs page is displayed. The EIP information (both IPv4 and IPv6) is automatically updated to the list.
- In the row of the EIP, click in the Operation column.
- Configure protection rules.
- In the navigation pane, choose .
- On the Protection Rules > EIP tab page, click Add Rule. On the Add Rule page, configure protection information and set other parameters as needed.
Configure the following protection rules:
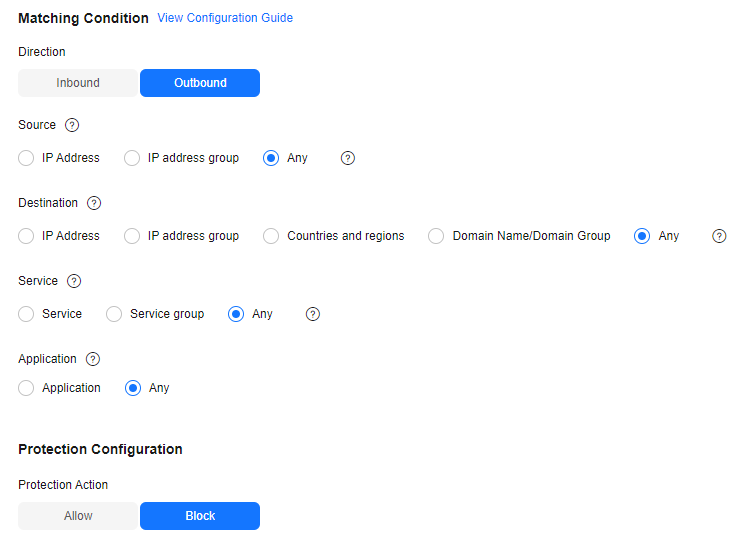
- One of the rule blocks all traffic, as shown in Figure 1. The priority is the lowest.
Table 1 Blocking all traffic Parameter
Example Value
Description
Direction
Inbound
Direction of the protected traffic.
Source
Any
Origin of network traffic.
Destination
Any
Receiver of network traffic.
Service
Any
Protocol, source port, and destination port of network traffic.
Application
Any
Protection policy for application layer protocols.
Action
Allow
Action taken when traffic passes through the firewall.
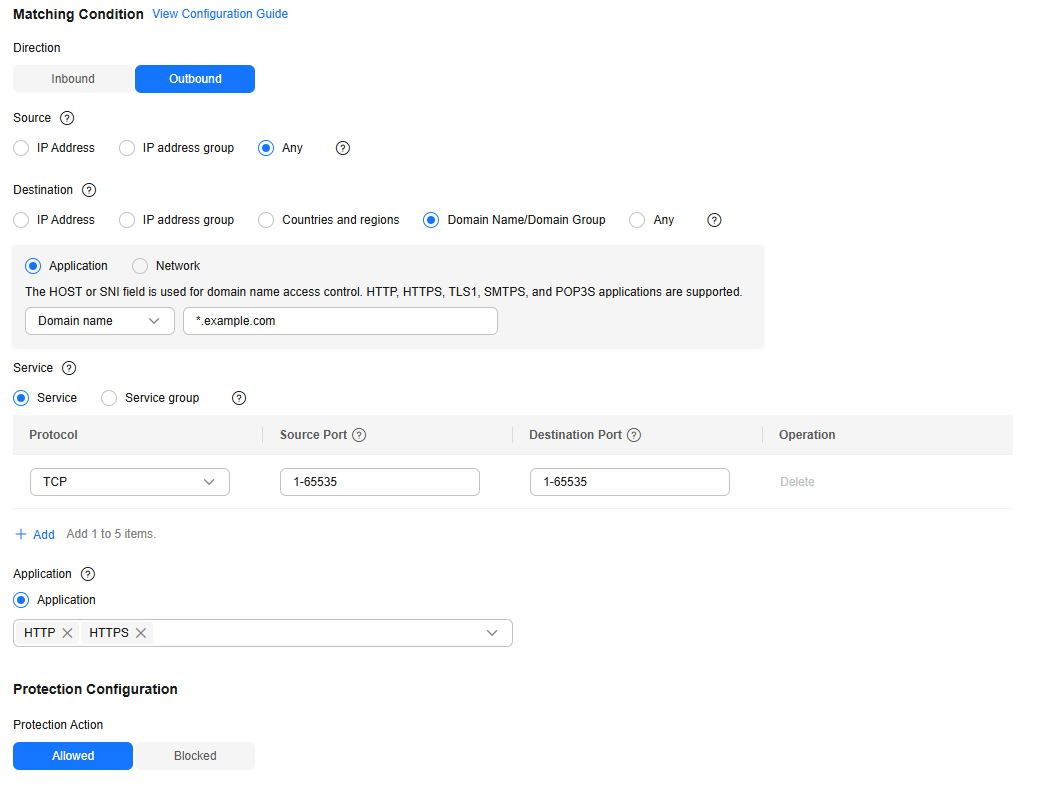
- The other rule allows the traffic to *.example.com, as shown in Figure 2. The priority is the highest.
Table 2 Allowing the access traffic to a domain name Parameter
Example Value
Description
Direction
Outbound
Direction of the protected traffic.
Source
Any
Origin of network traffic.
Destination
Domain Name/Domain Name Group
Application type and application domain name. Enter *.example.com.
Receiver of network traffic.
Service
TCP/1-65535/1-65535
Protocol, source port, and destination port of network traffic.
Application
HTTP and HTTPS
Protection policy for application layer protocols.
Action
Allow
Action taken when traffic passes through the firewall.
- Direction: Outbound
- Source: Any
- Destination: Select Domain name/domain group and then Application. Select Domain name from the drop-down list and enter *.example.com.
- Service: TCP/1-65535/1-65535
- Application: HTTP and HTTPS
- Action: Allow
Specified domain names
- One of the rule blocks all traffic, as shown in Figure 1. The priority is the lowest.
- View the rule hits in access control logs.
In the navigation pane, choose Log Audit > Log Query. Click the Access Control Logs tab.

In the rows where Destination IP is a domain name matching example.com, the corresponding Action is Allow. For other traffic, the Action is Block.
References
- For details about how to configure a domain name group, see Allowing Traffic from a Service to a Platform.
- For details about how to add other protection rules, see the parameter description in Adding a Protection Rule.
- For details about how to allow cloud resources to access specified domain names through the NAT gateway, see Configuring a Protection Rule to Protect SNAT Traffic.
Feedback
Was this page helpful?
Provide feedbackThank you very much for your feedback. We will continue working to improve the documentation.See the reply and handling status in My Cloud VOC.
For any further questions, feel free to contact us through the chatbot.
Chatbot


