
Referencing Third-Party Libraries to Develop Advanced Pages
Expected Results
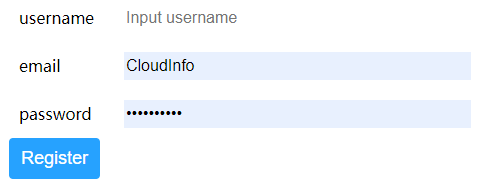
When you develop widgets for advanced pages, you can reference third-party libraries to simplify widget development and enrich functions. The widgets cannot run properly if their dependency libraries are missing. Huawei Cloud Astro Zero includes preset libraries that can be directly used in advanced page widgets or loaded in page settings. You can also upload and use custom libraries on a page. This section demonstrates uploading a custom library and using it in widgets, with Vue (preset) and MintUI (custom) as examples. The final effect is shown in Figure 1.
Implementation Methods
- Compress the files of the custom library into a ZIP package.
Download the MintUI code files from the MintUI website, add a metadata file packageinfo.json, and list in the file the names of the JavaScript and CSS files contained in the library, and compress the files into a ZIP package, as Figure 2. You can also click here to obtain the package.
packageinfo.json contains the files to be imported. For example, if the js/index.js and css/index.css files need to be imported to the MintUI library, add the description of the two files to packageinfo.json. js and css define the file type, and name defines the file path and name.
{ "js": [ { "name": "js/index" } ], "css": [ { "name": "css/index" } ] } - Upload the custom library.
- On the Huawei Cloud Astro Zero console, click Access Homepage to go to the application development page.
- Click
 and choose Environments > Environment Configuration.
 - Choose Maintenance from the main menu.
- In the navigation pane, choose Global Elements > Page Assets > Libraries.
- Click Submit New Library.
- Set basic information about the library, upload the ZIP package in 1, and click Submit. Figure 3 Uploading a library

Table 1 Parameters for creating a MintUI library Parameter
Description
Example
Name
Name of the new library.
Value: 1–80 characters.
MintUI
Upload Source File(.zip)
Select the compressed package of the custom library.
Select the library in 1.
Library ID
Only letters and digits are allowed. Start with a letter.
MintUI
Release Notes
Description of the custom library. Set it as required.
Custom library
- Reference the library in an advanced page widget. This section uses the custom widget widget_demo_mintui to reference a third-party library.
- Add the requires node to the packageinfo.json file in the widget package and specify the library ID and version of the dependency library.
name indicates the library ID, and version indicates the library version.
For example, add the requires node. Obtain the library file names and versions from the library details page."requires": [ { "name": "global_Vue", "version": "100.7" }, { "name": "t0000000000fcsfrfcaks_MintUI", "version": "1.0.0" } ]When you specify library files in requires, specify them in sequence based on the dependency between the library files. For example, global_VueI18n depends on global_Vue and needs to be written after global_Vue.
- Write a DOM form in the widget_demo_mintui.ftl file of the advance page widget package.
<div id="widget_demo_mintui">
  <mt-field label="username" placeholder="Input username" v-model="username"></mt-field>
  <mt-field label="email" placeholder="Input email" type="email" v-model="email"></mt-field>
  <mt-field label="password" placeholder="Input password" type="password" v-model="password"></mt-field>
  <mt-button type="primary" @click="submit">Register</mt-button>
</div>
- Add a Vue instance to the widget_demo_mintui.js/render method in the advanced page widget package.
Vue.use(MINT); var vm = new Vue({ el: $("#widget_demo_mintui", elem)[0], data:{ username: "", email: "", password: "" }, methods:{ submit: function(){ console.log(this.username + " registers"); } } }) - Package the modified content again. You can also click widget_demo_mintui.zip to obtain the widget package.
- Add the requires node to the packageinfo.json file in the widget package and specify the library ID and version of the dependency library.
- Return to the environment configuration page, choose Maintenance > Global Elements > Page Assets > Widgets. On the displayed page, click Submit New Widget to upload the custom widget package to the widget library. Figure 4 Uploading a widget

Table 2 Parameters for uploading a widget Parameter
Description
Example
Name
Widget name. The system automatically sets this parameter based on the widget package name.
widgetdemomintui
Upload Source File(.zip)
Source file package of the widget.
Select widget_demo_mintui.zip in 3.d.
Scenario
Application scenario of a widget package. You can select multiple application scenarios at a time.
Advanced page
Release Notes
Description of the widget. Set it as required. The information configured here will be displayed on the overview tab page of the widget details page.
Custom widget
- Disable the Vue3 render framework of page widgets. The custom widgets in this practice are developed based on the Vue2 framework. However, the Vue3 render framework of page widgets is enabled by default. You need to manually disable the Vue3 page widgets to avoid the error message displayed when dragging the widget to the page.Figure 5 Displayed error

- Go to the application designer. In the navigation pane, choose Settings.
- In the Advanced Settings area, deselect The render framework of page widgets is upgraded from Vue2 to Vue3. Figure 6 Deselecting

- In the navigation pane, choose Page, and click + next to Advanced Page.
- Click
 and drag the widget_demo_mintui widget from Custom to the canvas. Figure 7 Dragging the widget to the canvas
- Click
 in the upper part of the page to save the advanced page. Then click
  to release the advanced page.
 - Click
 to go to the preview page and check whether the effect meets the expectation.

Feedback
Was this page helpful?
Provide feedbackThank you very much for your feedback. We will continue working to improve the documentation.See the reply and handling status in My Cloud VOC.
For any further questions, feel free to contact us through the chatbot.
Chatbot


