
Using the File Template Function to Generate Contracts
Application Scenarios
Huawei Cloud Astro Zero enables quick creation of Word, Excel, Email, and SMS templates, enhancing document efficiency and standardization.
This practice uses a Word template as examples. Developers can create print templates based on customer needs. For example, users can generate a product order list based on information such as products and prices from the product order management system by using this function. After processing an order, the template function can sync this order information to a contract template, creating a contract document for offline signing. Similarly, in finance, templates can be used to generate customized invoices and receipts. If a formal invitation is needed, the same template feature can create and print professional business letters.
Advantages
In a flow, you can call document template nodes and configure their input and output parameters to generate specific documents. This flow can be packaged as an open API for third-party use, or directly called on standard pages for portal users to download.
Constraints
- After uploading a Word document (containing text type variables defined by ${Parameter}), you can only preview the document template or generate a specific document, but modifying it directly on the GUI is not allowed. To make changes, modify the template locally on your PC and re-upload it.
- The generated DOCX template supports only text variable replacement. It does not support dynamic replacement of QR codes or images.
Procedure
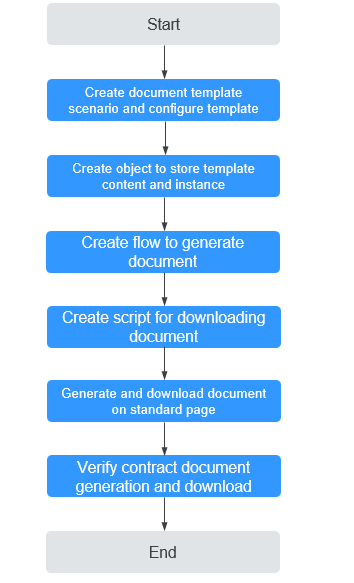
Figure 1 shows the process of generating a contract using a file template.
Step 1: Create a Document Template Scenario and Configure the Template
Create a template scenario and add a contract template to the scenario. In the template scenario configuration, add the parameters to be replaced in the document template. A template scenario is a collection of service scenarios. Multiple templates can be created in a template scenario. The templates share the data structure.
- Create a low-code application.
- Apply for a free trial or purchase a commercial instance by referring to Authorization of Users for Huawei Cloud Astro Zero Usage and Instance Purchases.
- After the instance is purchased, click Access Homepage on Homepage. The application development page is displayed.
- In the navigation pane, choose Applications. On the displayed page, click Low-Code or
 .
. When you create an application for the first time, create a namespace as prompted. Once it is created, you cannot change or delete it, so check the details carefully. Use your company or team's abbreviation for the namespace.
- In the displayed dialog box, choose Standard Applications and click Confirm.
- Enter a label and name of the application, and click the confirm button. The application designer is displayed. Figure 2 Creating a blank application

- Create a file template scenario.
- In the navigation pane of the application designer, choose Logic > More > Templates. Figure 3 Clicking Template

- Click Add Template Scenario, set the label and name of the template scenario, and click Confirm. Figure 4 Creating a template scenario

- In the navigation pane of the application designer, choose Logic > More > Templates.
- On the Configurations tab page, set the storage location of the template file and click Save. Figure 5 Configuring file storage

Table 3 File storage parameters Parameter
Description
Example
Connector Type
Connector type of the file storage. Currently, only OBS and MINIO are supported. In Huawei Cloud Astro Zero, you can create OBS and MinIO connectors to store data in OBS and MinIO, for details, see Interconnecting with OBS Instances and Connecting MinIO for Object and Asset Storage.
OBS
Connector Name
Name of the OBS or MinIO connector created in Huawei Cloud Astro Zero. You can choose Integrations > Connector > Connector Instance > Storage > OBS/MINIO to view the name.
Namespace__OBS_Connector
Connector Bucket Name
OBS or MinIO bucket name configured during connector creation. .
template-obs
File Storage Location
You can specify the path for storing files in the OBS or MinIO bucket.
docTemplate
- On the Templates tab page, click Add to create a contract template. Figure 6 Creating a contract template

- On the Data tab page, add parameters in Table 5 for the contract template. The template parameters added here correspond to the content to be replaced in the document template.Figure 7 Adding a company name parameter to a contract template

- Upload the document template.
- On the Templates tab page, click
 next to the template created in 4. The contract template page is displayed. Figure 8 The template editing page
- Click the upload button, select the Word file to be uploaded, and view the effect after the file is uploaded. After the upload is successful, you can view the uploaded Word document in the OBS bucket configured in 3, as shown in Figure 11.Figure 9 Uploading a Word document
 Figure 10 Viewing the effect after the document is uploaded
In this practice, the content of the Word document to be uploaded is as follows. Upload the document based on service requirements.
${Namespace__contractName} Article 1 Purpose of the Contract This contract outlines the specific terms and conditions under which ${Namespace__companyName} will purchase goods/services from Party B. Article 2 Product/Service Description Detailed description of the goods/services, including but not limited to the model, specifications, quantity, and unit price. The number of orders: ${Namespace__orderNum} Article 3 Price Clause The total amount of the goods/services is ${Namespace__amount}. Article 4 Quality Assurance Party B warrants that the goods/services provided comply with the agreed quality standards. Article 5 Liability for Breach of Contract If one party violates the contract clauses, the breaching party shall compensate the other party for all losses incurred therefrom. Article 6 Conditions for Entry into Force This contract shall take effect upon signature and seal by the authorized representatives of both parties. Party A: ${Namespace__companyName} Party B: ${Namespace__otherCompanyName} Contract signed by: ${Namespace__person} Date: ${Date__date} - Click the preview button in the upper right corner of the page and set parameters to preview the effect.
For example, enter the following template parameters in the input parameter text box and check whether the corresponding parameters in the contract are replaced.
{
    "Namespace__contractName": "Contract",
    "Namespace__companyName": "xx Co., Ltd."
}
Figure 12 After the parameters in the contract are replaced
- If the preview meets your expectation, click Enable in the upper right corner of the page to enable the document template.
- On the Templates tab page, click
- Return to the document template scenario and click the enable button to enable the template scenario. Figure 13 Enabling a template scenario


Step 2: Create an Object to Store Template Content and the Template Instance
Create an object with fields to store both the document template content and the template instance generated later.
- In the navigation pane, choose Data, and click + next to Object.
- Complete the configuration and click the confirm button. Figure 14 Creating docObject

- Click
 to go to the object details page. Figure 15 Clicking the edit button
- On the Fields tab page, click Add and add the companyName field for the object. Figure 16 Adding the companyName field

Table 7 Parameters for adding the companyName field Parameter
Description
Example
Display Name
Name of the new field, which can be changed after the field is created.
Value: 1–63 characters.
Company name
Unique ID
ID of a new field in the system. The value cannot be changed after the field is created. Naming rules:
- Max. 63 characters, including the prefix namespace.
- Start with a letter and use only letters, digits, and an underscore (_). Do not end with an underscore (_).
companyName
Field Type
Click
 . On the page that is displayed, select the type of the new field based on the parameter description.
Text
Data Length
Length of a field that can be entered.
64
- Repeat the preceding operations to add the fields in Table 8 to the object. Figure 17 Viewing fields in an object

Table 8 Fields to be added to the object Name
Unique ID
Type
Company name (added)
companyName
Text
Contract amount
amount
Number
Number of orders
orderNum
Number
Contract signer
person
Text
Contract date
date
Date
Contract name
contractName
Text
Company name of party B
otherCompanyName
Text
Contract template instance
modedoc
Text (The data length is set to 255.)
Step 3: Create a Flow to Generate a Document
Create a flow and add the Invoke Template and Record Create diagram elements to create a document based on the parameters in the contract.
- In the navigation pane, choose Logic, and click + next to Flow.
- Specify the label and name and click Add. Figure 18 Creating a flow

- Create a global context variable.
- On the flow design page, select the start node and click
 .
. - Click Context and click
 next Variable to create the variable variable0.
 - Click
 next to variable0 and select Set.
 - Set Name to companyName and click Save. Figure 19 Creating the companyName variable

- Repeat the preceding operations to create variables in Table 10. Figure 20 Viewing created variables

- Select the start node and set the input and output parameters of the node. Figure 21 Setting input and output parameters

- On the flow design page, select the start node and click
- Add the Invoke Template node.
- Under Basic, drag the Invoke Template diagram element to the end of the start diagram element. Figure 22 Dragging the Invoke Template diagram element to the canvas

- Select the Invoke Template diagram element, click
 , and set the diagram element. Figure 23 Setting the Invoke Template diagram element
Table 11 Parameter description Parameter
Description
Example
Template Scenario
Select the template scenario associated with the Invoke Template diagram element, that is, the template scenario created in 2.
Namespace__docModel
Template Type
Select a type.
Word
Document Template
Select the document template created in 4.
Namespace__contractModel
Connector Type
Automatically determined by the selected document template.
OBS
Connector Name
Automatically determined by the selected document template.
Namespace__OBS_Connector
Connector Bucket Name
Automatically determined by the selected document template.
template-obs
File Storage Location
Automatically determined by the selected document template.
docTemplate
Input Parameter
Transfer data to the template and assign the input parameter variables to the corresponding template parameters at a time.
Variables created in 3
Document Storage Address
Add the output variable modelDoc in the document storage address to store the generated document name.
modedoc
- Under Basic, drag the Invoke Template diagram element to the end of the start diagram element.
- Add a record creation node.
- Drag Record Create from Basic and place it after Invoke Template. Figure 24 Adding Record Create

- Select the Record Create diagram element and click
 to save the input and output parameter variables to the object created in Step 2: Create an Object to Store Template Content and the Template Instance. Figure 25 Configuring Record Create
- Drag Record Create from Basic and place it after Invoke Template.
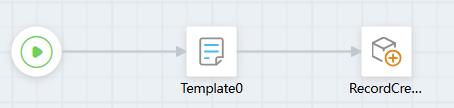
- Connect the diagram elements in this order: Start to Invoke Template, then Invoke Template to Record Create. Figure 26 Specifying the logical relationship between diagram elements
- Click
 to save the flow.
 - Click
 . The flow debugging page is displayed.
 Enter the following information in the input parameter text box and click Run:
{
    "companyName": "Company A",
    "amount": "10",
    "orderNum": "2",
    "person": "Zhang San",
    "date": "2024-11-05",
    "contractName": "New purchase contract",
    "otherCompanyName": "Company B"
}
The command is successfully executed if the following information is displayed. Log in to the OBS console. The contract in Figure 27 is generated in the path configured in 3. Download the contract to the local host and view the content, as shown in Figure 29. You can find that the content in the contract has been replaced.
Figure 28 Viewing the newly generated contract
- Click
 to activate the flow.


Step 4: Create a Script for Downloading the Document
Create a script to download the contract generated in the OBS bucket based on the document name.
- In the navigation pane, choose Logic and click + next to Script.
- Create a script, set the name to docScript, and click Add. Figure 30 Creating docScript

- In the script editor, enter the sample code.
This sample code is used to download the document. In the example, Namespace__OBS_Connector is the connector name configured in 3, and docTemplate is the file storage location configured in 3.
import * as context from 'context';//Import the standard library related to the context. import * as objectstorage from 'objectstorage'; //Define the input parameter structure. @action.object({ type: "param" }) export class ActionInput { @action.param({ type: 'String', required: true, label: 'String' }) docName: string; } //Define the output parameter structure. @action.object({ type: "param" }) export class ActionOutput { @action.param({ type: 'Any' }) buf: any; } @action.object({ type: "method" }) export class CreateWorkOrder { //Define the API class. The input parameter of the API is ActionInput, and the output parameter is ActionOutput. @action.method({ input: 'ActionInput', output: 'ActionOutput' }) public createWorkOrder(input: ActionInput): ActionOutput { let out = new ActionOutput(); //Create an instance of the ActionOutput type as the return value. let error = new Error(); //Create an instance of the error type to save the error information when an error occurs. try { // OBS bucket path, which is the same as that in the template configuration. let path = "docTemplate/"; // Call the connector to download the file. Namespace__OBS_Connector indicates the name of the called connector. let obsCli = objectstorage.newClient(objectstorage.StoreType.OBS, "Namespace__OBS_Connector"); let data = obsCli.getObject(path + input.docName); out.buf = data; } catch (error) { console.error(error.name, error.message); context.setError(error.name, error.message); } return out; } } - Click
 to save the script.
 - Test the script.
- Click
 in the upper part of the editor to run the script.
 - Set the input parameters, click
 in the upper right corner of the test window, and check the returned message.
 { "docName": "1730874683589013855743152260007e733dd-80ea-19f1-b7a0-93fdcd20a541_Namespace__contractModel.docx" }1730874683589013855743152260007e733dd-80ea-19f1-b7a0-93fdcd20a541_Namespace__contractModel.docx is the document generated in Step 3: Create a Flow to Generate a Document. That is, use the script to download the actual contract in the OBS bucket based on the document name.
Figure 31 Viewing output parameters
- Click
- After the script test is complete, click
 in the upper part of the editor to activate the script.
Step 5: Call the Flow and Script on a Standard Page to Generate and Download the Document
Design a standard page and call the flow and script to generate and download the contract on the frontend page.
- Creating a standard page
- In the navigation pane, choose Page, and click + next to Standard Page.
- Specify the label and name of the standard page and click Add. Figure 32 Adding a standard page

- Creating an object model
- At the bottom of the standard page, click Model View.
- Click New, specify Model Name (for example, flowDemo), select Services for Source, and click Next. Figure 33 Adding a flow object model

- Select the flow created in Step 3: Create a Flow to Generate a Document, click Next, and then click OK. Figure 34 Selecting the target flow

- Click New, specify Model Name (for example, scriptDemo), select Services for Source, and click Next. Figure 35 Adding a script object model

- Select the script created in Step 4: Create a Script for Downloading the Document, click Next, and then click OK. Figure 36 Selecting the target script

- Designing a standard page for generating and downloading the contract
- At the bottom of the standard page, click Designer View.
- Drag four text boxes, two number text boxes, and a date selector under Basic to the canvas of the standard page, for example, Figure 37.
- Select a widget to modify its label, as shown in Figure 38.
- Select the company name text box. Choose Properties > Data Binding and click
 next to Value Binding. Figure 39 Clicking the icon next to Value Binding
- Select companyName in 2.b and click the confirm button. Figure 40 Binding companyName

- Repeat the preceding operations to bind models to other widgets.
The contract name is bound to flowdemo.inputParam.contractName, the contract signer is bound to flowdemo.inputParam.person, the company name of party B is bound to flowdemo.inputParam.otherCompanyName, the contract amount is bound to flowdemo.inputParam.amount, the number of orders is bound to flowdemo.inputParam.orderNum, and the order date is bound to flowdemo.inputParam.date.
- Adding a button widget for the standard page
- Choose Basic > Common, drag a button widget to the area below the order date widget, and change the Display Name of the button widget to "Contract parameters submission and document generation instance". Figure 41 Adding a button widget

- Select the button widget. On the Events tab page, click
 next to on-click. The page for adding an action is displayed.
 - Under Custom Action, enter the following sample code and click Create. The sample code is used to generate a contract based on the contract parameters set in the flow model. flowDemo indicates the flow model created in 2.b.
$model.ref('flowDemo').run().then(function(data){
    console.log(data);
    context.$message.success('Submitted successfully.');
}).catch(function(error){
    context.$message.error('Submission failed:' + error.resMsg);
});
- Choose Basic > Common, drag a button widget to the area below the order date widget, and change the Display Name of the button widget to "Contract parameters submission and document generation instance".
- Adding a table widget for the standard page
- Choose Basic > Layout and drag a table widget below the button widget. Figure 42 Adding a table widget

- Select the table widget, choose Properties > Data Binding, and click
 next to Value Binding.
 - Click New, specify Model Name (for example, obj), select Objects for Source, and click Next. Figure 43 Setting basic model information

- Select the object and fields created in Step 2: Create an Object to Store Template Content and the Template Instance, click Next, and click OK. Figure 44 Setting the model

- In the Select Model dialog box, select the created model and bind the object model to the table. Figure 45 Binding the model to the table

- Select the table widget and add an operation column to the table. Figure 46 Adding an operation column

- Click
 next to the new column. Under Operation Button, click Add Operation Button. Figure 47 Adding an operation button
- Click
 and then click
  next to Action List to add an action for the button. Figure 48 Adding an action for the button
- Under Custom Action, enter the following sample code and click Create. The sample code is used to download the document generated by the flow from OBS based on the field name of the contract template instance. Namespace__modedoc__CST is the field name of the contract template instance, and scriptDemo is the script object model created in 2.d.
// Base64 decoding function function base64DecodeToBinary(base64String) { // Decode the Base64 character string. const binaryString = atob(base64String); // Convert the decoded string into binary data. const len = binaryString.length; const bytes = new Uint8Array(len); for (let i = 0; i < len; i++) { bytes[i] = binaryString.charCodeAt(i); } // Convert Uint8Array to Blob. const blob = new Blob([bytes]); return blob; } // Obtain the row data in the table. Namespace__modedoc__CST is the field name of the contract template instance in the table. var rowData = context.$component.current.$attrs.row; const docName = rowData.Namespace__modedoc__CST; // Set the input parameters of the script. let originData = $model.ref('scriptDemo').getData(); originData.inputParam.docName = docName; $model.ref('scriptDemo').setData(originData); //Run the script to download the document generated by the flow from OBS. $model.ref('scriptDemo').run().then(function(data){ const decodedString = base64DecodeToBinary(data.buf); const url = URL.createObjectURL(decodedString); let link = document.createElement('a'); link.href = url; // Set the name of the document to be downloaded. Namespace__modedoc__CST is the field name of the contract template instance in the table. link.setAttribute('download', rowData.Namespace__modedoc__CST); document.body.appendChild(link); link.click(); URL.revokeObjectURL(link.href); document.body.removeChild(link); context.$message.success('DownLoad successfully.'); }).catch(function(error){ console.log('error is', error); context.$message.error('DownLoad failed:' + error.resMsg); }); - Set the label of the operation button to downloadDoc, and set Column Title under Basic to download. Figure 49 Editing the operation column title and operation label

- Return to the standard page, choose Properties > Table Block, and click Add next to Toolbar to add a toolbar to the table. Figure 50 Adding a toolbar to the table

- Choose Basic > Layout and drag a table widget below the button widget.
- After the standard page is designed, click
 in the upper part of the page to save the standard page.


Step 6: Verify the Function of Generating and Downloading the Contract
- In the upper part of the standard page, click
 . The preview page is displayed.
 - Enter the contract content and click the button to submit contract parameters and generate document instance. Figure 51 Entering the contract content

- After the submission success message appears, click the refresh button to view the submitted contract data. Figure 52 Viewing the submitted contract data

- Click the download button next to the data to save the contract to your local PC and view the document. Figure 53 Contract downloaded
 Figure 54 Viewing the contract
Feedback
Was this page helpful?
Provide feedbackThank you very much for your feedback. We will continue working to improve the documentation.See the reply and handling status in My Cloud VOC.
For any further questions, feel free to contact us through the chatbot.
Chatbot


