

Handling False Alarms
In some cases, normal service traffic may be mistakenly blocked by WAF protection rules, such as basic web protection, feature-based anti-crawler, bot protection, custom protection, and blacklist rules. You need to generate an Allow rule quickly to handle false alarms.
Video Tutorial
Operation Scenario of False Alarms
| Root Cause | Solution | Result | Security Risk | Operation Guide |
|---|---|---|---|---|
| Requests incorrectly matched basic web protection rules or feature-based anti-crawler rules. | Configure a field-level check whitelist. | WAF performs a full check, but skips the features that match specified parameters, headers, and bodies. Other traffic remains strictly protected. | Very low | Handling False Alarms Triggered by Basic Web Protection or Feature-based Anti-crawler Rules |
| Configure a module-level check whitelist. | WAF ignores protection modules for a specified domain name. For example, you can disable SQL injection detection in the basic web protection module. | High (use with caution) | ||
| Legitimate access was incorrectly identified as malicious by bot protection rules. | Disable the corresponding bot protection rule. | All traffic of the domain name directly bypasses checks of the bot protection rule. | Low | |
| Normal services are blocked by custom protection rules (such as CC attack protection rules and precise protection rules). | Temporarily disable or delete the corresponding custom protection rule. | All traffic of the domain name directly bypasses checks of the corresponding rule. | Medium | |
| Trusted IP addresses were blocked. | Allow the corresponding IP address group in the blacklist. | Requests from whitelisted IP addresses are allowed. | Medium |
Procedure
| Step | Description |
|---|---|
| View the details of the specified protection event to obtain information such as the rule ID and rule description, and confirm the type of the protection rule that the request hit. | |
| Check whether the protection event is a false alarm. | |
| Handle confirmed false alarms based on the protection rule type obtained in Step 1. | |
| Verify that the false alarm has been handled. |
Constraints
- A protection event can only be handled as a false alarm once.
- After the blocked event is falsely reported, the event is no longer displayed on the Events page.
- Dedicated WAF instances earlier than June 2022 do not support All protection for Ignore WAF Protection. Only Basic web protection can be selected.
Prerequisites
A protection event has been reported and displayed on the Events page.
Step 1: Check the ID and Description of the Hit Rule
- Log in to the WAF console.
- Click
 in the upper left corner and select a region or project.
- (Optional) If you have enabled the enterprise project function, in the upper part of the navigation pane on the left, select your enterprise project from the Filter by enterprise project drop-down list. Then, WAF will display the related security data in the enterprise project on the page.
- In the navigation pane on the left, choose .
- Locate the target protection event and click Details in the Operation column.
- On the event details page, view the hit rule and rule description. Figure 1 Viewing the hit rule and rule description

Step 2: Check Whether the Request Is a False Alarm
- Check the attack type, rule description, attack payloads identified by WAF, and request details in the event details to see whether the traffic is legitimate.
- If your website becomes abnormal after being connected to WAF, the requests may be blocked by WAF protection rules or the website service may be faulty. You can use the following methods to identify the root causes:
- Access the website using its domain name. If the access remains abnormal, go to the next step.
- Use the public IP address of the origin server to access the same page:
- Access is normal: The request is blocked by a WAF protection rule. If you confirm that the request does not contain any attack behavior, handle the event as a false alarm by referring to content in this section.
- An access error is reported: The access exception is caused by a service fault. Troubleshoot and rectify your service fault in a timely manner.
Handling false alarms: If the event is a false alarm, perform the following operations.
Step 3: Handle False Alarms
- If the false alarm is triggered by a basic web protection rule or a website anti-crawler rule, you can configure a global protection whitelist to whitelist the corresponding path, rule ID, and crawler.
- If the false alarm is triggered by precise protection, CC attack protection, or geolocation access control rules, you are advised to modify the matching conditions of the related protection rules.
WAF basic web protection rules and feature-based anti-crawler rules are built-in rules in WAF. You can handle events as false alarms in just a few clicks, for example, by specifying whitelists for request features or protection modules to bypass certain checks.
- Log in to the WAF console.
- Click in the upper left corner and select a region or project.
- (Optional) If you have enabled the enterprise project function, in the upper part of the navigation pane on the left, select your enterprise project from the Filter by enterprise project drop-down list. Then, WAF will display the related security data in the enterprise project on the page.
- In the navigation pane on the left, choose .
- Check protection details of a specified domain name, instance, and time range. For details, see Querying a Protection Event.
- Locate the target protection event and click Handle as False Alarm in the Operation column.
- In the Handle False Alarm dialog box, handle the event. In the Handle as False Alarm dialog box, check the auto-filled information and click OK to add the request signature corresponding to the protection event to the Ignore WAF Protection module of a global protection whitelist rule. The auto-filled information includes the request signature and ignored protection module, as well as related parameters of the global protection whitelist rule. For details about the parameters of the global whitelist rule, see Table 1.Figure 2 Handle False Alarm
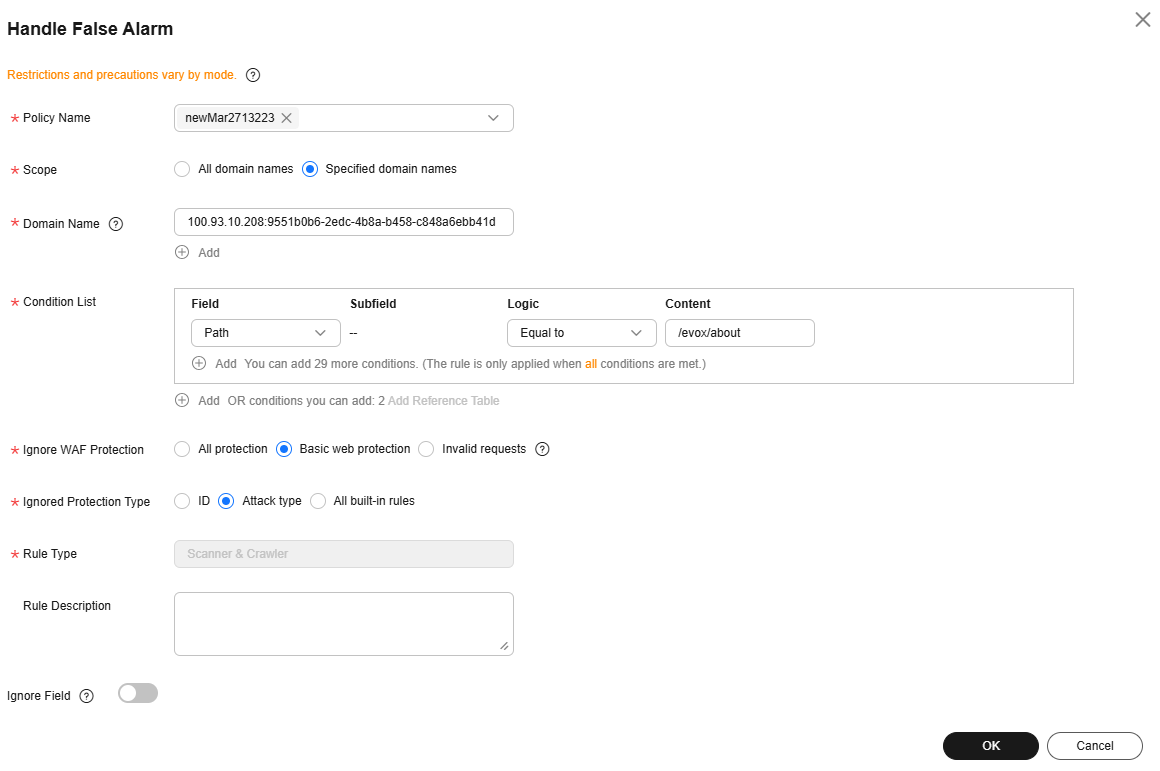
Table 1 Parameters Parameter
Description
Example Value
Scope
Domain name that the policy is applied to.
- All domain names: By default, this rule will be applied to all domain names that are protected by the current policy.
- Specified domain names: The rule will be applied to specified domain names that are protected by the current policy.
Specified domain names
Domain Name
If Scope is set to Specified domain names, select or enter the domain names for the rule. You can click Add to add more domain names.
The domain name format varies depending on the access mode.- Cloud CNAME access: Enter a complete domain name.
- Cloud load balancer access: Enter Domain_name:ELB_load_balancer_ID.
- If the protected domain name is a single domain name, select or enter Domain_name:ELB_load_balancer_ID.
- If the domain name is a wildcard domain name, select or enter *:ELB_load_balancer_ID.
For example, if you need to add wildcard domain name * and the ELB ID is c8c5fbd9-XXXX-XXXX-XXXX-d6f341a46ee5, enter *:c8c5fbd9-XXXX-XXXX-XXXX-d6f341a46ee5.
- Dedicated mode: Enter a complete domain name or IP address.
- Cloud CNAME access: www.example.com
- Cloud load balancer access: *:c8c5fbd9-XXXX-XXXX-XXXX-d6f341a46ee5
- Dedicated mode: Enter www.example.com or 192.168.2.3.
Condition List
Request features to be matched by the rule. If a request matches the features, WAF handles the request according to the configured rule.
- At least one condition is required for the rule to take effect.
- Click Add Condition in the condition box to add a condition in the group. You can add up to 30 conditions. If multiple conditions are configured, the rule takes effect only when all conditions are met.
- Click Add Condition outside the condition box to add a condition group. You can add up to three condition groups. The relationship between multiple condition groups is OR. This rule takes effect when one of the condition groups is met.
Condition parameter description:
- Field: For more details, see Condition Field Description.
- Subfield: Configure this field only when IPv4, IPv6, Params, Cookie, Header or Response Header is selected for Field. A subfield cannot exceed 2,048 characters.
If Field is set to Response Header or Header, and Subfield is not All or Any, Case Sensitive is supported.
- Logic: Select the desired logical relationship from the drop-down list.
- Content: Enter or select the content that matches the condition.
If you set Logic to Include any value, Exclude any value, Equal to any value, Not equal to any value, Prefix is any value, Prefix is not any of them, Suffix is any value, or Suffix is not any of them, you need to select a reference table.
Field is set to Path.
Logic is set to Include.
Content is set to /product.
Ignore WAF Protection
Select how you want WAF to whitelist protection.
- All protection: All WAF rules do not take effect, and WAF allows all request traffic to the domain names in the rule.
- Basic web protection: You can ignore the entire basic web protection or specific protection type by rule ID or attack type. For example, if you do not want to check a specific URL for XSS attacks, you can configure a false alarm masking rule to mask XSS checks for the URL.
- ID: Protection modules will be whitelisted based on protection rule IDs.
If you select this option, you need to configure Rule ID. Use commas (,) to separate multiple IDs. You can enter a maximum of 100 IDs.
After entering a rule ID, press Enter to view the added rule ID, rule description, and risk level.
You can also click Handle as False Alarm in the Operation column of the rule ID, and click Handle Now in the displayed dialog box. Then, if you select ID for Ignored Protection Type and click OK, this rule ID will be added to the global protection whitelist.
- Attack type: Protection modules will be whitelisted based on the attack type. One type contains one or more rule IDs.
After selecting this option, you need to specify Rule Type. You can specify multiple rule types. The options are Cross Site Scripting, Webshell, Others, SQL Injection, Scanner & Crawler, Remote File Inclusion, Local File Inclusion, and Command Injection.
- All built-in rules: All protection rules enabled in Basic Web Protection.
- ID: Protection modules will be whitelisted based on protection rule IDs.
- Invalid requests: You can allow certain invalid requests.
A request is invalid if:
- The request header contains more than 512 parameters.
- The URL contains more than 2,048 parameters.
- The request header contains "Content-Type:application/x-www-form-urlencoded", and the request body contains more than 8,192 parameters.
Ignore WAF Protection: Basic web protection
Ignored Protection Type: ID
Rule ID: 041046
Rule Description
A brief description of the rule. This parameter is optional.
SQL injection attacks are not intercepted.
Ignore Field
If you select Basic web protection for Ignore WAF Protection, you can enable Ignore Field and configure a specific field to ignore attacks against the specified field. You can ignore the fields you do not want WAF to check. If you configure ignored fields, you can leave the condition list blank.
- WAF can ignore the following fields: Params, Cookie, Header, Body, and Multipart.
- You can ignore all fields or a specified field.
- All fields: Params, Cookie, Header, Body, and Multipart.
If All is selected, WAF will not block any attack events matching the selected field.
- Field: Only the Params, Cookie, and Header fields are supported. If Field is selected, you need to enter a subfield.
- All fields: Params, Cookie, Header, Body, and Multipart.
- If you select Cookie, the Domain Name box for the rule can be empty.
Params
All
Bot protection is a set of built-in WAF rules designed to detect bot behavior characteristics. You can disable rules of a specific type to allow all traffic to bypass bot protection rule checks.
- Log in to the WAF console.
- Click in the upper left corner and select a region or project.
- (Optional) If you have enabled the enterprise project function, in the upper part of the navigation pane on the left, select your enterprise project from the Filter by enterprise project drop-down list. Then, WAF will display the related security data in the enterprise project on the page.
- In the navigation pane on the left, choose .
- Check protection details of a specified domain name, instance, and time range. For details, see Querying a Protection Event.
- Locate the target protection event and click Handle as False Alarm in the Operation column.
- In the Handle as False Alarm dialog box, confirm the bot protection rule that triggers the event and click Handle. The page of the bot protection rule is displayed. Click the rule status switch to disable the rule. For details about bot protection rules, see Configuring Bot Protection Rules to Defend Against Bot Behavior.
Some false alarms may be triggered by a custom protection rule you created. To handle those false alarms, you can temporarily disable or delete the rule.
- Log in to the WAF console.
- Click in the upper left corner and select a region or project.
- (Optional) If you have enabled the enterprise project function, in the upper part of the navigation pane on the left, select your enterprise project from the Filter by enterprise project drop-down list. Then, WAF will display the related security data in the enterprise project on the page.
- In the navigation pane on the left, choose .
- Check protection details of a specified domain name, instance, and time range. For details, see Querying a Protection Event.
- Locate the target protection event and click Handle as False Alarm in the Operation column.
- In the Handle as False Alarm dialog box, confirm the custom protection rule that the event matches and click Handle. The page of the custom protection rule is displayed. Click Disable or Delete in the Operation column of the target rule.
If you are sure a client IP address is blocked mistakenly, you can add the IP address to an address group and add the IP address to a blacklist/whitelist rule to allow it.
- Log in to the WAF console.
- Click in the upper left corner and select a region or project.
- (Optional) If you have enabled the enterprise project function, in the upper part of the navigation pane on the left, select your enterprise project from the Filter by enterprise project drop-down list. Then, WAF will display the related security data in the enterprise project on the page.
- In the navigation pane on the left, choose .
- Check protection details of a specified domain name, instance, and time range. For details, see Querying a Protection Event.
- Locate the target client IP address and click Add to Address Group or Add to Blacklist/Whitelist.
- Adding a client IP address to an address group
- In the Operation column of the target client IP address, choose .
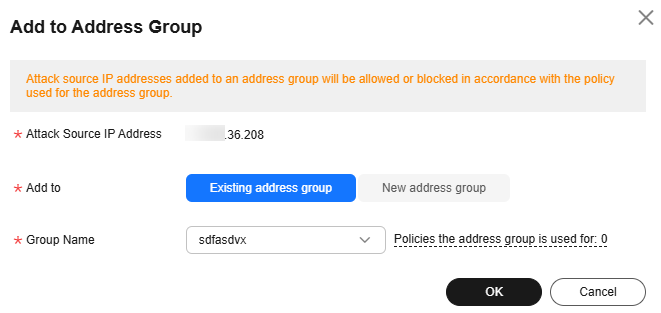
- In the Add to Address Group dialog box, add the client IP address to an existing address group or a new address group. Figure 3 Add to Address Group
- Associate the address group with a protection policy. If the address group has been associated with a protection policy, skip this step.
After the preceding configurations are complete, WAF blocks or allows the client IP addresses based on the protection policy associated with the address group.
- Adding a client IP address to a blacklist or whitelist
- In the Operation column of the target client IP address, choose .
- In the Add to Blacklist/Whitelist dialog box, add the client IP address to an existing rule or a new rule. For more details about a blacklist/whitelist rule, see Table 2. Figure 4 Add to Blacklist/Whitelist
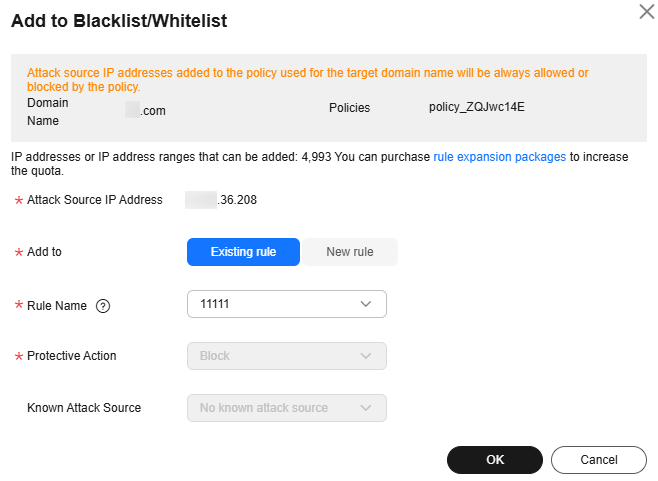

Table 2 Parameter descriptions Parameter
Description
Add to
- Existing rule: Add the client IP address to an existing blacklist or whitelist rule used for the protected domain name.
- New rule: Create a blacklist or whitelist rule for the protected domain name and add the client IP address to the rule.
Rule Name
- If you select Existing rule for Add to, select a rule name from the drop-down list.
- If you select New rule for Add to, customize a blacklist or whitelist rule.
IP Address/Range/Group
Add an IP address, IP address range, or address group. This parameter is mandatory only when you select New rule for Add to.
- IP address/range: Add the client IP address to the blacklist or whitelist.
- Address group: Add the client IP address to the address group associated with the blacklist or whitelist rule.
If you select Address Group, you need to select an existing address group or add a new address group. For details, see Adding a Blacklist or Whitelist IP Address Group.
Protective Action
Select the protective action for the rule. This parameter is mandatory only when you select New rule for Add to.
- Block: Select Block if you want to block the IP address or IP address range you configured previously.
- Allow: Select Allow if you want to allow the IP address or IP address range you configured previously.
- Log only: Select Log only if you want to observe the traffic from the IP address or IP address range you configured previously.
Known Attack Source
If you select Block for Protective Action, you can configure a known attack source rule. Then, WAF blocks the requests matching the configured IP, Cookie, or Params for a period configured by the known attack source rule. For details, see Configuring a Known Attack Source Rule.
Rule Description
Description of the rule.
After the preceding configurations are complete, WAF blocks or allows client IP addresses based on the blacklist and whitelist rules you configure.
- Adding a client IP address to an address group
Step 4: Verify the Result
It takes about one minute for the operation to work. Handled false alarms will no longer be displayed in the event list. You can refresh the browser cache, access the page for which the global whitelist rule is configured, and check whether the configuration is successful.
Related Operations
- If an event is handled as a false alarm, the rule hit will be added to the global protection whitelist rule list. You can go to the Policies page and then switch to the Global Protection Whitelist page to manage the rule, including querying, disabling, deleting, and modifying the rule. For details, see Configuring a Global Protection Whitelist Rule.
- If the Handle as False Alarm button is grayed out, see Why Is the Handle as False Alarm Button Grayed Out?
What is your overall rating for this page?
Thank you very much for your feedback. We will continue working to improve the documentation.See the reply and handling status in My Cloud VOC.
For any further questions, feel free to contact us through the chatbot.
Chatbot


