Experiencing CAE Hosting by Deploying a Demo Application
Cloud Application Engine (CAE) simplifies hosting for serverless applications. With CAE, applications can be deployed within minutes using source code, software packages, or container images. CAE supports mainstream languages such as Java, Go, and Tomcat and multiple runtime systems. It provides seamless hosting of multiple types of applications, including web applications, microservices, and APIs. Also, it supports auto scaling based on resources or custom service metrics to cope with unexpected user access traffic. Resources are billed by pay-per-use.Related resources are billed on the pay-per-use basis. In addition, CAE enables zero infrastructure O&M, so that users can focus more on application service development.
In this example, CAE is bound to the GitHub source code repository, and a frontend and a backend component are deployed to build and archive source code and create applications.
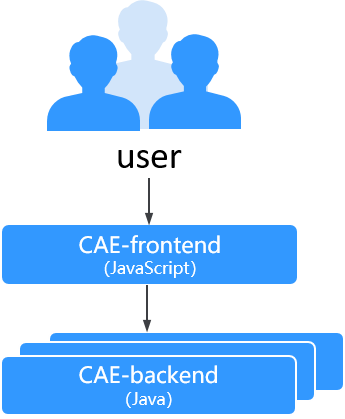
The following figure shows the demo logical networking and calling relationship.

- Component CAE-frontend: Frontend GUI developed using the Vue framework. It functions as the application entry and can send requests to the backend.
- Component CAE-backend: Backend service developed using Spring Boot. It processes requests sent by the demo-frontend component.
Prerequisites
- You have signed up for a HUAWEI ID and enabled Huawei Cloud services and logged in.
- You have registered a GitHub account and created a private token for subsequent authorization.
GitHub addresses:
- demo-frontend: https://github.com/servicestage-demo/cae-frontend
- demo-backend: https://github.com/servicestage-demo/cae-backend
Step 1: Create an Environment
- Log in to CAE.
- If you use CAE for the first time, a message is displayed indicating that no environment has been created. Click Create Now to create an environment. Otherwise, click
 on the right of the Environment module to create an environment.
 - Set parameters by referring to Table 1.
Table 1 Creating an environment Parameter
Description
Example Value
Environment
Enter an environment name. Enter 2 to 30 characters, starting with a lowercase letter and ending with a lowercase letter or digit. Use only lowercase letters, digits, and hyphens (-).
cae-demo
Enterprise Project
Select an enterprise project. An enterprise project facilitates project-level management and grouping of cloud resources and users. The default project is default.
It is available after the enterprise project function is enabled.
default
Virtual Private Cloud
Select the VPC to which the environment resource belongs from the drop-down list. A VPC is a logically isolated virtual network that secures internal network management and configurations.
To create a VPC, click Create VPC. For details, see Creating a VPC.
NOTE:The VPC cannot be modified after the environment is created.
vpc-test(192.168.0.0/16)
Subnet
Select a subnet from the drop-down list. A subnet is a unique CIDR block with a range of IP addresses in a VPC. You can divide a VPC into several subnets to help you plan IP addresses.
If no subnet is available, click Create Subnet to access the network console and create a subnet. For details, see Creating a Subnet for the VPC.
NOTE:Keep at least two available network IP addresses for CAE configuration and optimization.
vpc-test(192.168.0.0/16)
Security Group
You can select Auto generate or Use existing. A security group is a collection of access control rules for instances, such as cloud servers, containers, and databases, that have the same security requirements and that are mutually trusted within a VPC.
NOTE:This group must allow access from the selected subnet to both the subnet gateway address and the access addresses and ports of middleware such as RDS and CSE instances.
Select Automatically generated.
Organization
Select an image repository organization from the drop-down list. The image repository organization provides more refined organization management to build image resource management based on the organization structure.
If you use CAE for the first time, select Create Organization from the drop-down list and enter an organization name.
NOTE:You can add up to five organizations. To add more, submit a service ticket.
cae-demo
- Click OK. The creation progress is displayed in the Creating environment window. Wait for the environment to be created.
Step 2: Create an Application
- After the environment is created, you can create an application on the Overview page.
- Enter the application name, for example, cae-test.
- Click Create Application.

After the first application is created, you need to choose Components and click
 on the right of the Application module to create more applications.
Step 3: Create Frontend and Backend Components
Create a frontend component.
- In the navigation pane, choose Components. Under the created application, click Create Component.

You can also click Try It Out Now on the right of the Overview page, select the corresponding environment and application, and click Deploy to create the demo-backend and demo-frontend components.
- On the Create Component page, enter the component information by referring to Table 2.
Table 2 Creating a frontend component Parameter
Description
Example Value
Component
Enter a component name. Enter 4 to 32 characters, starting with a lowercase letter and ending with a lowercase letter or digit. Use only lowercase letters, digits, and hyphens (-).
cae-frontend
Version
Component version.
The format is A.B.C or A.B.C.D. A. B, C, and D are natural numbers, for example, 1.0.0 or 1.0.0.0.
1.0.0
Specifications
Select instance specifications.
For example, 0.5core,1GiB indicates that the instance has 0.5 vCPUs and 1 GiB memory.
0.5core,1GiB
Instances
Value range: 1 to 99. Default value: 2.
For example, if you set this parameter to 2, two instances with 0.5 vCPUs and 1 GiB memory are created.
2
Code Source
Select the code source, which can be Source code repository, Images, or Software packages.
Source code repository
Source code repository
If you select Source code repository, select a code source.
CodeArts, GitHub, GitCode, GitLab, and Bitbucket code can be identified.
GitHub
Authorization
If you select GitHub, select the authorization information from the drop-down list.
If you use this function for the first time, click Create Authorization and set Authorization and Method, and click Confirm.
In this case, retain the default name and select Token.
NOTE:To obtain a token, perform the following steps:
- Log in to the token creation page of GitHub.
- Click Generate new token > Generate new token (classic).
- On the setting page, create a token with correct permissions and select the following scopes: repo, read:org, admin:repo_hook, admin:org_hook and read:user.
- Click Generate token. The token is returned only once. Record and save the token.
Select the source code authorization information.
Username/Organization
If you select GitHub as the source code repository, select the username or organization corresponding to the source code for code management of the current project.
Select the username or organization created for GitHub.
Repository
If you select GitHub as the source code repository, you need to set the repository name to manage the code of each module in the current project.
cae-frontend
Branch
If you select GitHub as the source code repository, select the corresponding branch for code management.
master
Language/Runtime System
Select a language of the source code from the drop-down list.
Nodejs16
Custom Build
Select Default or Custom.
Note: The authorization mode varies depending on the code source.
Default command or script
Dockerfile
Set this parameter if the component source is Source code repository. You can select Custom or Default.
Custom
Dockerfile Address
If you select Custom for Dockerfile, set the path relative to the root directory.
Note:
- Dockerfile Address is the directory where the Dockerfile is located relative to the root directory (./) of the project. The Dockerfile is used to build an image.
- The Docker program reads the Dockerfile file to generate a custom image.
- The Dockerfile address contains 1 to 255 characters, including letters, digits, periods (.), hyphens (-), underscores (_), and slashes (/).
- If the file name is Dockerfile, you can only enter a directory address and this address must end with a slash (/).
./
- Click Create and Deploy Component. In the displayed dialog box, click Deploy Now. Wait until the component is created.
Create a backend component.
- In the created application, click Create Component.
- On the Create Component page, enter the component information by referring to Table 3.
Table 3 Creating a backend component Parameter
Description
Example Value
Component
Enter a component name. Enter 4 to 32 characters, starting with a lowercase letter and ending with a lowercase letter or digit. Use only lowercase letters, digits, and hyphens (-).
cae-backend
Version
Component version.
The format is A.B.C or A.B.C.D. A. B, C, and D are natural numbers, for example, 1.0.0 or 1.0.0.0.
1.0.0
Specifications
Select instance specifications.
For example, 0.5core,1GiB indicates that the instance has 0.5 vCPUs and 1 GiB memory.
0.5core,1GiB
Instances
Value range: 1 to 99. Default value: 2.
For example, if you set this parameter to 2, two instances with 0.5 vCPUs and 1 GiB memory are created.
2
Code Source
Select the code source, which can be Source code repository, Images, or Software packages.
Source code repository
Source code repository
If you select Source code repository, select a code source.
CodeArts, GitHub, GitCode, GitLab, and Bitbucket code can be identified.
GitHub
Authorization
If you select GitHub, select the authorization information from the drop-down list.
If you use this function for the first time, click Create Authorization and set Authorization and Method, and click Confirm.
In this case, retain the default name and select Token.
NOTE:To obtain a token, perform the following steps:
- Log in to the token creation page of GitHub.
- Click Generate new token > Generate new token (classic).
- On the setting page, create a token with correct permissions and select the following scopes: repo, read:org, admin:repo_hook, admin:org_hook and read:user.
- Click Generate token. The token is returned only once. Record and save the token.
Select the source code authorization information.
Username/Organization
If you select GitHub as the source code repository, select the username or organization corresponding to the source code for code management of the current project.
Select the username or organization created for GitHub.
Repository
If you select GitHub as the source code repository, you need to set the repository name to manage the code of each module in the current project.
cae-backend
Branch
If you select GitHub as the source code repository, select the corresponding branch for code management.
master
Language/Runtime System
Select a language of the source code from the drop-down list.
java8
Custom Build
Select Default or Custom.
Note: The authorization mode varies depending on the code source.
Default command or script
Dockerfile
Set this parameter if the component source is Source code repository. You can select Custom or Default.
Custom
Dockerfile Address
If you select Custom for Dockerfile, set the path relative to the root directory.
Note:
- Dockerfile Address is the directory where the Dockerfile is located relative to the root directory (./) of the project. The Dockerfile is used to build an image.
- The Docker program reads the Dockerfile file to generate a custom image.
- The Dockerfile address contains 1 to 255 characters, including letters, digits, periods (.), hyphens (-), underscores (_), and slashes (/).
- If the file name is Dockerfile, you can only enter a directory address and this address must end with a slash (/).
./
- Click Create and Deploy Component. In the displayed dialog box, click Deploy Now. Wait until the component is created.
Step 4: Configure Components
Configure a frontend component.
- Choose Component Configurations.
- Select cae-frontend from the drop-down list in the upper part of the page.
- Click Edit in the Access Mode module.
- In the Access Component from Another Environment area, click Load Balancing > Add Load Balancer.
- Configure the parameters based on Table 4.
Table 4 Configuring external network access for load balancing Parameter
Description
Example Value
Load Balancer
You can select Dedicated or Built-in load balancer.
- If you select Built-in load balancer, only EIP-based public network access is supported.
- If you select Dedicated, select the corresponding load balancer from the drop-down list.
NOTE:
- Before selecting a Dedicated load balancer, configure VPC to access the CAE environment.
- Only load balancers in the environment's VPC are supported.
- You can configure an EIP for the load balancer to access CAE components from public network.
Built-in load balancer
Health Check
The health check is for the load balancer.
- Disable
- Enable: default.
Enable
Access Control
You can create an access control policy to allow or forbid an IP address to access a component. The value can be an IP address or an IP network segment.
Allow all IP addresses
Port Settings
Configure the protocol, listening port, and access port.
- Protocol: Select TCP.
- Listening Port: Enter 8080.
- Access Port: Select a valid port ranging from 0 to 65,535, for example, 20,004.
The port number must be unique.
- Click OK.
- Click Activate Settings in the upper part of the page. In the dialog box displayed on the right, confirm the configurations and click OK for the configurations to take effect.
Configure a backend component.
- Select cae-backend from the drop-down list in the upper part of the page.
- Click Edit in the Access Mode module.
- Select Load Balancing, click Add Load Balancer, and set parameters by referring to Table 5.
Table 5 Configuring external network access for load balancing Parameter
Description
Example Value
Load Balancer
You can select Dedicated or Built-in load balancer.
- If you select Built-in load balancer, only EIP-based public network access is supported.
- If you select Dedicated, select the corresponding load balancer from the drop-down list.
NOTE:
- Before selecting a Dedicated load balancer, configure VPC to access the CAE environment.
- Only load balancers in the environment's VPC are supported.
- You can configure an EIP for the load balancer to access CAE components from public network.
Built-in load balancer
Health Check
The health check is for the load balancer.
- Disable
- Enable: default.
Enable
Access Control
You can create an access control policy to allow or forbid an IP address to access a component. The value can be an IP address or an IP network segment.
Allow all IP addresses
Port Settings
Configure the protocol, listening port, and access port.
- Protocol: Select TCP.
- Listening Port: Enter 9090.
- Access Port: Select a valid port ranging from 0 to 65,535, for example, 20,001.
The port number must be unique.
- Click OK.
- Click Activate Settings in the upper part of the page. In the dialog box displayed on the right, confirm the configurations and click OK for the configurations to take effect.
Configure environment variables for a frontend component.
- Select cae-frontend from the drop-down list in the upper part of the page.
- Click Edit in the Environment Variables module.
- Click Add Environment Variable and configure the environment variable by referring to Table 6.
Table 6 Environment variable parameters Parameter
Description
Example Value
Type
Select Add manually or Import secret.
Add manually
Name
Name of an environment variable, which must be unique. Use letters, digits, underscores (_), hyphens (-), or periods (.). Do not start with a digit.
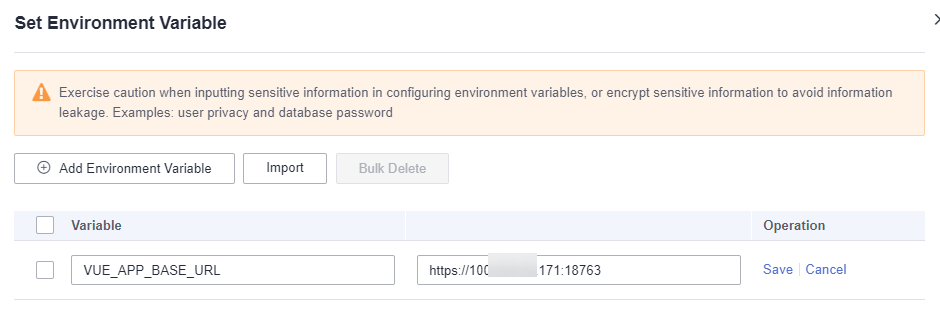
VUE_APP_BASE_URL
Variable/Variable Reference
Enter the backend access address, which can be obtained from Components, as shown in Figure 1.
Enter the backend access address.
Figure 2 Configuring frontend environment variables
- Click Save and then click OK to complete the configuration.
- Click Activate Settings in the upper part of the page. In the dialog box displayed on the right, confirm the configurations and click OK for the configurations to take effect.
Step 5: Access Application
- Choose Components.
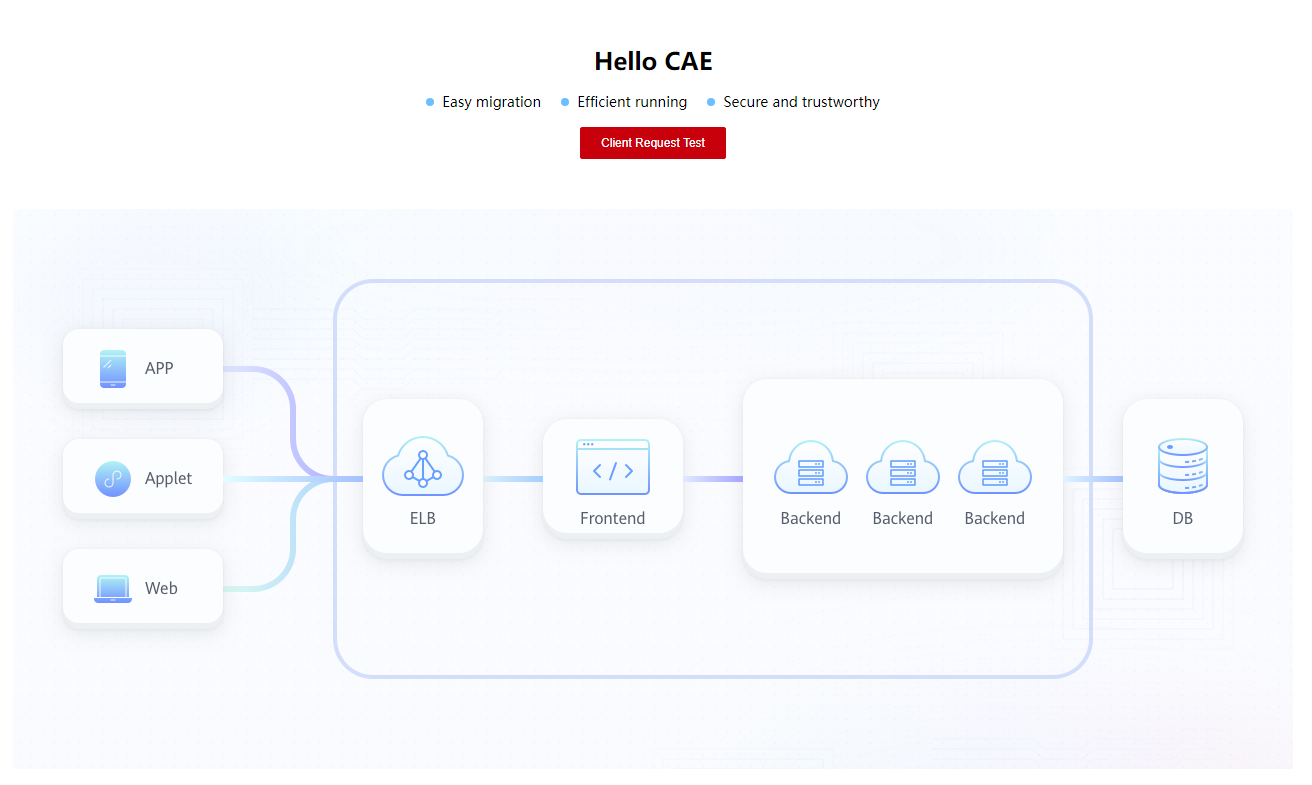
- Click the public network address in the Access Address column of the cae-frontend component to view the application page.
Figure 3 Application page


If you select the private network access mode, log in to the cluster node and run the curl command. For details, see Private Network Access.
Feedback
Was this page helpful?
Provide feedbackThank you very much for your feedback. We will continue working to improve the documentation.See the reply and handling status in My Cloud VOC.
For any further questions, feel free to contact us through the chatbot.
Chatbot


