هذه الصفحة غير متوفرة حاليًا بلغتك المحلية. نحن نعمل جاهدين على إضافة المزيد من اللغات. شاكرين تفهمك ودعمك المستمر لنا.
- What's New
- Function Overview
- Service Overview
-
Billing
- Billing Overview
- Billing Modes
- Billing Items
- Billing Examples
- Changing the Billing Mode
- Renewing Your Subscription
- Bills
- About Arrears
- Billing Termination
- Cost Management
-
Billing FAQs
- How Is SecMaster Billed?
- Can I Use SecMaster for Free?
- How Do I Change or Disable Auto Renewal for SecMaster?
- Will SecMaster Be Billed After It Expires?
- How Do I Renew SecMaster?
- Where Can I Unsubscribe from SecMaster?
- Where Can I View the Remaining Quotas of Security Data Collection and Security Data Packages?
- Can I Change the Billing Mode for SecMaster?
- Getting Started
-
User Guide
- Buying SecMaster
- Authorizing SecMaster
- Checking Security Overview
- Workspaces
- Viewing Purchased Resources
-
Security Governance
- Security Governance Overview
- Security Compliance Pack Description
- Authorizing SecMaster to Access Cloud Service Resources
- Subscribing to or Unsubscribing from a Compliance Pack
- Starting a Self-Assessment
- Viewing Security Compliance Overview
- Viewing Evaluation Results
- Viewing Policy Scanning Results
- Downloading a Compliance Report
- Security Situation
- Resource Manager
- Risk Prevention
- Threats
- Security Orchestration
-
Playbook Overview
- Ransomware Incident Response Solution
- Attack Link Analysis Alert Notification
- HSS Isolation and Killing of Malware
- Automatic Renaming of Alert Names
- Auto High-Risk Vulnerability Notification
- Automatic Notification of High-Risk Alerts
- Auto Blocking for High-risk Alerts
- Real-time Notification of Critical Organization and Management Operations
-
Settings
- Data Integration
-
Log Data Collection
- Data Collection Overview
- Data Collection Process
- Adding a Node
- Configuring a Component
- Adding a Connection
- Creating and Editing a Parser
- Adding and Editing a Collection Channel
- Verifying Log Collection
- Managing Connections
- Managing Parsers
- Managing Collection Channels
- Viewing Collection Nodes
- Managing Nodes and Components
- Partitioning a Disk
- Logstash Configuration Description
- Connector Rules
- Parser Rules
- Upgrading the Component Controller
- Customizing Directories
- Permissions Management
- Key Operations Recorded by CTS
-
Best Practices
-
Log Access and Transfer Operation Guide
- Solution Overview
- Resource Planning
- Process Flow
-
Procedure
- (Optional) Step 1: Buy an ECS
- (Optional) Step 2: Buy a Data Disk
- (Optional) Step 3: Attach a Data Disk
- Step 4: Create a Non-administrator IAM User
- Step 5: Configure Network Connection
- Step 6: Install the Component Controller (isap-agent)
- Step 7: Install the Log Collection Component (Logstash)
- (Optional) Step 8: Creating a Log Storage Pipeline
- Step 9: Configure a Connector
- (Optional) Step 10: Configure a Log Parser
- Step 11: Configure a Log Collection Channel
- Step 12: Verify Log Access and Transfer
- Credential Leakage Response Solution
-
Log Access and Transfer Operation Guide
-
API Reference
- Before You Start
- API Overview
- Calling APIs
-
API
- Alert Management
- Incident Management
- Indicator Management
- Playbook Management
- Alert Rule Management
- Playbook Version Management
- Playbook Rule Management
- Playbook Instance Management
- Playbook Approval Management
- Playbook Action Management
- Incident Relationship Management
- Data Class Management
- Workflow Management
- Data Space Management
- Pipelines
- Workspace Management
- Metering and Billing
- Metric Query
- Baseline Inspection
- Appendix
- FAQs
-
More Documents
-
User Guide (ME-Abu Dhabi Region)
- Service Overview
- Buying SecMaster
- Authorizing SecMaster
- Viewing Security Overview
- Workspaces
- Viewing Purchased Resources
-
Security Governance
- Security Governance Overview
- Security Compliance Pack Description
- Authorizing SecMaster to Access Cloud Service Resources
- Subscribing to or Unsubscribing from a Compliance Pack
- Starting a Self-Assessment
- Viewing Security Compliance Overview
- Viewing Evaluation Results
- Viewing Policy Scanning Results
- Downloading a Compliance Report
- Security Situation
- Resource Manager
- Risk Prevention
- Threat Operations
- Security Orchestration
-
Settings
- Data Integration
-
Log Data Collection
- Data Collection Overview
- Adding a Node
- Configuring a Component
- Adding a Connection
- Creating and Editing a Parser
- Adding and Editing a Collection Channel
- Managing Connections
- Managing Parsers
- Managing Collection Channels
- Viewing Collection Nodes
- Managing Nodes and Components
- Partitioning a Disk
- Logstash Configuration Description
- Connector Rules
- Parser Rules
- Upgrading the Component Controller
- Customizing Directories
- Permissions Management
- FAQs
- Change History
-
User Guide (Kuala Lumpur Region)
- Service Overview
- Authorizing SecMaster
- Security Overview
- Workspaces
- Viewing Purchased Resources
- Security Situation
- Resource Manager
-
Risk Prevention
-
Baseline Inspection
- Baseline Inspection Overview
- Creating a Custom Check Plan
- Starting an Immediate Baseline Check
- Viewing Check Results
- Handling Check Results
- Viewing Compliance Packs
- Creating a Custom Compliance Pack
- Importing and Exporting a Compliance Pack
- Viewing Check Items
- Creating a Custom Check Item
- Importing and Exporting Check Items
- Vulnerability Management
- Policy Management
-
Baseline Inspection
-
Threat Operations
- Incident Management
- Alert Management
- Indicator Management
- Intelligent Modeling
- Security Analysis
- Data Delivery
-
Security Orchestration
- Security Orchestration Overview
- Built-in Playbooks
- Security Orchestration Process
- (Optional) Configuring and Enabling a Workflow
- Configuring and Enabling a Playbook
- Operation Object Management
- Playbook Orchestration Management
- Layout Management
- Plug-in Management
- Settings
-
FAQs
-
Product Consulting
- Why Is There No Attack Data or Only A Small Amount of Attack Data?
- Where Does SecMaster Obtain Its Data From?
- What Are the Dependencies and Differences Between SecMaster and Other Security Services?
- What Are the Differences Between SecMaster and HSS?
- How Do I Update My Security Score?
- How Do I Handle a Brute-force Attack?
- Issues About Data Synchronization and Data Consistency
- About Data Collection Faults
-
Product Consulting
- Change History
-
User Guide (ME-Abu Dhabi Region)
- General Reference
Show all
Copied.
Step 11: Configure a Log Collection Channel
This topic describes how to configure a log collection channel and connect functional components to let SecMaster and the log collector work properly.
Configuring a Log Collection Channel
- Log in to the management console.
- Click
in the upper left corner of the page and choose Security & Compliance > SecMaster.
- In the navigation pane on the left, choose Workspaces > Management. In the workspace list, click the name of the target workspace.
Figure 1 Workspace management page
- In the navigation pane on the left, choose Settings > Collections. Then, select the Collection Channels tab.
Figure 2 Collection channel management tab page
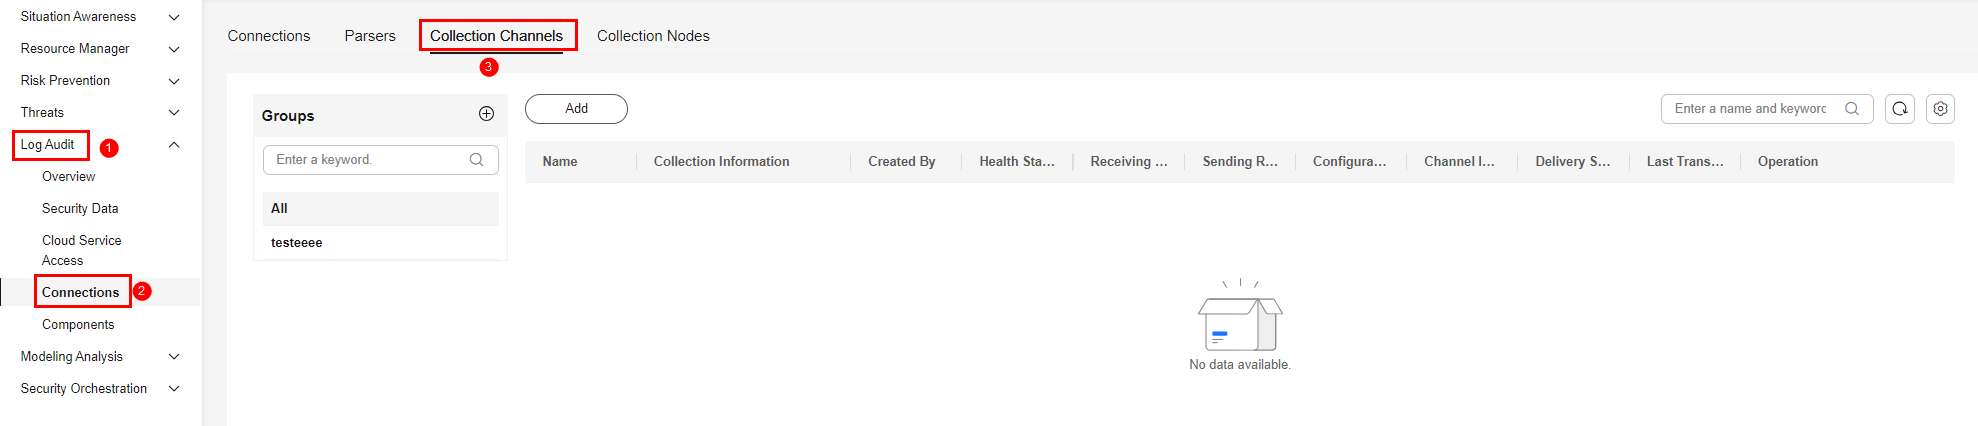
- Add a log collection channel group.
- On the Collection Channels tab, click
on the right of Groups.
- Enter a group name and click
.
- On the Collection Channels tab, click
- Create a log collection channel.
- On the right of the group list, click Add.
- In the Configure Basic Configuration step, configure basic information.
Table 1 Basic configuration parameters Parameter
Description
Basic Information
Title
The collection channel name you customize.
Channel grouping
Select the group created in 5.
(Optional) Description
Enter the description of the collection channel.
Configure Source
Source Name
Select the name of the log source added in Step 9: Configure a Connector.
After you select a source, the system automatically generates the information about the selected source.
Destination Configuration
Destination Name
Select the name of the log destination added in Step 9: Configure a Connector.
After you select a destination, the system automatically generates the information about the selected destination.
- Click Next in the lower right corner of the page.
- On the displayed Configure Parser page, select the parser configured in (Optional) Step 10: Configure a Log Parser and click Next in the lower right corner of the page.
If no parsers are configured, you can select Quick access Parser to add raw logs to the collection channel list.
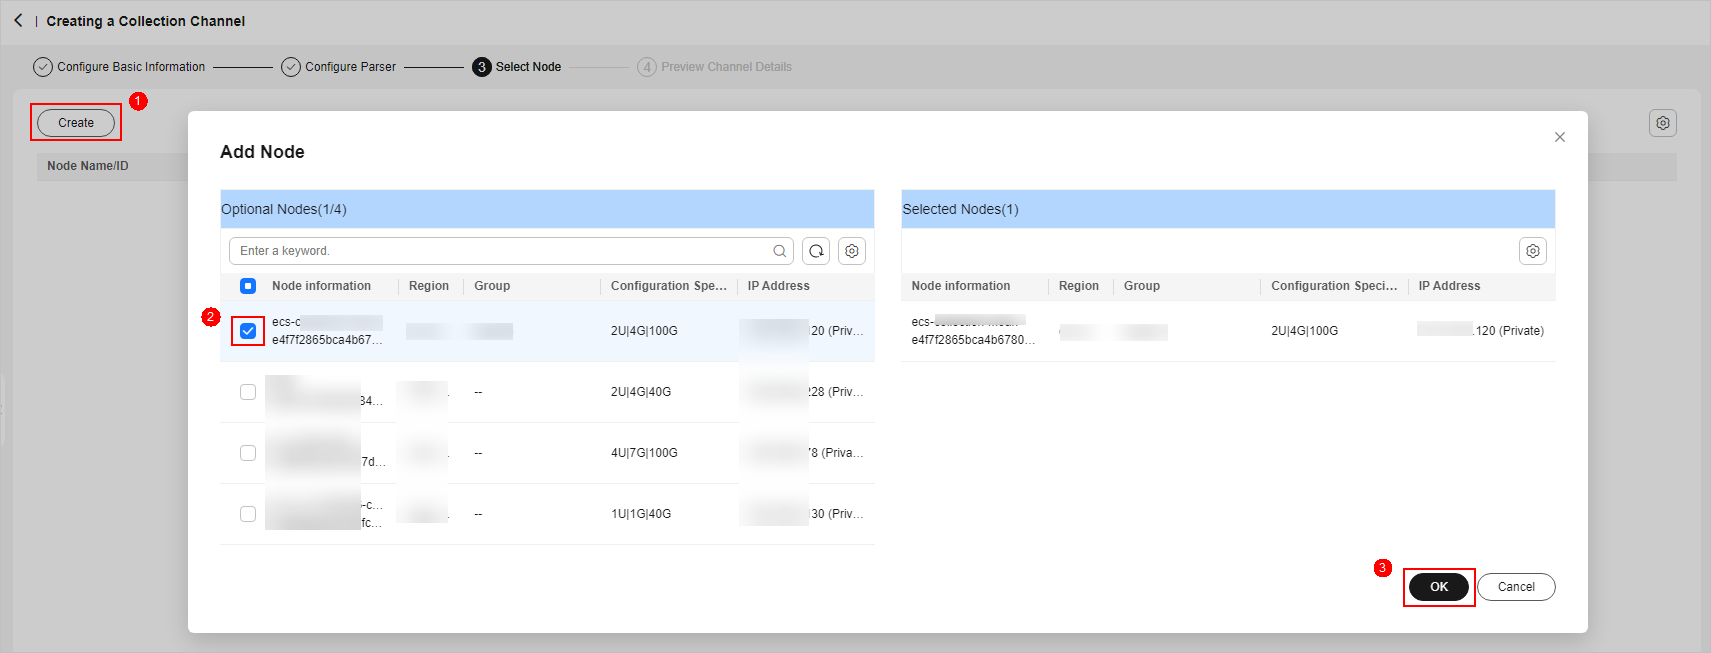
- On the Select Node page, click Create. In the Add Node dialog box displayed, select the ECS node created in (Optional) Step 1: Buy an ECS and click OK.
Figure 3 Selecting a node
- Click Next in the lower right corner of the page.
- On the Preview Channel Details page, confirm the configuration and click Save and Execute.
On the Collection Channels tab, if the health status of a collection channel is Normal, the collection channel is successfully delivered.
Figure 4 Collection channels configured
Feedback
Was this page helpful?
Provide feedbackThank you very much for your feedback. We will continue working to improve the documentation.See the reply and handling status in My Cloud VOC.
For any further questions, feel free to contact us through the chatbot.
Chatbot