
Creating a Build Task with Code
CodeArts Build allows you to define your build as code using YAML. Your configurations, such as build environments, parameters, commands, and actions, reside in a YAML file named build.yml. After creating this file, add it along with the source code to a code repository. The file will be used as a script by the system to run a build.
Defining your build as code has the following advantages:
- Your YAML file collects and clearly describes build parameters, commands, steps, as well as post-build operations, ensuring a trusted build process.
- The build configurations in build.yml are versioned alongside the commits in the code repository. This enables you to rerun earlier build tasks despite configuration changes.
- To modify the build script for a new feature, create a branch to modify the build.yml file for testing. By this way, you will not have to worry about affecting other branches.
Constraints
You can only use the code hosted in CodeArts Repo for code-based builds.
Preparations
- Obtain permissions for CodeArts Repo.
- Create a repository by referring to CodeArts Repo User Guide > "Creating a CodeArts Repo Repository".
- Create a project by referring to CodeArts User Guide > "Preparations" > "Creating a Project".
If you already have a project available, skip this step.
Creating a YAML File for Your Code-based Build
- Access the CodeArts Build Homepage from the project list.
- In the navigation pane, choose .
- On the CodeArts Repo console, click New Repository. On the displayed page, select Common and click Next. Then set parameters according to Table 1, and click OK.
Table 1 Creating a code repository Parameter
Description
Repository Name
Assign a custom name to the code repository, for example, maven_yml_build.
- The name starts with a digit, letter, or underscore (_).
- The name can contain periods (.) and hyphens (-).
- The name cannot end with .git, .atom, or a period (.).
Description
Optional. Enter additional information to describe the code repository.
.gitignore Programming Language
Optional. Select the appropriate programming language, such as Java, for the .gitignore file.
Initial Settings
Select all.
- Generate README: Select this option to create a README file where you can add details about the project's architecture and purpose, similar to a repository-wide comment.
- Automatically create check task (free of charge): Select this option to auto-generate a code check task for the repository upon creation. The check task will appear in the check task list.
Visibility
Select Private.
- Private: Only repository members can access and commit code.
- Public: The repository is open and read-only to all guests, but is not displayed in their repository list or search results. You can select an open-source license as the remarks.
- Choose to create a directory named .cloudbuild.
- In the .cloudbuild directory, choose to create a file named build.yml. Figure 1 shows the directory that stores files of the code repository.
If the YAML file is not stored in the .cloudbuild directory, you can use parameter CB_BUILD_YAML_PATH to specify the path of the YAML file in the code repository. For details about parameter settings, see Adding Custom Parameters.
- Click
 and write the build.yml file by referring to the sample code in Creating the build.xml File for a Single Task.

Configuring Basic Information
- In the navigation pane, choose .
- Click Create Task. On the displayed page, configure the basic information of the build task by referring to Table 2. Click Next. The page for selecting a build template is displayed.
Table 2 Basic information Parameter
Description
Name
Assign a custom name to the build task.
- Letters, digits, underscores (_), and hyphens (-) allowed.
- 1 to 115 characters.
Project
Select the project to which the build task belongs.
- This parameter is autofilled when you access CodeArts Build through the project list, so you can leave it as default.
- When accessing the service through the service homepage, select the project created in preparations.
Code Source
If you select Repo, code is pulled from CodeArts Repo for your build.
Repository
Select the repository from where the code to be compiled is pulled.
Default Branch
Select a default branch.
Description
Optional. Enter additional information to describe the build task. Max. 512 characters.
Selecting a Build Template

No matter which build template you select, code-based builds remain unaffected.
Configuring Build Actions
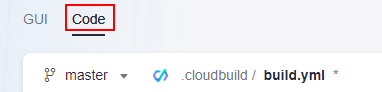
In the upper left corner of the Build Actions page, click the Code tab. The system automatically reads the YAML file from the code repository and the branch configured in basic information.
You can modify the YAML file by referring to the sample code in the "Build as Code" part of build task configurations. Any changes made to the YAML file will overwrite the original YAML file you create for your code-based build once the build task is completed.
Complete all the configurations and click Save to create a build task.
Feedback
Was this page helpful?
Provide feedbackThank you very much for your feedback. We will continue working to improve the documentation.


