Accessing a Cluster Using a Custom Domain Name
Scenario
Subject Alternative Name (SAN) enables certificates to be associated with multiple values, including IP addresses and domain names. A SAN is usually used by the client to verify the server validity in TLS handshakes. Specifically, the validity check includes whether the server certificate is issued by a CA trusted by the client and whether the SAN in the certificate matches the IP address or DNS domain name that the client actually accesses.
If a client cannot access the cluster's private IP address or EIP, add the client's accessible IP address or DNS domain name to the cluster server certificate as a SAN. This enhances security through two-way authentication. Typical use cases include DNAT access and domain name access.
If you have particular proxy access requirements or need to access resources in other regions, you can customize a SAN. Typical domain name access scenarios:
- Add the domain name mapping by either adding the DNS domain name address in the host domain name configuration on the client or configuring /etc/hosts on the client host.
- Use domain name access in the intranet. DNS allows you to configure mappings between cluster EIPs and custom domain names. After an EIP is updated, you can continue to use two-way authentication and the domain name to access the cluster without downloading the kubeconfig.json file again.
- Add A records on a self-built DNS server.
Prerequisites
A cluster of v1.19 or later is available.
Customizing a SAN
You can add a custom SAN on the CCE console. To do so, perform the following operations:
- Log in to the CCE console.
- Click the name of the target cluster in the cluster list to go to the cluster Overview page.
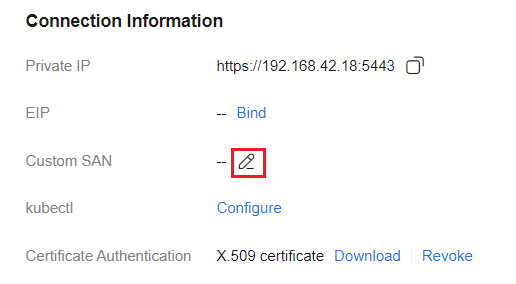
- In the Connection Information area, click
 next to Custom SAN. In the dialog box displayed, enter the IP address or domain name and click Save.
Figure 1 Custom SAN

- The kube-apiserver will be restarted and the kubeconfig certificate will be updated, which will take approximately 5 minutes. Do not perform any operations on the cluster during this period. After the operation is complete, download the updated kubeconfig certificate.
- A maximum of 128 domain names or IP addresses, separated by commas (,), are allowed.
- If a custom domain name needs to be bound to an EIP, ensure that you have configured an EIP.
Using the SAN to Access a Cluster
After the SAN is modified, the original kubeconfig.json configuration file and X.509 certificate become invalid. In this case, reconfigure the settings for accessing your cluster using an X.509 certificate or kubectl.
After the SAN is modified, the original kubeconfig.json file becomes invalid. If you previously accessed the cluster using kubectl, you need to reconfigure the settings.
- Download the kubeconfig.json file again after the SAN is modified.
- Log in to the CCE console and click the cluster name to access the cluster console.
- On the Overview page, locate the Connection Information area, and click Configure next to kubectl. On the page displayed, download the configuration file.
- Configure kubectl.
- Log in to your client and copy the kubeconfig.json file downloaded in 1 to the /home directory on your client.
- Configure the kubectl authentication file.
cd /home
mkdir -p $HOME/.kube
mv -f kubeconfig.json $HOME/.kube/config
- Change the kubectl access mode and use the SAN to access the cluster.
kubectl config use-context customSAN-0In the preceding command, customSAN-0 indicates the configuration name of the custom SAN. When multiple SANs are configured, each SAN is named with an incrementing number starting from 0, such as customSAN-0, customSAN-1, and more.
- Run the following command on the client to check whether the client can access the cluster using kubectl:
kubectl cluster-info # Check the cluster information.
If the following information is displayed, the client can access the cluster using kubectl:
Kubernetes control plane is running at https://xx.xx.xx.xx:5443
CoreDNS is running at https://xx.xx.xx.xx:5443/api/v1/namespaces/kube-system/services/coredns:dns/proxy
To further debug and diagnose cluster problems, use 'kubectl cluster-info dump'.
After the SAN is modified, the original X.509 certificate becomes invalid. If you previously accessed the cluster using the X.509 certificate, you need to reconfigure the settings.
- After the SAN is modified, download the X.509 certificate again.
- Log in to the CCE console and click the cluster name to access the cluster console.
- On the Overview page, locate the Connection Information area, and click Download next to X.509 certificate.
- In the Obtain Certificate dialog box displayed, select the certificate expiration time and download the X.509 certificate of the cluster as prompted.
- Call Kubernetes native APIs using the cluster certificate.
For example, run the curl command to call an API to obtain the pod information. In the following information, example.com:5443 indicates the custom SAN.
curl --cacert ./ca.crt --cert ./client.crt --key ./client.key https://example.com:5443/api/v1/namespaces/default/pods/
If the following information is displayed, the X.509 certificate is correctly configured and the API Server of the cluster is running properly:
{
  "kind": "PodList",
  "apiVersion": "v1",
...
For more cluster APIs, see Kubernetes API.
Helpful Links
- For more details about how to access a cluster using kubectl, see Accessing a Cluster Using kubectl.
- For more details about how to access a cluster using an X.509 certificate, see Accessing a Cluster Using an X.509 Certificate.
Feedback
Was this page helpful?
Provide feedbackThank you very much for your feedback. We will continue working to improve the documentation.


