
Using a Web Browser to Log In to Resources for O&M
After you log in to a host resource using a web browser, the cooperation, file management, file transfer, and command preset functions are available for you. A bastion host can log all activities performed on a host resource. The logs can be used for audits.
- Cooperation: This function allows the session initiator to invite other system users to participate the current session by sharing the session link with them, implementing O&M collaboration.
- File management: If you participate in a session and have operation permissions for this function, on the pane on the right of the session, you can manage files or folders on managed hosts and net disks on them. You can:
- Create new folders.
- Change the name of a file or folder.
- Delete files or folders in batches.
- File transfer: This function allows session participants to download or upload files or folders on the host or host net disk after they obtain the operation permissions. They can:
- Upload and download files.
- Upload folders.
- Upload multiple files on a local server or net disk to a host or download multiple files from a host to a local server or net disk, if Host Files is selected as the destination address.
- Upload multiple files or a folder to a host net disk or download multiple files from a host net disk to a local host, if Netdisk is selected as the destination address.
This topic describes how to log in to a host using a web browser and how to perform operations in the session window of the hosts using character or image protocols.
Constraints
- Only hosts using character protocols (SSH and Telnet) or image protocols (RDP and VNC) can be logged in using a web browser.
- The file transfer and management functions are unavailable for hosts using the Telnet protocol.
- Although using a web browser for O&M allows you to copy and paste a large number of characters without garbled characters, a maximum of 80,000 characters can be copied from the local to the remote, and a maximum of 1000,000 of bytes can be copied from the remote to the local.
- If you log in to a bastion host as a non-admin user and want to manage Windows host resources, deselect the admin console. To do so, go to the page, click Web OPS Settings in the upper right corner, then deselect admin console.
- File management
- File Transmission
- By default, the system supports the upload of a single file with a maximum size of 100 GB. However, the size of a single file to be uploaded is limited by the Personal Netdisk space and browser type.

If the disk space is insufficient, the upload will fail. In this case, you need to clear the disk or expand the disk capacity.
- Folders cannot be downloaded.
- For the hosts using the RDP protocol, only Netdisk can be select as the destination address.
- By default, the system supports the upload of a single file with a maximum size of 100 GB. However, the size of a single file to be uploaded is limited by the Personal Netdisk space and browser type.
Prerequisites
- You have the management permissions for the Host Operations module.
- You have obtained the access permissions for the resources.
- The network connection between the managed host and the system is normal, and the account username and password for logging in to the managed host are correct.
Procedure
- Log in to your bastion host.
- Choose Operation > Host Operations to go to the Host Operations page.
- Select the host you want and click Login in the Operation column to open the session.
- Session Window of Hosts Using the RDP or VNC Protocol
- Session Window of Hosts Using the SSH or Telnet Protocol Figure 1 Session window of hosts using the SSH protocol

- Invite other system users to participate in the current session. For details, see Cooperation.
- Click Cooperation. The collaborative session window is displayed.
- Click Share. Complete the information in the displayed Invite friends dialog box.
- The URL link can be copied and sent to multiple users.
- Only users with the access permission can access the bastion host. Otherwise, a connection error will be reported, indicating that the connection has been disconnected because the server does not respond for a long time. Check your network settings and try again (Code: T_514).
- Copy the link and send it to the users whom you want to invite. The users must have the access permission assigned. Once they receive the link, they can log in to the bastion host, open a web browser, and enter the link to open it in the web browser.
- If you are invited, click Enter to join the session.
Table 1 Parameters for session operation Parameter
Description
Apply for control
The invited user can apply for control from the invitation sender. Once approved, the invited user can control the current session.
Exit session
Exit the current session.
- Upload files to or download files from the host or host net disk. For details, see File Transfer.
- Click File Transfer. The File Transfer window is displayed.
Figure 2 File Transmission
- Host Files is selected by default. You can click Host Files to switch the destination address to Netdisk.
Figure 3 Switchover of destination address
- Click
 to upload a file.
 - Select a file and click
 to download a file. Figure 4 Uploading files
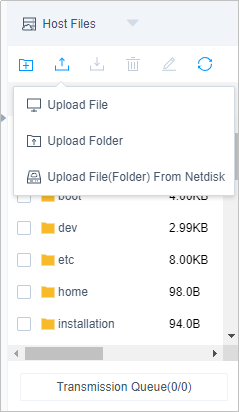
- Netdisk is dedicated for your exclusive use. It cannot be accessed by other users. You can transfer files from Netdisk to multiple hosts without worries of data leakage.
- The default file storage path of Windows servers is drive G, and that of Linux servers is the root directory.
- To upload or download files on a Windows server, open the disk directory of the server and copy and paste the file to drive G of the Netdisk.
- In the file management area, manage files or folders on the host or host net disk.
- Click File Transfer. The File Transfer window is displayed.
- Click
 to create a folder. Figure 5 New folder
- Select one or more files or folders and click
 to delete them.
 - Select a file or folder and click
 to edit its name.
 - Click
 to refresh all file directories.
Session Window of Hosts Using the SSH or Telnet Protocol
| Parameter | Description |
|---|---|
| Encode | The character protocol supports multiple encoding formats. |
| Copy/Paste | Select the characters, press Ctrl+C to copy it, and press Ctrl+V to paste it. |
| Preset command | You can preset commands that are long and frequently used. |
| Terminal Type | The character protocol supports terminal type switching, including Linux and Xterm. |
| Mass sending | When the group sending function is enabled, you can run commands in multiple sessions at the same time. |
| Font size | There are three types of font sizes: large, medium, and small. |
| Copy window | You can copy the current session window. |
| Full screen | Displays the window in full screen. |

Session Window of Hosts Using the RDP or VNC Protocol
| Parameter | Description |
|---|---|
| Copy/Paste | Remote text: Select the character you want, press Ctrl+C twice to copy the character, and press Ctrl+V to paste the character. Remote machine files: Select a text or image, press Ctrl+B to copy it, and press Ctrl+G to paste it. NOTE: Although using a web browser for O&M allows you to copy and paste a large number of characters without garbled characters, a maximum of 80,000 characters can be copied from the local to the remote, and a maximum of 1000,000 of bytes can be copied from the remote to the local. |
| Resolution | You can switch the resolution of the current operation interface. During the switching, a new connection is created. |
| Switch to remote mouse | You can switch over between the local mouse and remote mouse. |
| Windows | This Windows icon can be used for easy access to Windows system functions. |
| Ctrl+Alt+Delete | Lock the screen. |
| Copy window | You can copy the current session window. |
| Full screen | Displays the window in full screen. |

Feedback
Was this page helpful?
Provide feedbackThank you very much for your feedback. We will continue working to improve the documentation.


