Creating and Logging In to a Bastion Host
CBH is a unified security management and control platform. It provides accounting, authorization, authentication, and auditing management services that enable you to centrally manage cloud computing resources.
You can buy a CBH instance and use the admin account to add resources and policies to implement resource O&M and audit. In addition, you can use the admin account to create roles for permission management.
This topic walks you through how to buy a standard single-node instance with 50 assets, as well as how to quickly perform operations and audit on Linux host resources.
- Edition you buy: Standard
- Specifications: 50 assets
- Instance Type: Single node
- Managed resource type: Linux host resources
Procedure
This document describes how to quickly buy and configure a CBH instance.

|
Step |
Description |
|---|---|
|
Before using cloud services, sign up for a HUAWEI ID, enable Huawei Cloud services, complete real-name authentication, and top up your account. |
|
|
On the CBH console, buy a standard single-node bastion host with 50 assets. |
|
|
After you buy a bastion host, the default admin account is used to log in to the bastion host. |
|
|
Log in the bastion host as user admin and add Linux resources you want to manage to the bastion host so that resources can be accessed through the bastion host. You can use the admin account to create system users with different roles to implement refined permission management. |
|
|
Log in to the bastion host as user admin and associate management roles with resources. You can configure the login time range, operation permissions, and access blacklist and whitelist, and create access control policies for resources. |
Preparations
Before buying a CBH instance, you need to sign up for a HUAWEI ID, enable Huawei Cloud services, complete real-name authentication, and top up your account. Ensure that your account has sufficient balance or has a valid payment method configured.
Step 1: Buy a Bastion Host
- Log in to the CBH console.
- Click Buy CBH Instance to go to the Buy CBH Instance page.
- Select CBH Instance for Service Type and specify other parameters as required. For more information, see Table 2.
Table 2 Parameters for buying a bastion host instance Parameter
Example Value
Description
Billing Mode
Pay-per-use
The billing mode of the CBH instance. Currently, only Pay-per-use is supported.
The billing mode of the instance. Select Yearly/Monthly or Pay-per-use.
Yearly/Monthly is a prepaid billing mode in which a CBH instance is billed based on the service duration. This cost-effective mode is ideal when the duration of CBH instance usage is predictable.
Pay-per-use billing is a postpaid mode in which you pay for what you use by the hour.NOTE:After the pay-per-use billing mode is enabled, the billing stops only when the target instance is deleted, regardless of the instance running status.
Region
EU-Dublin
Select the region where the bastion host is used. You are advised to select the region where you deploy ECSs and RDS database instances you want to manage. This can reduce network latency and improve access speed.
Instance Type
Single-node
Select a single-node or primary/standby instance type based on your service requirements.
- Single-node: Only one bastion host is available after the purchase.
- Primary/Standby: After the purchase request is submitted, two bastion hosts will be delivered and deployed in different AZs to form a two-node cluster. If the primary bastion host becomes unavailable, the standby host will take over the job.
NOTE:
If you buy a primary/standby instance, do not disable HA, or logins will fail.
AZ
Retain the default value.
An AZ is the location where the purchased bastion host is deployed.
NOTE:Primary and standby hosts can be deployed in the same AZ or different AZs.
Instance Name
CBH-default-001
Name of the CBH instance.
Specifications
50 Assets
Specifications of your CBH instance.
CBH specifications: 50, 100, 200, 500, 1,000, 2,000, and 5,000 assets.
Asset quantity indicates the maximum number of resources the CBH instance you buy can manage and the maximum number of concurrent requests your CBH instance supports. The vCPUs and the size of data and system disks vary depending on the asset quantity. For details about the asset specifications, see Edition Differences.
For example, if you select 100 assets, the number of resources your instance can manage and the maximum number of concurrent connections your instance supports are both 100.
Edition
Standard
CBH provides two editions: Standard and Professional. The Professional edition supports database resource management. For details about the differences between editions, see Edition Differences.
Storage Package
0
If the number of assets exceeds the storage specifications, you can expand the storage capacity.
VPC
vpc-default(192.168.x.x/xx)
The Virtual Private Cloud (VPC) where your instance is located. Select a VPC in the current region.
If no VPC is available in the current region, click View VPC and create one.
NOTE:- By default, networks in VPCs in different regions or even in the same region are not connected. Different networks are isolated from each other. This is not the case for different AZs in the same VPC. Two networks on the same VPC should be able to communicate with each other even if they are in different AZs.
- CBH can directly access and manage resources, such as ECSs, in the same VPC in the same region. To manage resources such as ECSs in different VPCs in the same region, establish a VPC peering connection, use a VPN, or use other methods to connect networks. For details, see Creating a VPC Peering Connection. Managing ECSs across regions is not recommended.
For more details, see VPC Planning.
Assign IPv4 Address
Auto
Select Auto or Manual.
If you select Manual, you can view the used IP addresses.
Security Group
Sys-default
The security group for your CBH instance. The default security group is Sys-default in the current region.
If no security group is available, click Manage Security Groups to create a security group or configure a new one.
NOTE:- A security group provides access rules for the CBH instances and resources that have the same security protection requirements and are mutually trusted in the same VPC. CBH instances are protected by these access rules after being added to the security group. For details, see Security Group Overview.
- CBH instances and ECSs can be added to the same security groups. They do not affect each other when implementing security group rules.
- Before creating HA instances, ensure that the security group allows inbound traffic from ports 22, 31036, 31679, and 31873.
- When a bastion host instance is created, ports 80, 8080, 443, and 2222 are automatically enabled. If you do not need to use them, disable them immediately after the instance is created.
- During cross-version upgrade, ports 22, 31036, 31679, and 31873 are automatically enabled for the instance. After the upgrade, keep port 31679 enabled and disable other ports immediately if you do not need to use them.
For more details about security groups, see How Do I Configure a Security Group for a CBH Instance?
EIP
100.x.x.x
The EIP in the current region for your CBH instance.
If no EIP is available in the current region, click Buy EIP to create one.
NOTE:If you need a publicly accessible CBH instance, you need to bind an EIP to it. While no EIPs are required if you log in to the CBH instance over a private network, such as VPN or Direct Connect connections.
Enterprise Project
default
Select the enterprise project the CBH instance you are buying belongs to.
The default enterprise project is selected by default.
Password
Cbh@default.001
User-defined password of the admin user.
NOTE:- The password must:
- Contain 8 to 32 characters.
- Contain at least three of the following types of characters: uppercase letters (A to Z), lowercase letters (a to z), digits (0 to 9), and following special characters: !@$%^-_=+[{}]:,./?~#*
- Cannot contain the username or the username spelled backwards.
- Cannot contain more than two consecutive identical characters.
- Enter the same password in the Password and Confirm Password text boxes.
- The CBH system cannot obtain the password of system administrator admin. Keep your account information secure.
- When you log in to your CBH system as admin for the first time, change the password and configure mobile phone number as prompted. Otherwise, you cannot log in to the CBH system.
- If you forget the password of user admin after buying a CBH instance, reset the password by referring to Resetting the Password.
Required Duration
1 month
Required duration of the instance.
You can buy a CBH instance on a monthly or yearly basis.
- Confirm details in the Current Configuration area and click Next.

When receiving a network restriction notification, click Enable to eliminate the network restrictions so that the instance can be issued after purchase.
You can view the rules in the security group and firewall ACL and ensure that:
- Access to port 9443 is allowed in the outbound direction of the security group to which your CBH instance belongs.
- The subnet where the instance locates is not associated with the firewall ACL, or the ACL rule of the associated firewall allows the instance to access port 9443 in the outbound direction.
- On the Confirm page, confirm the details, read the privacy statement, select Privacy Statement, and click Submit.
- Return to the CBH instance list and check the new CBH instance you buy.
After a CBH instance is purchased, the corresponding CBH system is automatically created for you, which takes about 10 minutes.

Do not unbind an EIP from a CBH instance before the mapped CBH system is created. If you unbind an EIP from an instance before its status changes to Running, the mapped CBH system may fail to be created.
Step 2: Log In to the Bastion Host
You need to log in to the instance to perform operations such as bastion host management, O&M, and audit.
- Return to the CBH instance list page and check whether the status of the purchased CBH instance is Running.
- Click Remote Login in the Operation column. In the displayed dialog box, click Log In in the Admin Login bar to automatically log in to the bastion host.

You need to change the initial password of the admin user upon the first login to access the bastion host instance.
Figure 2 Login to a bastion host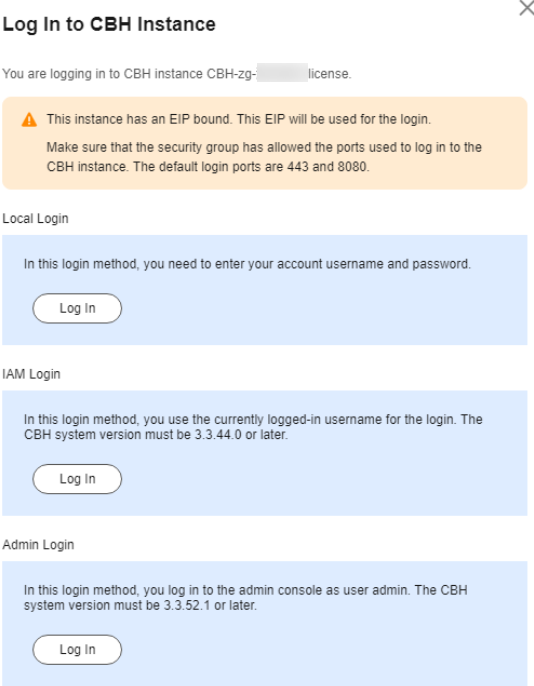
Step 3: Add Resources to the Bastion Host System
To use the bastion host to audit or maintain resources, you need to add resources to the bastion host first.
- On the CBH instance page, choose .
To add application resources, choose . For details, see Using a Bastion Host to Manage Application Servers.
- Click New. In the displayed dialog box, configure network parameters and basic information about the host.
Figure 3 New Host
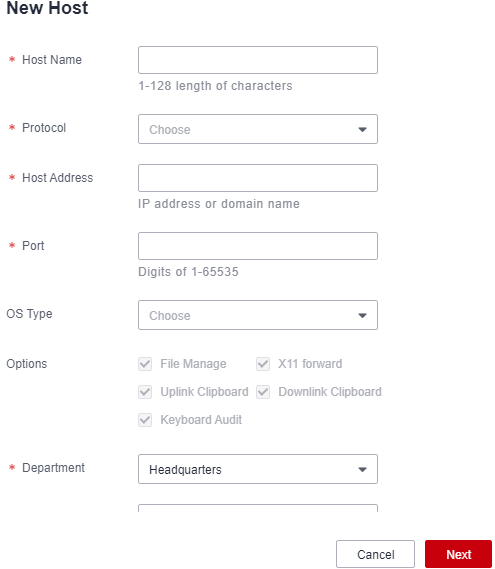
Table 3 Host resource network parameters Parameter
Example Value
Description
Host Name
host-test-01
Custom name of the host resource. A host name must be unique in a bastion host.
Protocol
SSH
Select a protocol based on the protocol type of the host you are adding.
Host Address
100.x.x.x
Host IP address that can be used to establish connection with your bastion host.
Port
22
Enter the port number that can be used to access the host.
OS Type
Linux
(Optional) Type of the host OS or device OS.
- The default value is empty. You need to select an OS type based on the type of the added resources.
- 14 OS types are supported, including Linux, Windows, Cisco, Huawei, H3C, DPtech, Ruijie, Sugon, Digital China sm-s-g 10-600, Digital China sm-d-d 10-600, ZTE, ZTE5950-52tm, Surfilter, and ChangAn.
- In addition, system administrator admin can customize OS types.
Encode
UTF-8
If you select SSH or TELNET for Protocol, the Chinese character can be used on the O&M page.
The options are UTF-8, Big5, and GB18030.
Terminal Type
Linux
If you select SSH or TELNET for Protocol, you can specify the O&M terminal you want.
The options are Linux and Xterm.
Options
Retain the default value.
(Optional) Select File Manage, X11 forward, Uplink Clipboard, Keyboard Audit, and/or Downlink Clipboard.
- File Manage: This option is supported only by SSH, RDP, and VNC hosts.
- Clipboard: This option is supported only by SSH, RDP, and Telnet hosts.
- X11 forward: This option is supported only by SSH hosts.
- Keyboard Audit: Only RDP, VNC, and protocol hosts can be configured.
Department Name
HQ
Department to which the host resource belongs.
- Click Next to add an account for the managed host. Select Afterward.
Figure 4 Adding an account
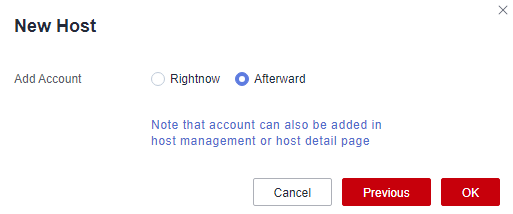
- Click OK. After the account is verified, you can then view the new host resource under the Host tab.
Step 4: Add an Access Control Policy
After a resource is added, you need to bind an account or IP address to the resource to ensure resource access security.
- Log in to the bastion host instance and choose Policy > ACL Rules to enter the ACL rule list page.
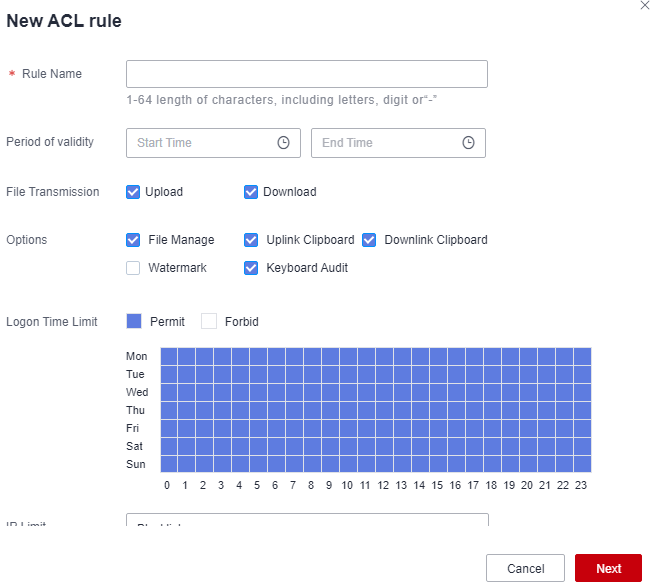
- Click New. In the dialog box displayed, configure basic policy information.
Figure 5 ACL Rules
- Click Next and select the admin user.
Figure 6 Selecting accounts
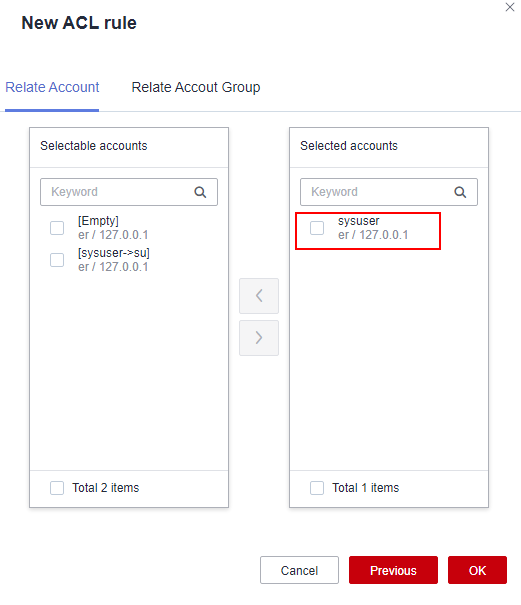
- Click Next and select the resource account.

Resource account Empty is the account automatically created when a resource is added. It can be used to log in to resources.
Figure 7 Relate Account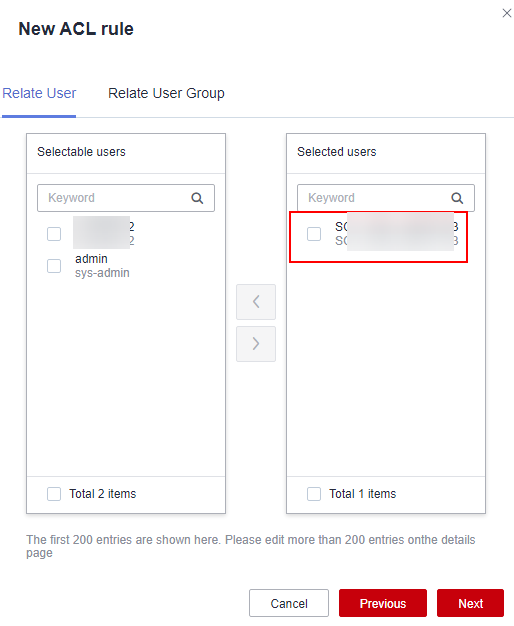
- Click OK. You can view the new policy in the policy list.

After policies are configured, you can choose Operation > Host Operations, select the target host, and use the Empty account to log in to the host. After the login, you can perform O&M operations. Then, you can choose Audit > System Log and view the login logs and operation logs.
Follow-up Operations
- If you need to distinguish management roles, log in to the bastion host as user admin and add different roles to the bastion host instance for refined permission management.
- If you need to customize settings for login, account, session, gateway, router, port, authentication, and alarm parameters, choose .
Feedback
Was this page helpful?
Provide feedbackThank you very much for your feedback. We will continue working to improve the documentation.


