

Creating a User
Scenarios
A user is an account used to log in to a bastion host system. The system administrator admin is the first account for users to log in to a bastion host system for the first time. The admin user has the highest operation permissions, and such permissions cannot be deleted or changed.
The administrator creates users in the corresponding bastion host system and assigns different roles to other users. Users then have different system operation and access permissions based on the permissions of the roles assigned to them.
The admin and other users who have the permission to manage the User module can create and manage users.
Prerequisites
Your role has the management permission for the User module. To synchronize AD domain users, you also need to have the management permission for the System module. You can check permissions assigned to a role in Role.
Method 1: Creating a User
- Log in to your bastion host system.
- In the navigation pane on the left, choose User > User to go to the user list page.
- In the upper right corner of the page, click New. In the displayed New User dialog box, complete required parameters. Figure 1 New User
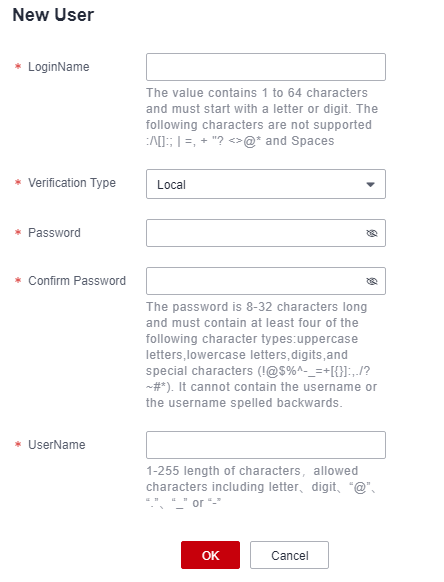
Table 1 Parameters for creating a user Parameter
Description
LoginName
Specify the username for logging in to the system.
The LoginName must be unique in a system and cannot be changed once created.
Verification Type
Specify how the user is verified for logging in to the bastion host.
- Local: The user is verified against the account management system of the bastion host. This method is the default method.
- AD: The user is verified against the Windows AD domain server. To use this method, you need to configure the corresponding remote authentication server in the system first. For details, see Configuring Remote AD Authentication.
- LDAP: The user is verified against the third-party authentication server through the LDAP protocol. To use this method, you need to configure the corresponding remote authentication server in the system first. For details, see Configuring Remote LDAP Authentication.
- RADIUS: The user is verified against the third-party authentication server through the RADIUS protocol. To use this method, you need to configure the corresponding remote authentication server in the system first. For details, see Configuring Remote RADIUS Authentication.
- Azure AD: The user is verified against the Azure platform based on Security Assertion Markup Language (SAML) configuration. To use this method, you need to configure the corresponding remote authentication server in the system first. For details, see Configuring Remote Azure AD Authentication.
Domain name
This parameter is mandatory if you select Azure AD for Verification Type.
Provide the suffix you registered with the Azure platform.
Password/Confirm Password
A password must be configured for the user to log in to the bastion host if you select Local for Verification Type.
UserName
Enter a custom username.
This name indicates the name of the person who uses the account so that system users can be distinguished from each other.
Mobile
Enter the mobile number of the user.
The user can use this number to receive SMS verification code for logins and resetting their passwords.
Email
Enter the email address of the user.
The user can use this email address to receive system notifications.
Role
Select the role to be assigned to the user. Only one role can be assigned.
The bastion host system provides multiple default roles. You can also add custom roles. For details about roles and their permissions, see Role.
NOTE:If the role that has the Create User permission is assigned to a user, the user can select any role from the role pool predefined by the admin user when creating a user. This could potentially allow the user with this role to create another user with higher permissions than the user itself. Therefore, exercise caution when granting the Create User permission to users. Ensure that the Create User permission is granted sparingly and exclusively to trusted individuals. All such grants can be reviewed and audited via system logs.
Department Name
Select the department to which the user belongs. For details about how to create a department, see Creating a Department.
To set Department to a superior department for a user, you must have management permissions for the Department module. For details about how to modify the management permissions for a role, see Role.
Remarks
(Optional) Provide a brief description of the user.
- Click OK.
You can then view the new system user on the user list page.
Method 2: Batch Importing Users into the System
- Log in to your bastion host system.
- In the navigation pane on the left, choose User > User to go to the user list page.
- Click
 in the upper right corner of the page. The configuration window is displayed.
- Click Download to download the template.
- Enter the information of users according to the configuration requirements in the template.
- Click Upload and upload the completed template file.
- (Optional) Select Override existing user.
- Selected: If an existing user account and the user account being imported have the same LoginName, the existing one will be overwritten. The user account information in the bastion host is updated accordingly.
- Deselected: If an existing user account and the user account being imported have the same LoginName, the existing one will be skipped and kept unchanged.
- Click OK.
You can then view the imported user on the user list page.
Method 3: Synchronizing AD Domain Users to the System
You can configure Sync Mode for the AD authentication to let the system synchronize existing user information on the AD domain server to your bastion host. When a user logs in to the bastion host, the AD domain server provides the identity authentication service.
- Log in to your bastion host system.
- Choose System > System Config > Authenticate to go to the authentication configuration page. Figure 2 Configuring remote authentication
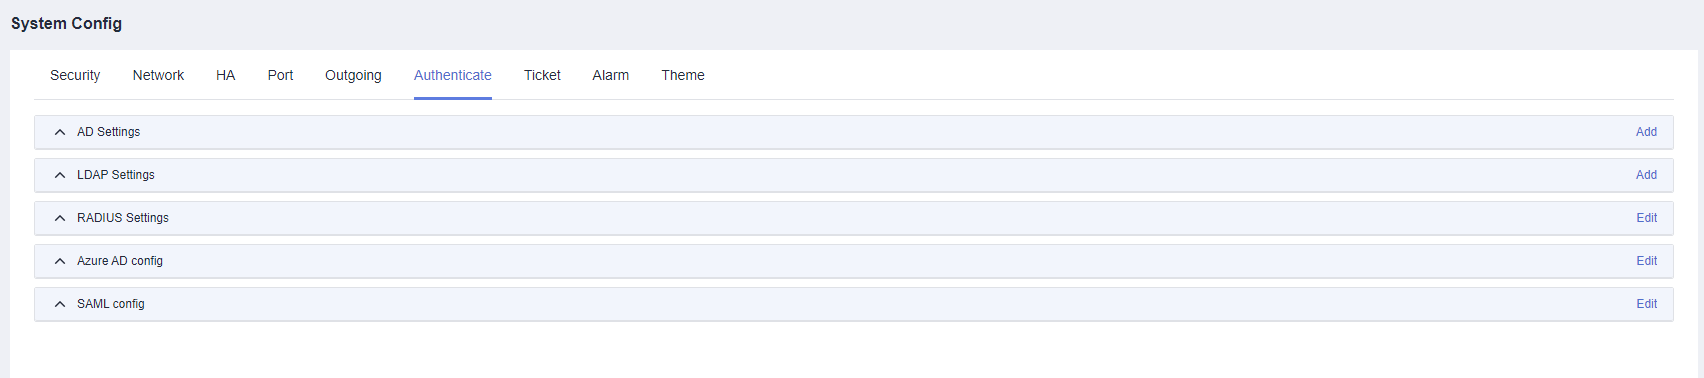
- Click Add in the AD Settings area.
- Set the AD domain authentication Mode to Sync Mode.
Table 2 AD settings for synchronizing users Parameter
Description
Server
Enter the address of the AD domain server.
Status
Select whether to enable AD domain remote authentication. AD domain remote authentication is enabled by default.
- Enabled: AD domain authentication is enabled. If the configuration information is valid, AD domain authentication is enabled or AD domain users are synchronized to the bastion host when the user performs a login.
- Disabled: AD domain authentication is disabled.
SSL
Select whether to enable SSL encryption. SSL encryption is disabled by default.
- Disabled: SSL encryption is disabled.
- After SSL encryption is enabled, data transmitted by synchronized users or authenticated users is encrypted.
Mode
Select the working mode of AD domain. Select Sync Mode.
Port
Select the access port of the remote server of AD domain. The default port number is 389.
LoginName
Enter the username of the account for logging in to the AD domain server.
Password
Enter the password of the account for logging in to the AD domain server.
Domain
Enter the domain of the AD service.
Base DN
Enter the base DN for the remote AD domain server.
Dept Filter
Enter the departments to be filtered out for the remote AD domain server.
User Filter
Enter the users to be filtered out for the remote AD domain server.
Login Name Filter
Enter the login name to be filtered out. Separate multiple login names with vertical bars (|).
UserName
Enter the attribute name of user names on the remote AD domain server, for example, name.
Email
Enter the attribute name of the user mailbox on the AD domain remote server, for example, mail.
Mobile
Enter the attribute name of user's mobile phone on the AD domain remote server, for example, mobile.
Sync
Select the AD user synchronization method. The options include Manual and Auto.
- Manual: After you complete required configurations, manually synchronize the user information from the AD server.
- Auto: After you complete required configurations, user information is automatically synchronized. You are also required to configure Start time of sync, Duration, and End time for auto synchronization.
Department
Select the department to which the synchronized user account belongs.
Options
- Override existing
- Selected: If an existing user account and the user account being imported have the same LoginName, the existing one will be overwritten. The user account information in the bastion host is updated accordingly.
- Deselected: If an existing user account and the user account being imported have the same LoginName, the existing one will be skipped and kept unchanged.
- Sync user status: If you select this, the current user status will be synchronized to the bastion host. This option is recommended.
- (Optional) If you want to synchronize users from the AD domain server, click Next to obtain the source department structure of the AD domain server.
- Sync All Users is enabled by default.
- If you select a superior department of the user source, all users in the lower-level department are included in the source.
- Create new dept is disabled by default. You can enable it to let system create departments based on the department structure in the AD domain and synchronize users from the AD domain departments.
- Click OK. You can then view AD authentication configurations in the AD server list.
- In the AD Settings area, locate the AD server row. In the Operation column, click Start to synchronize AD domain users to a bastion host. You can view the synchronized user information in the user list.


