IF Statements
When developing and orchestrating jobs in DataArts Factory, you can use IF statements to determine the branch to execute.
This section describes how to use IF statements in the following scenarios:
- Determining the IF Statement Branch to Be Executed Based on the Execution Status of the Previous Node
- Determining the IF Statement Branch to Be Executed Based on the Execution Result of the Previous Node
- Configuring the Policy for Executing a Node with Multiple IF Statements
IF statements use EL expressions. You can select EL expressions and follow the instruction in this section to develop jobs.
For details about how to use EL expressions, see EL Expressions.
Determining the IF Statement Branch to Be Executed Based on the Execution Status of the Previous Node
Scenario
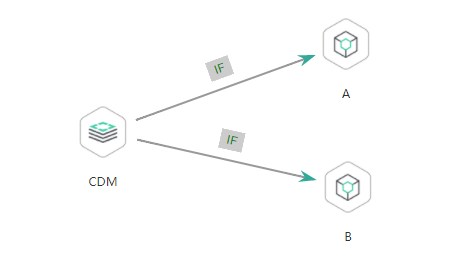
Generally, you can determine the IF statement branch to be executed based on whether the previous CDM node is successfully executed. For details on how to set IF statements, see Figure 1.
Configuration Method
- Log in to the DataArts Studio console, locate the target DataArts Studio instance, and click Access on the instance card.
- Click the Workspaces tab. In the workspace list, locate the target workspace and click DataArts Factory. The DataArts Factory console is displayed.
- On the Develop Job page, create a job, drag a CDM node and two Dummy nodes and drop them on the canvas in the right pane. Click and hold
 to connect the CDM node to the Dummy nodes, as shown in Figure 1.
Set the Failure Policy for the CDM node to Go to the next node.
Figure 2 Configuring the failure policy for the CDM node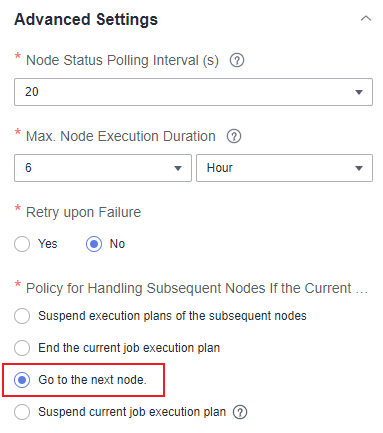
- Right-click the connection line and select Set Condition. In the Edit EL Expression dialog box, enter the IF statement in the text box.
Each statement branch requires an IF statement. The IF statement is a ternary expression based on the EL expression syntax. If the result of the ternary expression is true, subsequent nodes will be connected. Otherwise, subsequent nodes will be skipped.
In this demo, the #{Job.getNodeStatus("node_name")} EL expression is used to obtain the execution status of a specified node. If the execution is successful, success is returned; otherwise, fail is returned. In this example, the IF statement expressions are as follows:
- The IF statement expression for branch A is #{(Job.getNodeStatus("CDM")) == "success" ?. "true" : "false"}
- The IF statement expression for branch B is #{(Job.getNodeStatus("CDM")) == "fail" ?. "true" : "false"}
After entering the IF statement expression, you can select either Skip all subsequent nodes or Skip the next node for Failure Policy. After the configuration is complete, click OK to save the job.Figure 3 Configuring a failure policy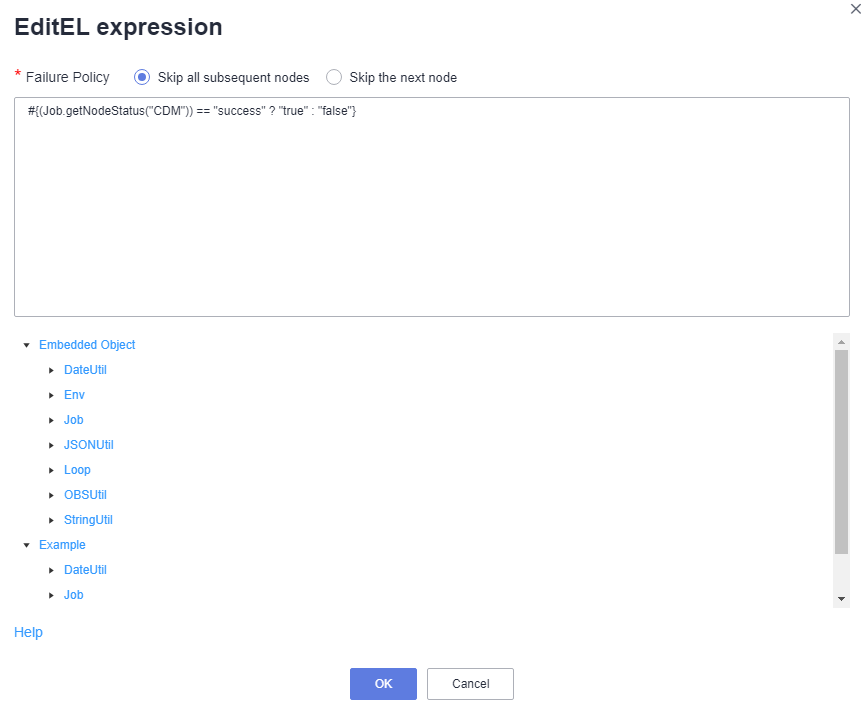
- Click Test to test the job and view the execution result on the Monitor Instance page.
- After the job is executed, view the job instance running result on the Monitor Instance page. The execution result meets the expectation. If the execution result is fail, branch A is skipped and branch B is executed.
Figure 4 Job execution result

Determining the IF Statement Branch to Be Executed Based on the Execution Result of the Previous Node
Scenario Description
Scenario: Use the Hive SQLnode to collect statistics on the number of people whose score is higher than 85, transfer the execution result as a parameter to the next node, compare the result with the number of people who have passed the test, and determine the IF condition branch to be executed.
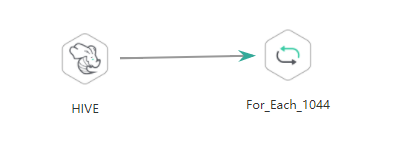
Analysis: The execution result of the select statement on the Hive SQL node is a two-dimensional array which contains a single field. Therefore, EL expression #{Loop.dataArray[][]} or #{Loop.current[]} can be used to obtain the value in the two-dimensional array. Currently, only the For Each node supports loop expressions, so the Hive SQL node needs to be connected to a For Each node.

In this scenario, the loop expression cannot be replaced by the StringUtil expression #{StringUtil.split(StringUtil.split(StringUtil.split(Job.getNodeOutput("Name of the previous node"),"]")[0],"[")[0],"\\"")[0]} because the StringUtil expression returns a string which cannot be compared with the standard data of the int type.
Figure 5 shows the job orchestration.
Key configurations of the For Each node are as follows:
- Dataset: Enter the execution result of the select statement on the Hive SQL node. Use the #{Job.getNodeOutput('HIVE')} expression, where HIVE is the name of the previous node.
- Subjob Parameter Name: Enter the parameter defined in the subjob. Transfer the output of the previous node of the main job to the sub-job for use. The variable name is result, and its value is a column in the dataset. The EL expression #{Loop.dataArray[0][0]} or #{Loop.current[]} is used. This example uses {Loop.dataArray[0][0]} as an example.
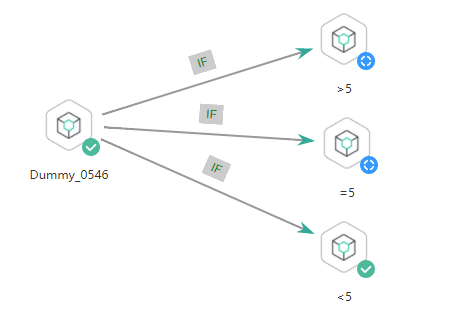
The sub-job selected on the For Each node determines the IF statement branch to be executed based on the subjob parameter transferred from the For Each node. Figure 6 shows the job orchestration.
The IF statement is the key configuration of the subjob. This example uses the expression ${result} to obtain the value of the job parameter.

Do not use the #{Job.getParam("job_param_name")} EL expression because this expression can only obtain the values of the parameters configured in the current job, but cannot obtain the parameter values transferred from the parent job or the global variables configured in the workspace. The expression only works for the current job.
To obtain the parameter values passed from the parent job and the global variables configured for the workspace, you are advised to use the ${job_param_name} expression.
Configuration Method
Developing a Subjob
- Log in to the DataArts Studio console, locate the target DataArts Studio instance, and click Access on the instance card.
- Click the Workspaces tab. In the workspace list, locate the target workspace and click DataArts Factory. The DataArts Factory console is displayed.
- On the Develop Job page, create a data development subjob For Each. Drag four Dummy nodes and drop them on the canvas, click and hold
 to connect them, as shown in Figure 6.
 - Right-click the connection line and select Set Condition. In the Edit EL Expression dialog box, enter the IF statement in the text box.
Each statement branch requires an IF statement. The IF statement is a ternary expression based on the EL expression syntax. If the result of the ternary expression is true, subsequent nodes will be connected. Otherwise, subsequent nodes will be skipped.
- For the >5 branch, the IF statement expression is #{${result} > 5 ? "true" : "false"}.
- For the =5 branch, the IF statement expression is #{${result} == 5 ? "true" : "false"}.
- For the <5 branch, the IF statement expression is #{${result} < 5 ? "true" : "false"}.
After entering the IF statement expression, you can select either Skip all subsequent nodes or Skip the next node for Failure Policy.

If an expression contains multiple conditions, you can use || to combine them conditions. The following is an example:
#{(${result} >= 19 || ${result} <=9) ? "true" : "false"}
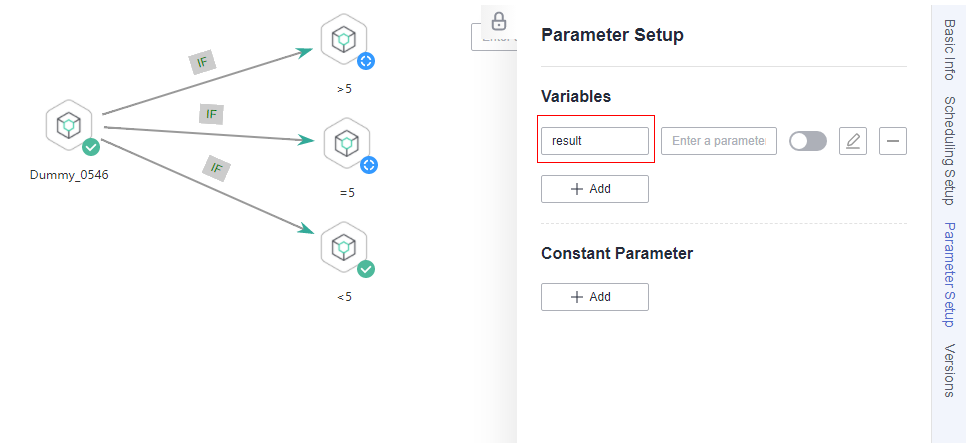
- Configure job parameters. Set the parameter name to result. This parameter is only used by the For Each node in the main job testif to identify subjob parameters. You do not need to set the parameter value.
Figure 7 Configuring job parameters
- Save the job.
Developing a Job
- On the Develop Job page, create a data development job named testif. Drag a HIVE SQL node and a For Each node and drop them on the canvas. Click and hold
 to connect the nodes, as shown in Figure 5.
 - Configure properties for the HIVE SQL node. Reference the following SQL script (there is no special requirement for other properties):
--Obtain the number of people whose scores are higher than 85 from the student_score table.
SELECT count(*) FROM student_score WHERE score> "85" ;
Figure 8 HIVE SQL script execution result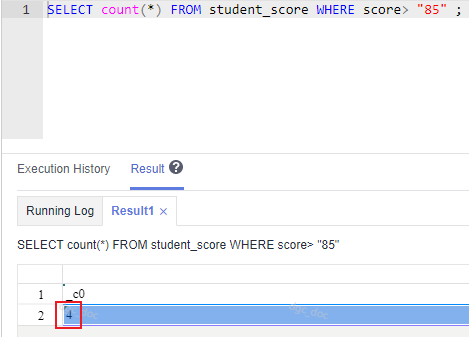
- Configure properties for the For Each node.
- Subjob in a Loop: Select foreach, the subjob that has been developed.
- Dataset: Enter the execution result of the select statement on the Hive SQL node. Use the #{Job.getNodeOutput('HIVE')} expression, where HIVE is the name of the previous node.
- Subjob Parameter Name: Enter the parameter defined in the subjob. Transfer the output of the previous node of the main job to the sub-job for use. The variable name is result (parameter name of the subjob), and its value is a column in the dataset. The EL expression #{Loop.dataArray[0][0]} is used.
Figure 9 Properties of the For Each node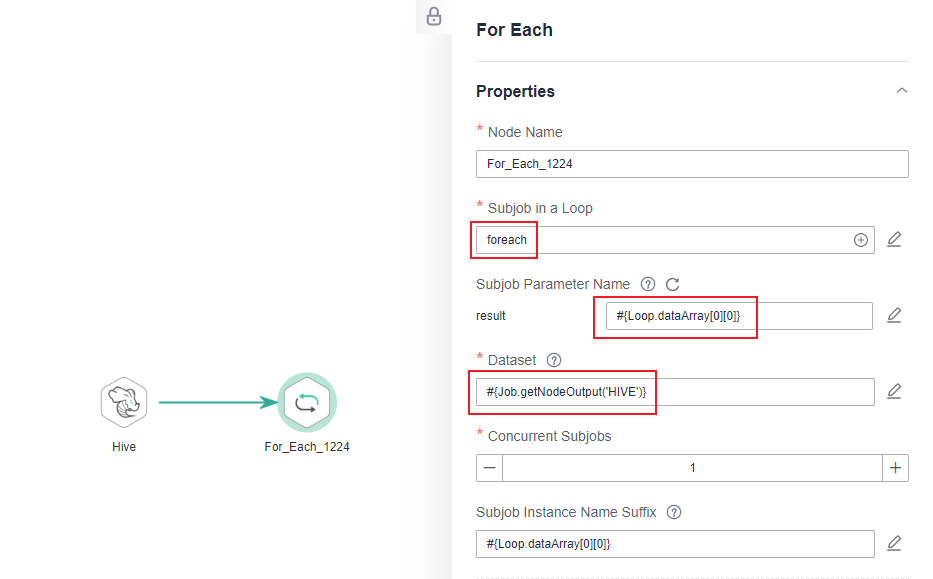
- Save the job.
Testing the Main Job
- Click Test above the canvas to test the main job. After the main job is executed, the subjob is automatically invoked through the For Each node and executed.
- In the navigation pane on the left, choose Monitor Instance to view the job execution result.
- After the job is executed, view the execution result of the subjob foreach on the Monitor Instance page. The execution result meets the expectation. Currently, the execution result of the Hive SQL statement is 4. Therefore, the >5 and =5 branches are skipped, and the <5 branch is successfully executed.
Figure 10 Execution result of the subjob

Configuring the Policy for Executing a Node with Multiple IF Statements
If the execution of a node depends on multiple IF statements, the policy for executing the node can be AND or OR.
If you choose the OR policy, the node will be executed if any one of the IF statements is met.
If you choose the AND policy, the node will be executed only if all of the IF statements are met.
If you choose neither, the OR policy will be used.
Configuration Method
Configure the execution policy.
- Log in to the DataArts Studio console, locate the target DataArts Studio instance, and click Access on the instance card.
- Click the Workspaces tab. In the workspace list, locate the target workspace and click DataArts Factory. The DataArts Factory console is displayed.
- On the DataArts Factory console, choose Configuration > Configure > Default Configuration.
- Select AND or OR for Multi-IF Policy.
- Click Save.
Develop a job.
- On the Develop Job page, create a data development job.
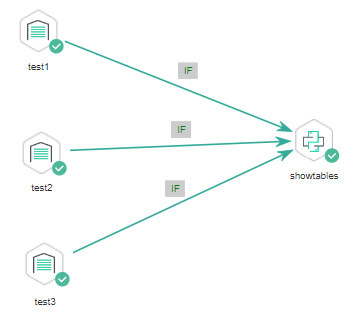
- Drag three DWS SQL operators as parent nodes and one Python operator as a child node to the canvas. Click and hold
 to connect the nodes to orchestrate the job shown in Figure 11.
 - Right-click the connection line and select Set Condition. In the Edit EL Expression dialog box, enter the IF statement in the text box.
Each statement branch requires an IF statement. The IF statement is a ternary expression based on the EL expression syntax.
- The IF statement expression for the test1 node is #{(Job.getNodeStatus("test1")) == "success" ? "true" : "false"},
- The IF statement expression for the test2 node is #{(Job.getNodeStatus("test2")) == "success" ? "true" : "false"},
- The IF statement expression for the test3 node is #{(Job.getNodeStatus("test3")) == "success" ? "true" : "false"},
The expression of each node is determined using the IF statement based on the execution status of the previous node.
After entering the IF statement expression, you can select either Skip all subsequent nodes or Skip the next node for Failure Policy.
Test the job.
- Click Save above the canvas to save the job.
- Click Test above the canvas to test the job.
If test1 is executed successfully, the corresponding IF statement is true.
If test2 is executed successfully, the corresponding IF statement is true.
If test3 fails to be executed, the corresponding IF statement is false.
If Multi-IF Policy is set to OR, the showtables node is executed and the job execution is complete.
Figure 12 How the job runs if Multi-IF Policy is OR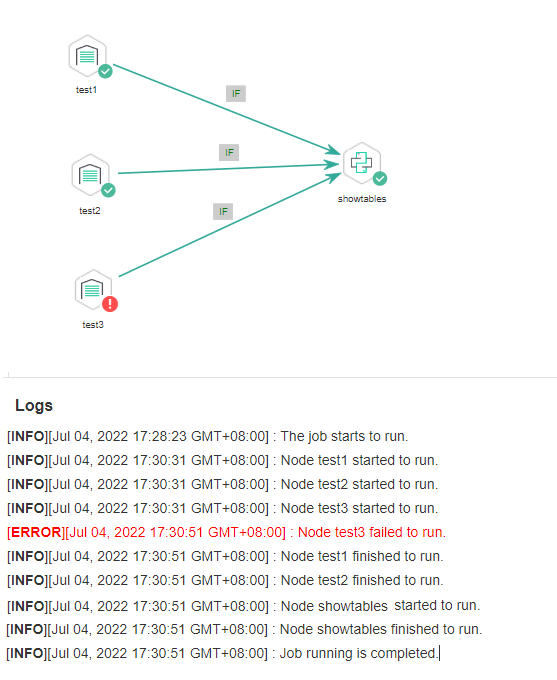
If Multi-IF Policy is set to AND, the showtables node is skipped and the job execution is complete.
Figure 13 How the job runs if Multi-IF Policy is AND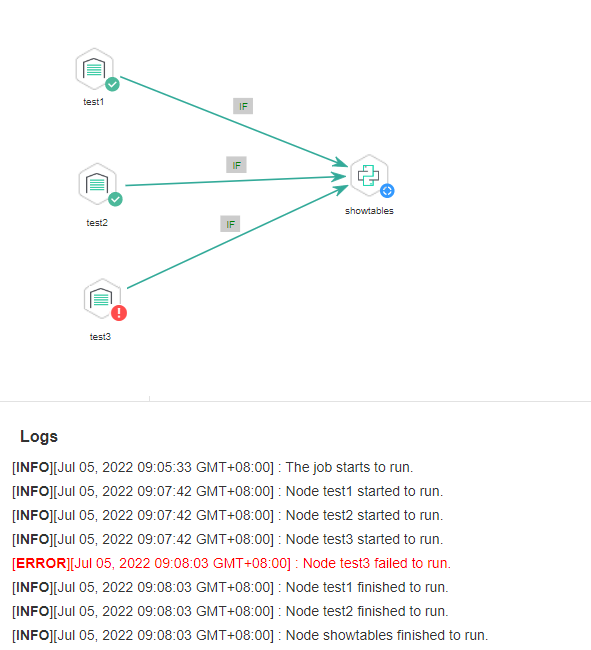
Feedback
Was this page helpful?
Provide feedbackThank you very much for your feedback. We will continue working to improve the documentation.


