DataArts Architecture Data Migration Configuration

In Management Center, you can directly migrate the subjects, processes, lookup tables, data standards, ER models, dimensions, business metrics, atomic metrics, derivative metrics, compound metrics, and summary tables in DataArts Architecture, excluding fact tables.
You can perform a migration by following the instructions provided in Management Center Data Migration Configuration or by using the import and export functions of DataArts Architecture described in this section.
This function depends on the import and export functions of DataArts Architecture.
Constraints
- Before importing tables and logical entities in ER modeling, dimensions and fact tables in dimensional modeling, and summary tables in Data Mart, ensure that a data connection has been created in Management Center and is available.
- Time filters, and data in the Review Center and Configuration Center cannot be imported or exported. You must synchronize them manually before migrating other data.
- The maximum size of a file to be imported is 4 MB. A maximum of 3,000 metrics can be imported. A maximum of 500 tables can be exported at a time.
Exporting Table Data from the Old Workspace
Log in to the console, access the DataArts Architecture module of the old workspace, and perform the following operations to export processes, subjects, lookup tables, data standards, ER modeling tables, logical entities, dimensions/fact tables, business metrics, technical metrics, and data mart summary tables.
Exporting processes
- On the DataArts Architecture page, choose Processes in the left navigation pane.
- Click Export above the list to export all processes. After the export is successful, you can obtain the exported .xlsx file.
Figure 1 Exporting processes

Exporting subjects
- On the DataArts Architecture page, choose Subjects in the left navigation pane.
- Click More and select Export above the list to export all subjects. After the export is successful, you can obtain the exported .xlsx file.

- If you select subjects and click Export, the system recursively exports the selected subjects and their child subjects.
- If you select subjects in the subject directory tree and click Export without selecting subjects in the subject list, the selected subjects are exported recursively.
Figure 2 Exporting subjects
Exporting Lookup Tables
- On the DataArts Architecture page, choose Lookup Tables in the left navigation pane.
- Select the lookup tables to export, click More above the list, and select Export from the drop-down list box to export the selected lookup tables. After the export is successful, you can obtain the exported .xlsx file.
Figure 3 Exporting lookup tables

Exporting Data Standards
- On the DataArts Architecture page, choose Data Standards in the left navigation pane.
- Select the data standards to export, click More above the list, and select Export from the drop-down list box to export the selected data standards. After the export is successful, you can obtain the exported .xlsx file.
Figure 4 Exporting data standards

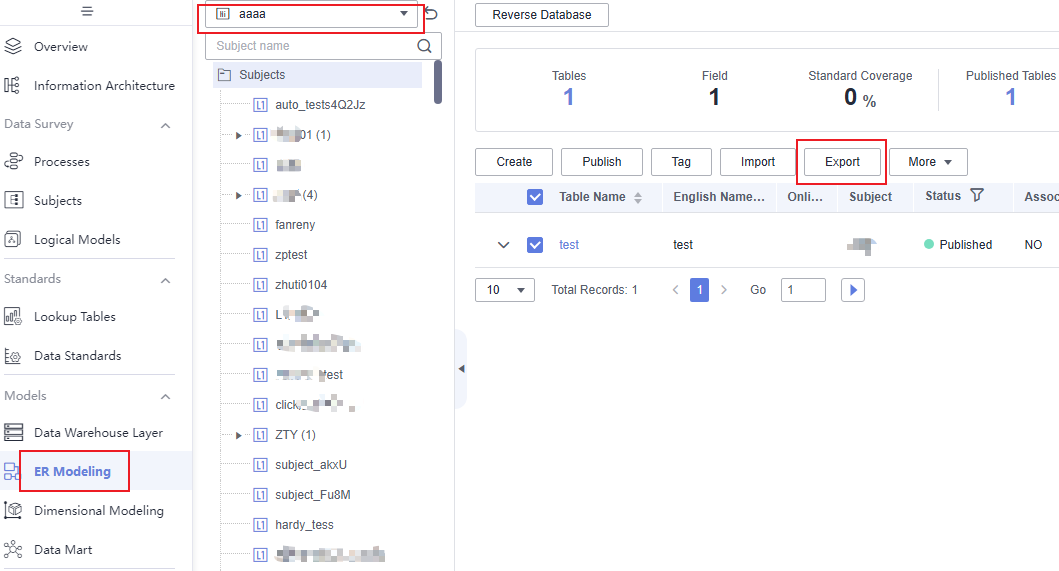
Exporting ER modeling tables
- On the DataArts Architecture page, choose ER Modeling in the left navigation pane.
- On the top of the middle area, select a physical model you want to export.
- Select the tables you want to export and click Export above the list to export the selected tables. You are advised to select Table for Export in the Export Model dialog box. After the export is successful, you can obtain the exported .xlsx file.
Figure 5 Exporting ER modeling tables
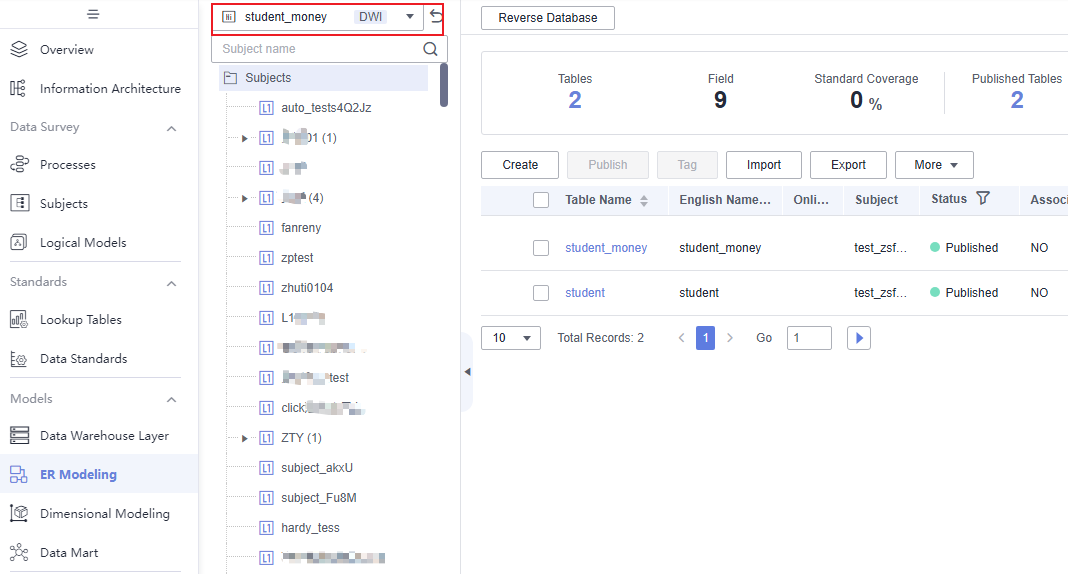
- On the top of the middle area, select other models and repeat Step 3 to download tables of other models.
Figure 6 Exporting tables of other models
Exporting logical entities
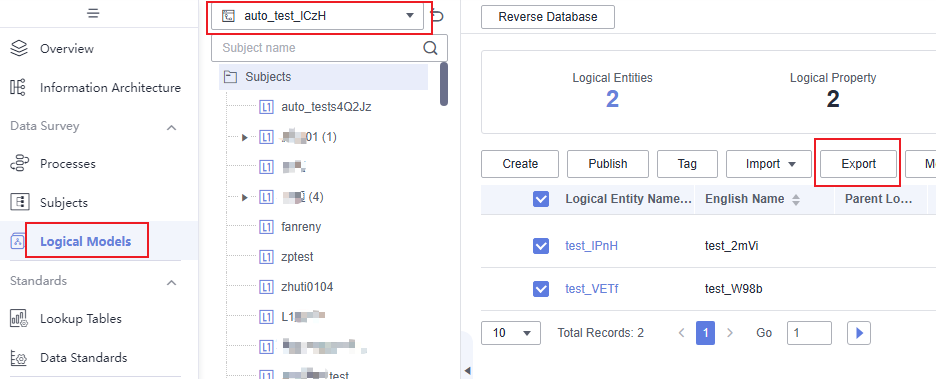
- On the DataArts Architecture page, choose Logical Models in the left navigation pane.
- Click a logical model.
- Select the logical entities you want to export and click Export above the list to export the selected logical entities. You are advised to select Table for Export in the Export Model dialog box. After the export is successful, you can obtain the exported .xlsx file.
Figure 7 Exporting logical entities
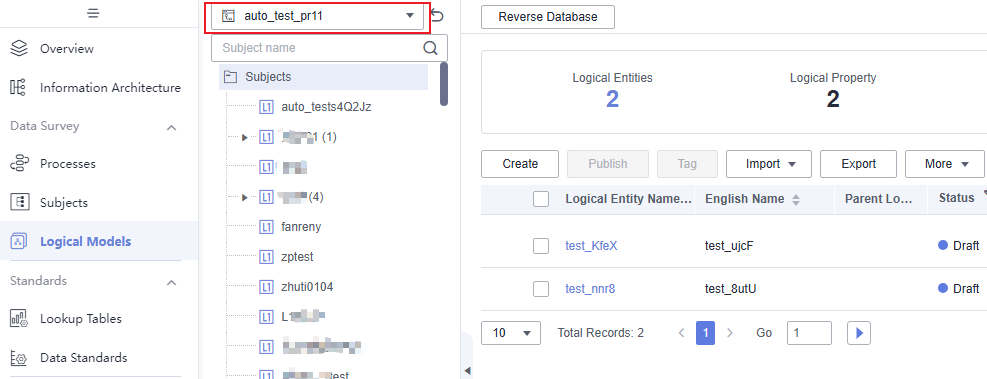
- In the subject list, select other models and repeat Step 3 to download tables/entities of other models.
Figure 8 Exporting entities of other models
Exporting dimensions/fact tables
- On the DataArts Architecture page, choose Dimensional Modeling in the left navigation pane.
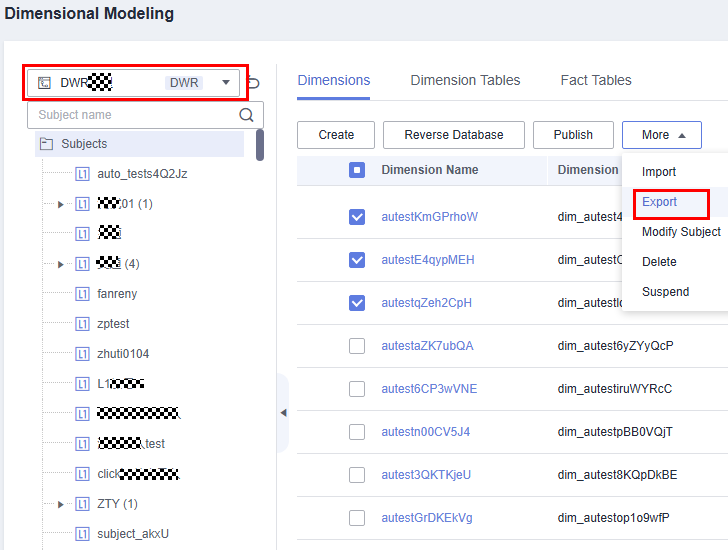
- On the displayed Dimensions page, select the DWR model and then the dimensions to export, click More above the list, and select Export from the drop-down list box. After the export is successful, you can obtain the exported .xlsx file.
Figure 9 Exporting dimensions
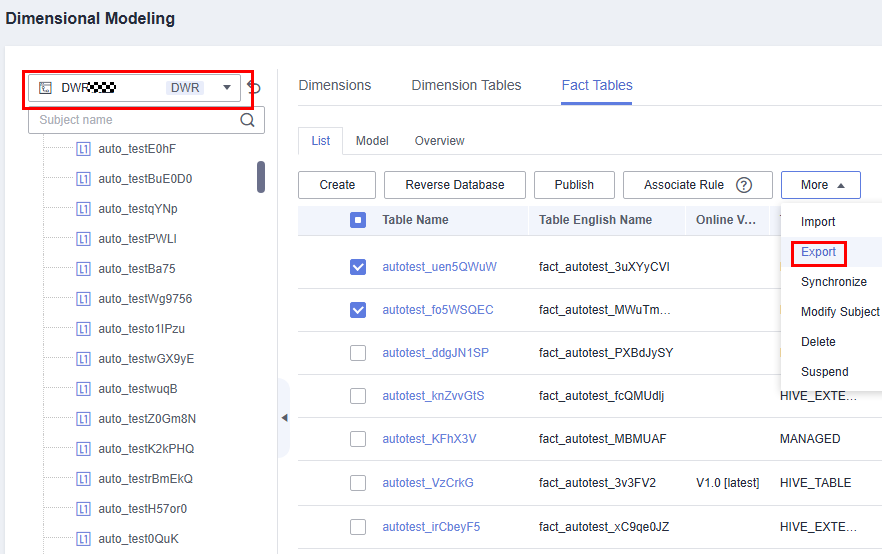
- On the Fact Tables page, select the DWR model and then the fact tables to export, click More above the list, and select Export from the drop-down list box. After the export is successful, you can obtain the exported .xlsx file.
Figure 10 Exporting fact tables
Exporting business metrics
- On the DataArts Architecture page, choose Business Metrics in the left navigation pane.
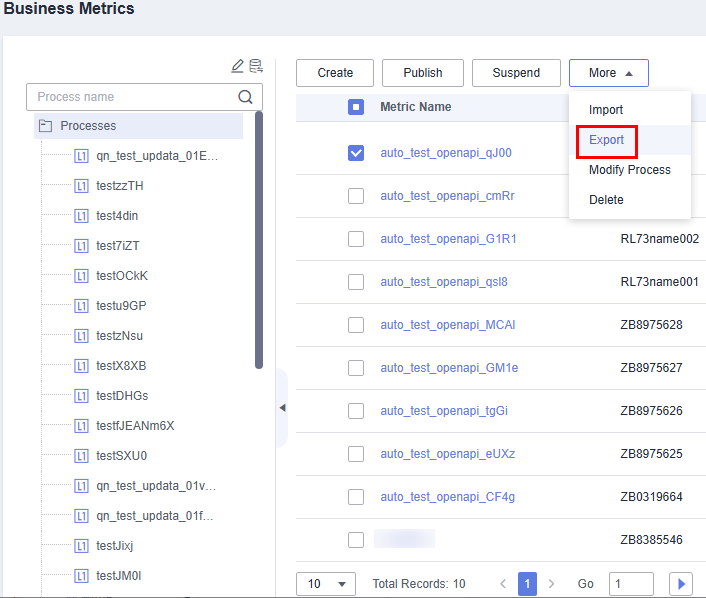
- Select the business metrics to export, click More above the list, and select Export from the drop-down list box to export the selected metrics. After the export is successful, you can obtain the exported .xlsx file.
Figure 11 Exporting business metrics
Exporting technical metrics
- On the DataArts Architecture page, choose Technical Metrics in the left navigation pane.
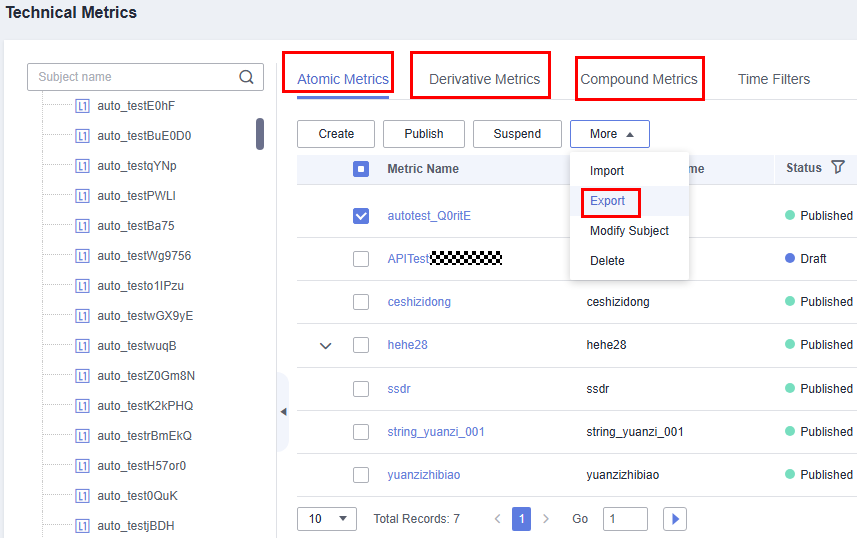
- Click the Atomic Metrics, Derivative Metrics, and Composite Metrics tab, respectively, select the metric to be exported, click More in the Operation column, and select Export. After the export is successful, you can obtain the exported .xlsx file.
Figure 12 Exporting technical metrics
Exporting data mart summary tables
- On the DataArts Architecture page, choose Data Mart in the left navigation pane.
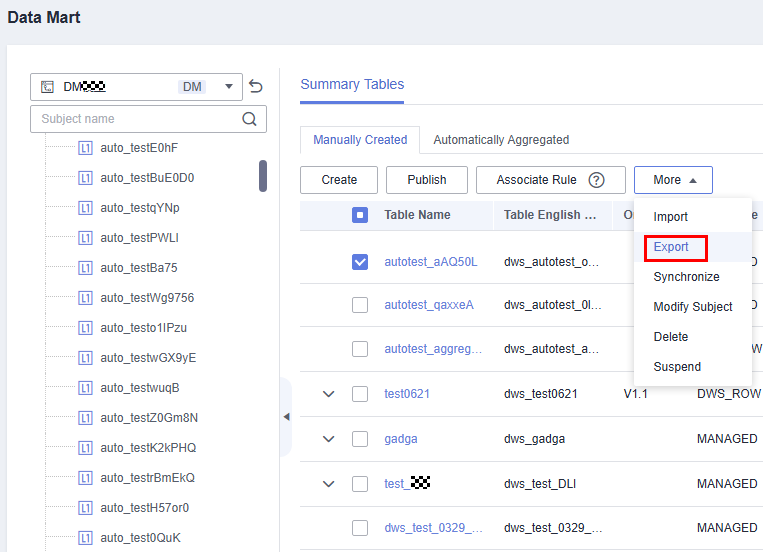
- Click the Summary Tables tab, select the DM model and then the summary tables to export, click More above the list, and select Export from the drop-down list box to export the selected summary tables. After the export is successful, you can obtain the exported .xlsx file.
Figure 13 Exporting summary tables
Importing Table Data to the New Workspace
Log in to the console, access the DataArts Architecture module of the new workspace, and perform the following operations to import processes, subjects, lookup tables, data standards, ER modeling tables, logical entities, dimensions/fact tables, business metrics, technical metrics, and data mart summary tables.
Importing processes
- On the DataArts Architecture page, choose Processes in the left navigation pane.
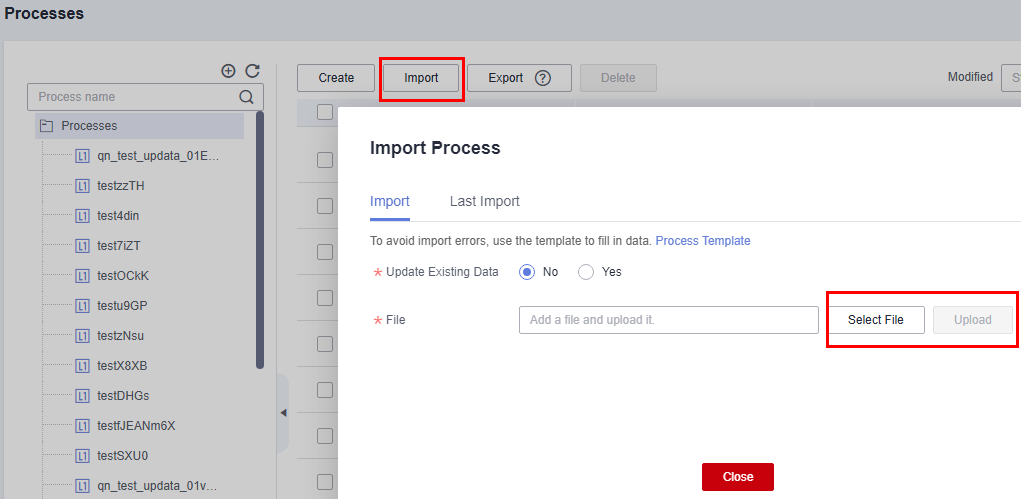
- Click Import above the list. In the displayed dialog box, select and upload the process file to import.
Figure 14 Import processes
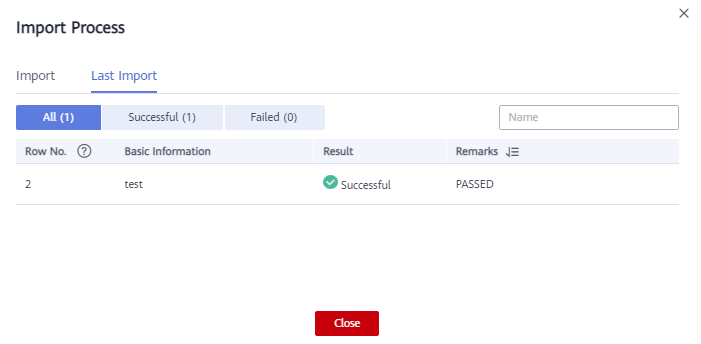
- After the file is uploaded, the system automatically starts importing it. After the file is imported, the import result is displayed.
Figure 15 Successful process import
Importing subjects
- On the DataArts Architecture page, choose Subjects in the left navigation pane.
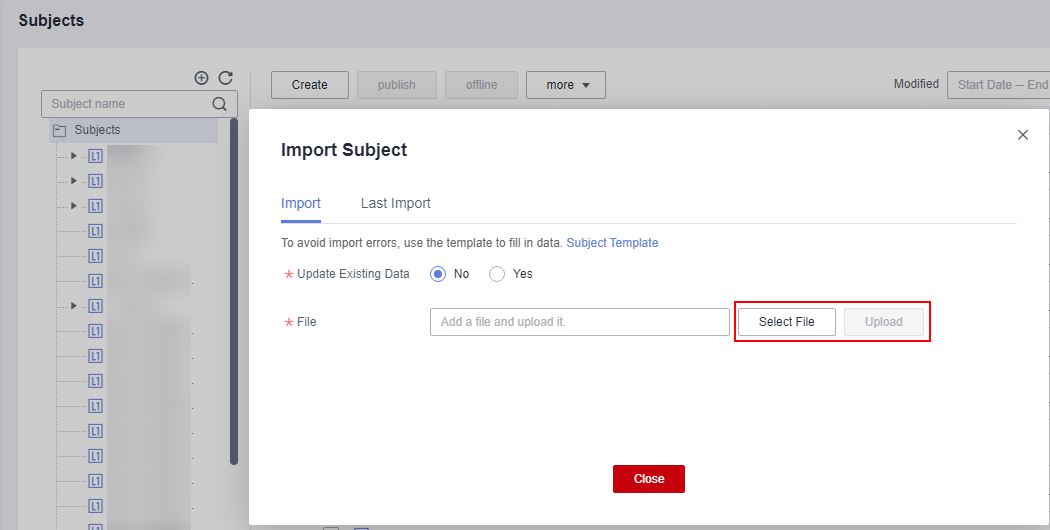
- Click More and select Import above the list. In the displayed dialog box, select and upload the subject file to import.
Figure 16 Importing subjects
 Figure 17 Selecting a file
- After the file is uploaded, the system automatically starts importing it. After the file is imported, the import result is displayed.
Figure 18 Successful subject import
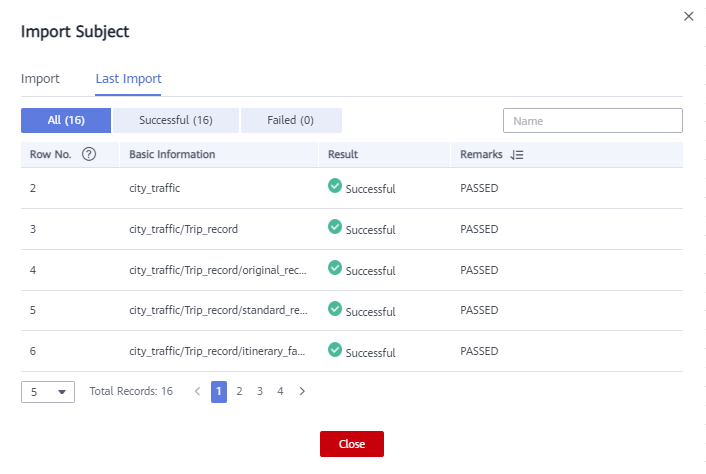
- After the import is successful, click Publish. The subject status will change to Published.
Importing lookup tables
- On the DataArts Architecture page, choose Lookup Tables in the left navigation pane.
- Click More above the list and select Import from the drop-down list box. In the displayed dialog box, select and upload the lookup table file to import.
Figure 19 Importing lookup tables
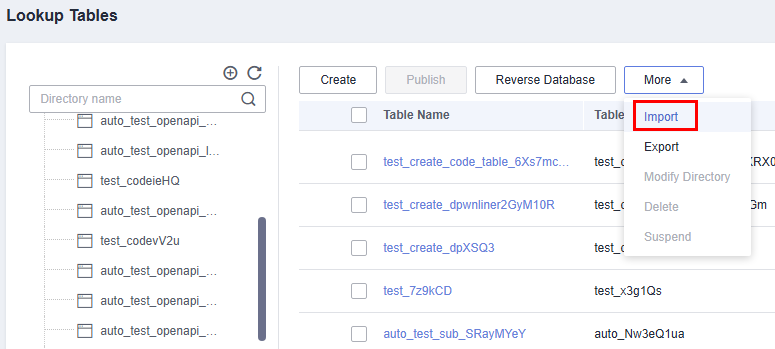
- After the file is uploaded, the system automatically starts importing it. After the file is imported, the import result is displayed.
Figure 20 Successful import of lookup tables
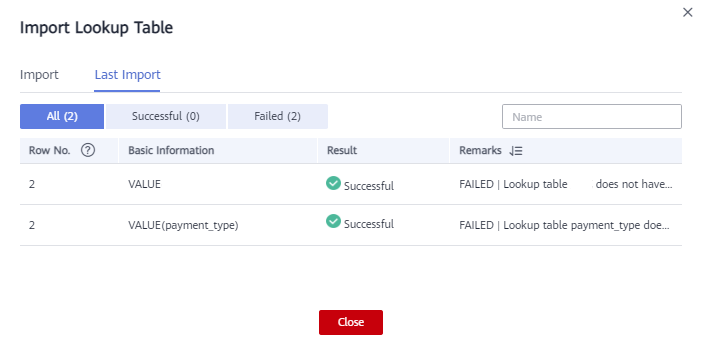
- After the import is successful, click Publish. The subject status will change to Published.
Importing data standards
- On the DataArts Architecture page, choose Data Standards in the left navigation pane.
- If you access the Data Standards page for the first time, you will be prompted to customize the data standard template. Edit the data standard template for the new workspace by referring to the Standard Templates page of Configuration Center in the old workspace, and then click OK.
- Click More above the list and select Import from the drop-down list box. In the displayed dialog box, select and upload the data standard file to import.
Figure 21 Importing data standards
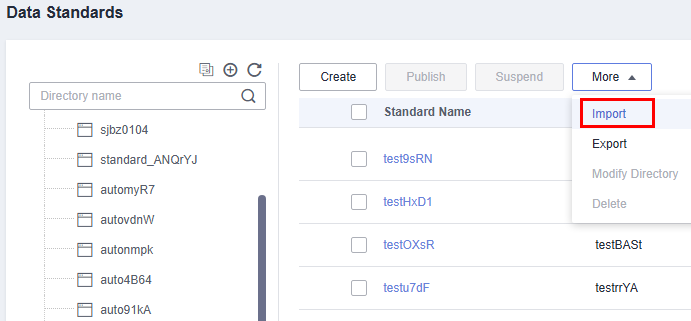
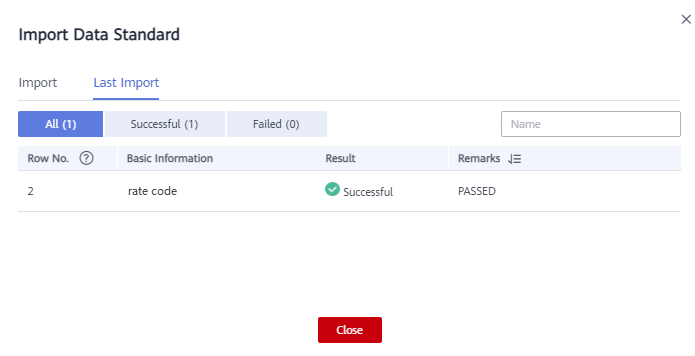
- After the file is uploaded, the system automatically starts importing it. After the file is imported, the import result is displayed.
Figure 22 Successful import of data standards
- After the import is successful, click Publish. The subject status will change to Published.
Importing ER modeling tables
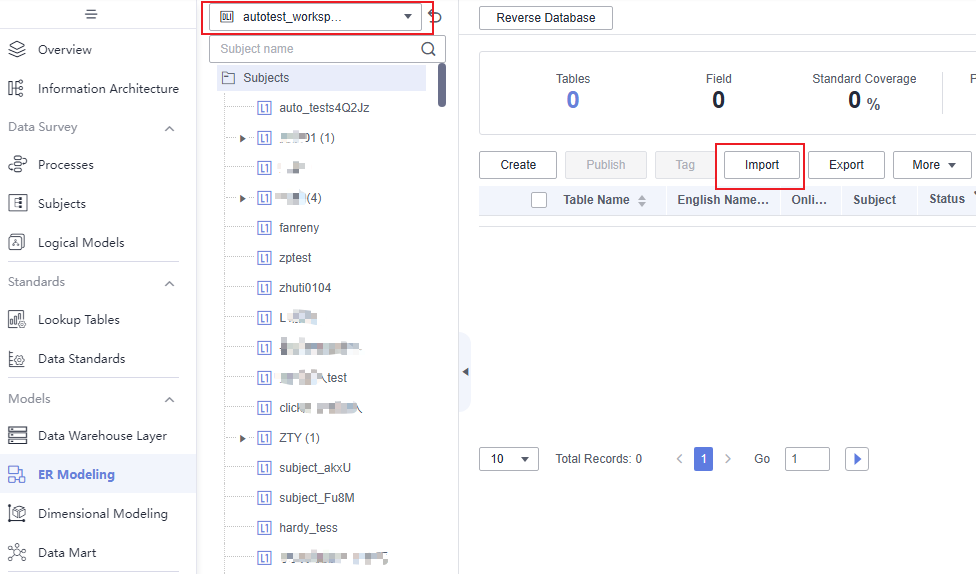
- On the DataArts Architecture page, choose ER Modeling in the left navigation pane.
- On the top of the middle area, select a physical model you want to import.
- Click Import above the list. In the displayed dialog box, select and upload the table file to import.
Figure 23 Importing ER modeling tables
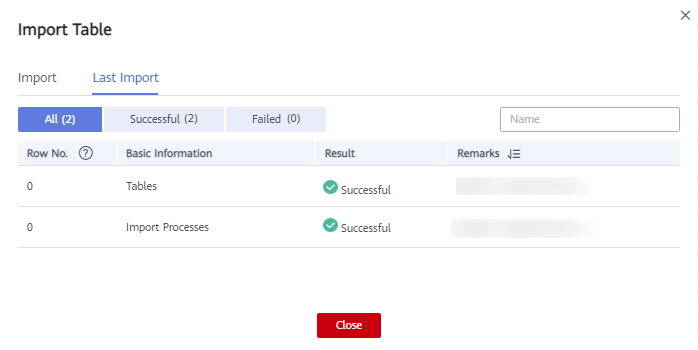
- After the file is uploaded, the system automatically starts importing it. After the file is imported, the import result is displayed.
Figure 24 Successful import of ER modeling tables
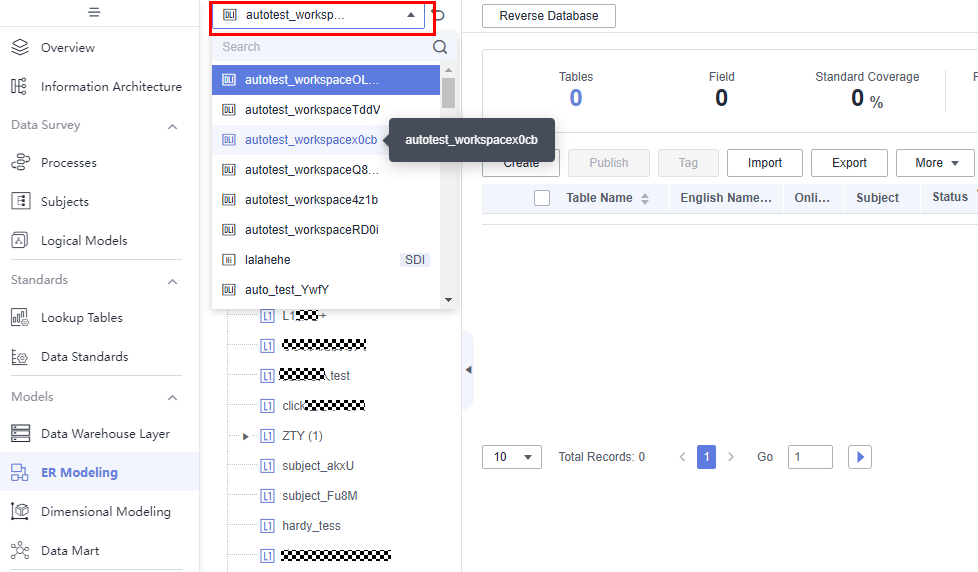
- In the subject list, select other models and repeat Step 2 to Step 4 to import tables to other models.
Figure 25 Importing tables/entities to other models
- After the import is successful, click Publish. The subject status will change to Published.
Importing logical entities
- On the DataArts Architecture page, choose Logical Models in the left navigation pane.
- Click a logical model to access the logical entity list page.
- Click Import above the list. In the displayed dialog box, select and upload the logical entity file to import.
Figure 26 Importing logical entities

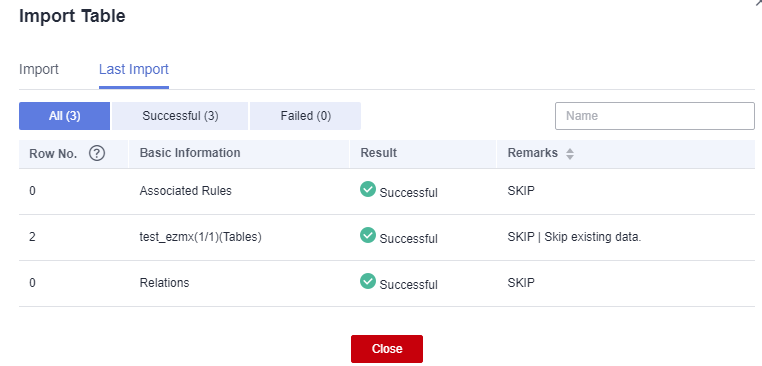
- After the file is uploaded, the system automatically starts importing it. After the file is imported, the import result is displayed.
Figure 27 Successful import of logical entities
- Select other models and repeat Step 5 to Step 6 to import tables/entities to other models.
Figure 28 Importing tables/entities to other models

- After the import is successful, click Publish. The subject status will change to Published.
Importing dimensions/fact tables
- On the DataArts Architecture page, choose Dimensional Modeling in the left navigation pane.
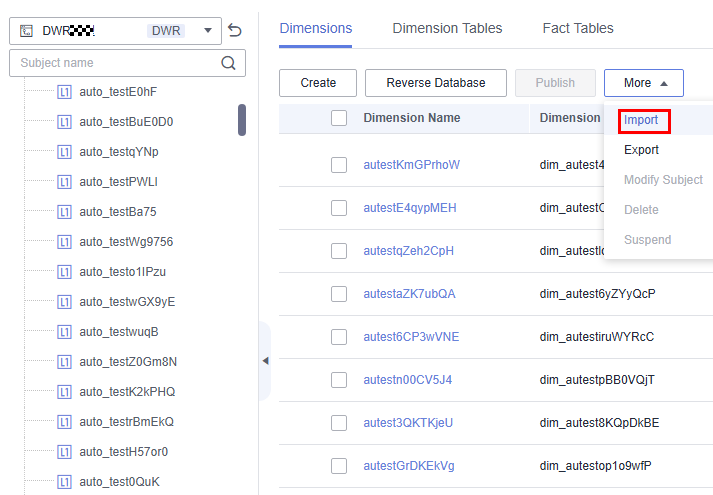
- On the displayed Dimensions page, select the target DWR model, click More above the list, and select Import from the drop-down list box. In the displayed dialog box, select and upload the dimension file to import.
Figure 29 Importing dimensions
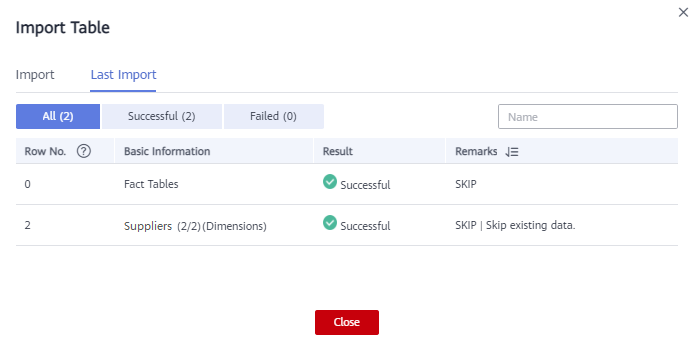
- After the file is uploaded, the system automatically starts importing it. After the file is imported, the import result is displayed.
Figure 30 Successful dimension import
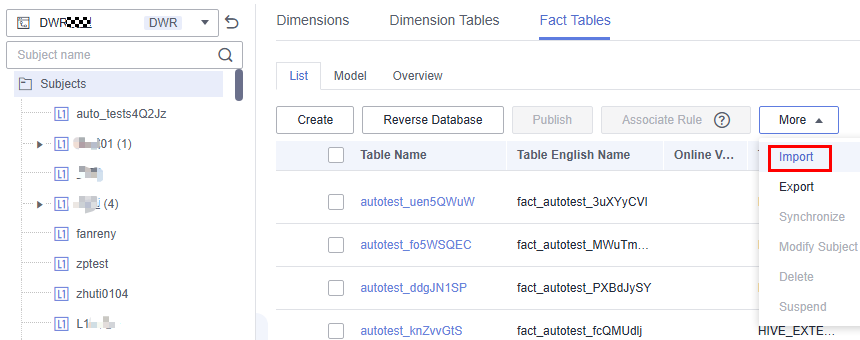
- Click the Fact Tables page, select the target DWR model, click More above the list, and select Import from the drop-down list box. In the displayed dialog box, select and upload the fact table file to import.
Figure 31 Importing fact tables
- After the file is uploaded, the system automatically starts importing it. After the file is imported, the import result is displayed.
Figure 32 Successful import of fact tables
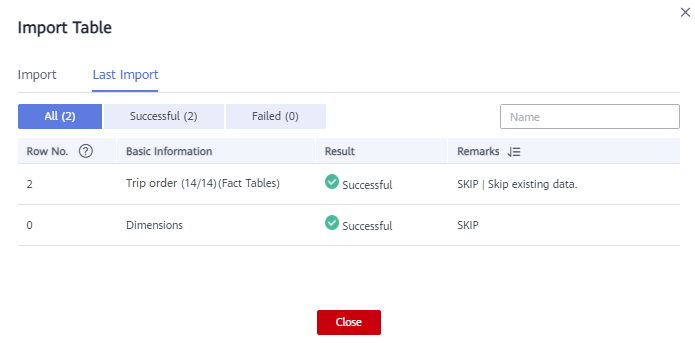
- After the import is successful, click Publish. The subject status will change to Published.
Importing business metrics
- On the DataArts Architecture page, choose Business Metrics in the left navigation pane.
- Click More above the list and select Import from the drop-down list box. In the displayed dialog box, select and upload the business metric file to import.
Figure 33 Importing business metrics
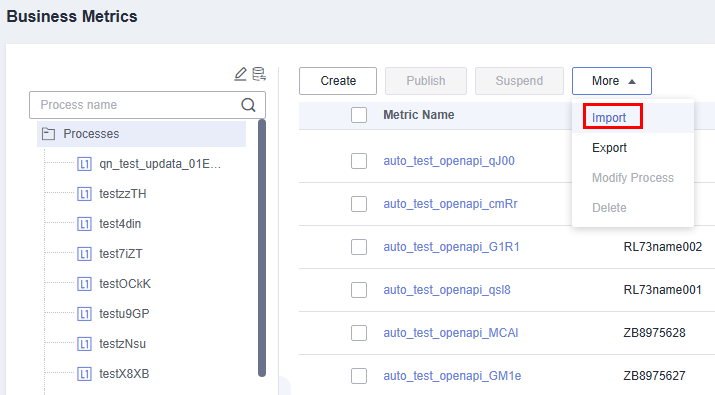
- After the file is uploaded, the system automatically starts importing it. After the file is imported, the import result is displayed.
Figure 34 Successful import of business metrics
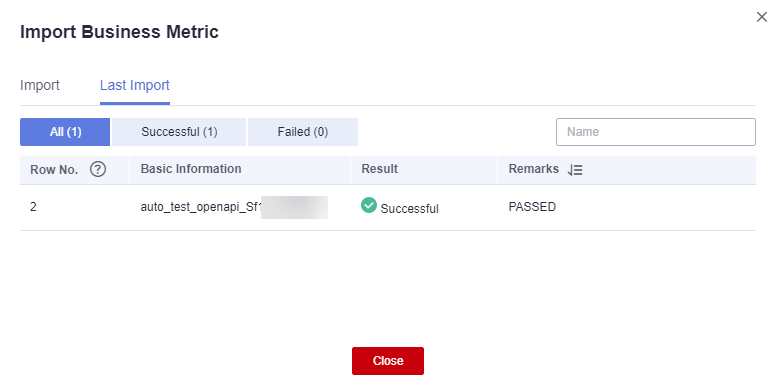
- After the import is successful, click Publish. The subject status will change to Published.
Importing technical metrics
- On the DataArts Architecture page, choose Technical Metrics in the left navigation pane.
- Click the Atomic Metrics, Derivative Metrics, and Compound Metrics tab, respectively. Click More and select Import. In the displayed dialog box, select and upload a technical metric file.
Figure 35 Importing technical metrics
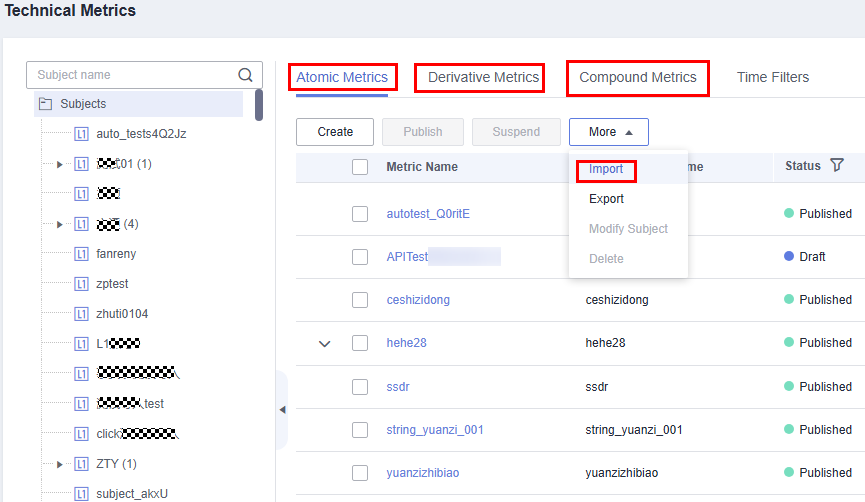
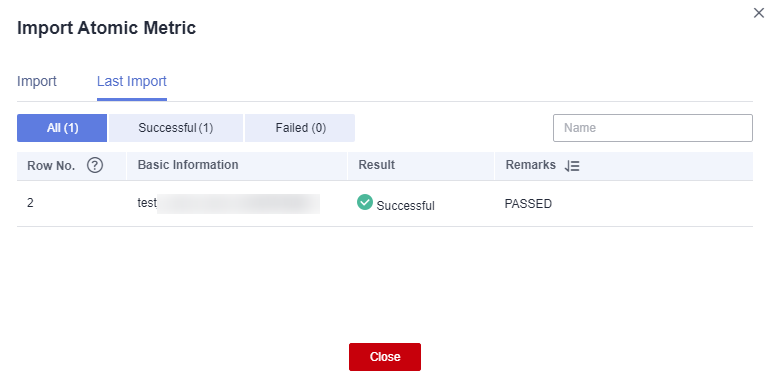
- After the file is uploaded, the system automatically starts importing it. After the file is imported, the import result is displayed.
Figure 36 Successful import of technical metrics
- After the import is successful, click Publish. The subject status will change to Published.
Importing data mart summary tables
- On the DataArts Architecture page, choose Dimensional Modeling in the left navigation pane.
- Click the Summary Tables page, click More above the list, and select Import from the drop-down list box. In the displayed dialog box, select and upload the summary table file to import.
Figure 37 Importing summary tables
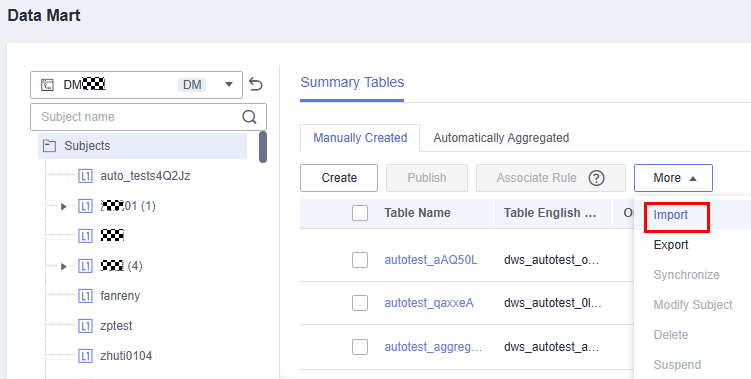
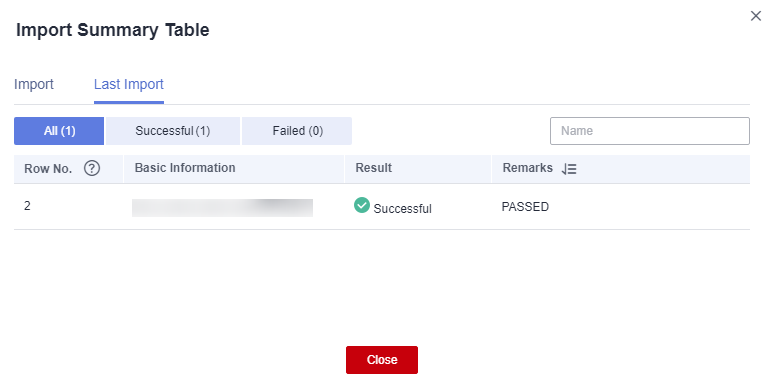
- After the file is uploaded, the system automatically starts importing it. After the file is imported, the import result is displayed.
Figure 38 Successful import of summary tables
- After the import is successful, click Publish. The subject status will change to Published.
Verifying the Migration
Check whether the models and table data imported to the new workspace are consistent with those in the old workspace. If they are consistent, the migration is successful.
Feedback
Was this page helpful?
Provide feedbackThank you very much for your feedback. We will continue working to improve the documentation.


