Managing an Operation Connection
Scenarios
- Definition: An operation connection includes the domain name and authentication parameters required by each plugin node in the security orchestration process.
- Function: During security orchestration, each plugin node transfers the domain name to be connected and the authentication information, such as the username, password, and account AK/SK, to establish connections.
- Operation connections and plugins: Plugins access other cloud services or third-party services through domain names and authentication. So, domain name parameters (endpoints) and authentication parameters (username/password, account AK/SK, etc.) are defined in the login credential parameters of plugins. An operation connection configures login credential parameters for a plugin. In a workflow, each plugin node is associated with different operation connections so that the plugin can access different services.
This topic describes how to manage operation connections, including Creating an Operation Connection, Checking an Operation Connection, Editing an Operation Connection, and Deleting an Operation Connection.
Creating an Operation Connection
- Log in to the SecMaster console.
- Click
 in the upper left corner of the management console and select a region or project.
 - Click
 in the upper left corner of the page and choose Security & Compliance > SecMaster.
 - In the navigation pane on the left, choose Workspaces > Management. In the workspace list, click the name of the target workspace.
Figure 1 Workspace management page

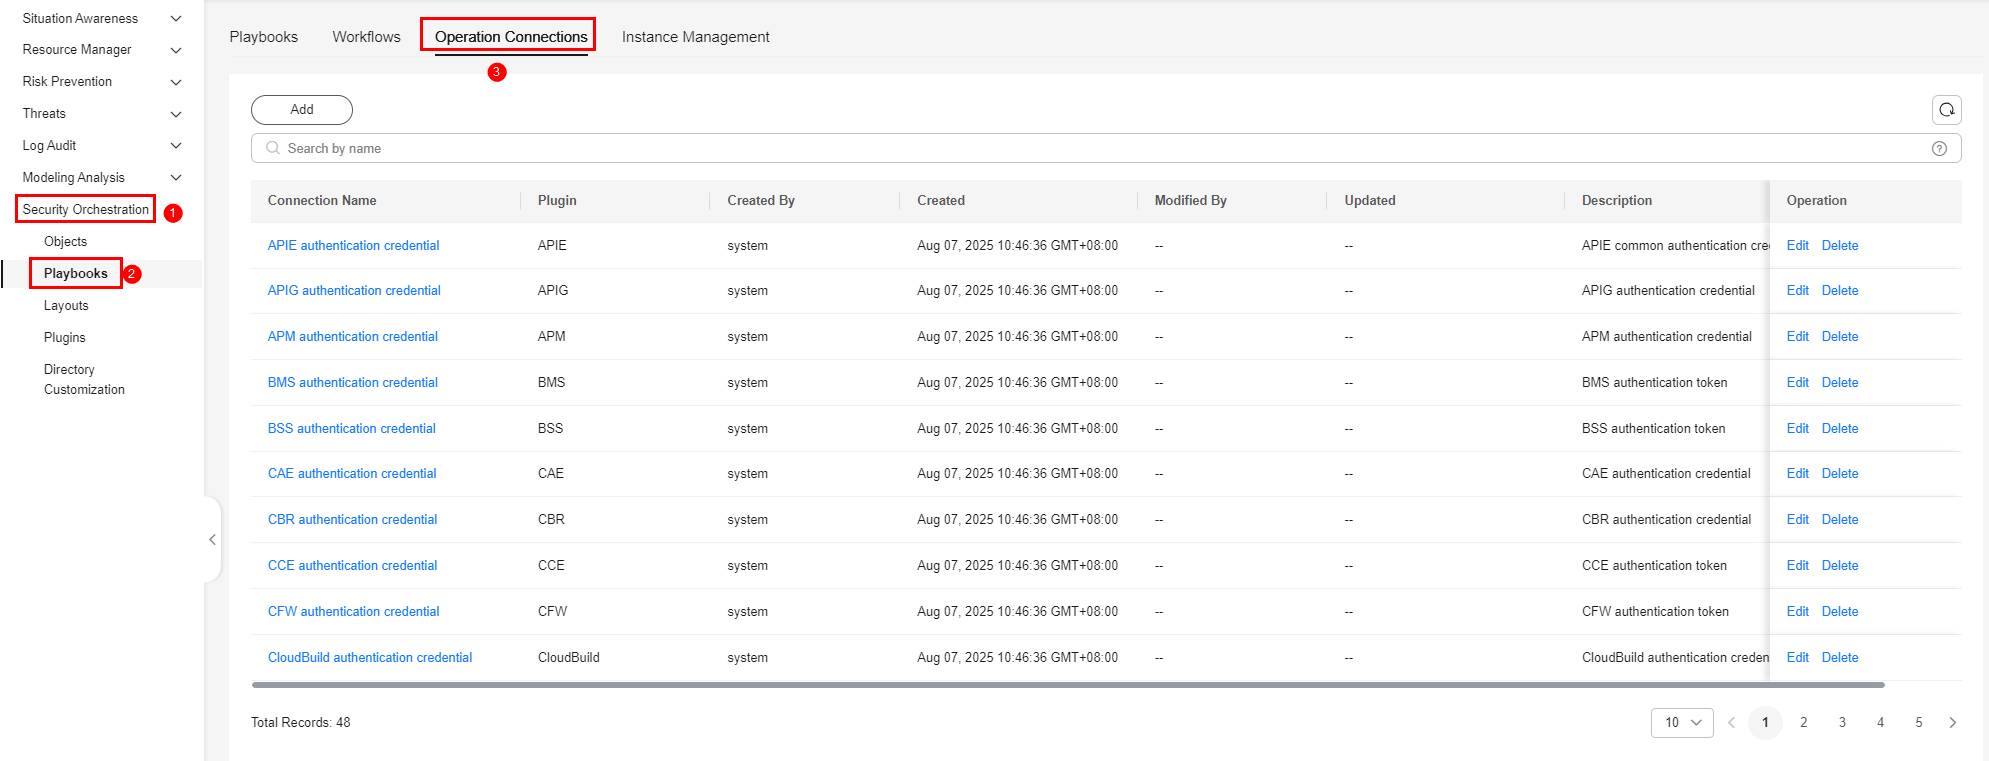
- In the navigation pane on the left, choose . On the displayed page, click the Operation Connections tab.
Figure 2 Operation Connections tab

- On the Operation Connections tab, click Add. The Operation Connections panel is displayed on the right.
- On the Operation Connections panel, configure connection parameters. Table 1 describes the parameters.
Table 1 Operation connection parameters Parameter
Description
Connection Name
Enter the name of the operation connection. The naming rules are as follows:
- Only uppercase letters (A to Z), lowercase letters (a to z), digits (0 to 9), and underscores (_) are allowed.
- A maximum of 64 characters are allowed.
Plugin
Select the plugin required for the operation connection. For details about the plugin, see Viewing Plugin Details.
Connection Type
Select the type of the operation connection.
Scenario 1: If you select a built-in cloud service plugin, the connection type can only be cloud service agency.
- Cloud service agency: If you select a built in cloud service plugin, Connection Type is automatically set to Agency. It cannot be modified. You do not need to manually enter authentication parameters such as the domain name, username, and password. The system automatically obtains the domain name (endpoint) of the corresponding cloud service based on the plugin name and uses the cloud service agency for authentication.
Scenario 2: If you select an external plugin, Connection Type can be set to any of the following:
- AK&SK: You need to manually enter the domain name (endpoint) and provide an AK and SK for authentication.
- Username & Password: You need to manually enter the domain name (endpoint) and provide a username and password for authentication.
- Others: Some plugins have other authentication parameters in addition to the preceding authentication parameters. Set these parameters based on the plugin login credential parameter guide.
Credential
If you select an external plugin for the operation connection and the connection type supports AK&SK, username and password, or plugin login credential, you need to enter the credential required, such as the endpoint, AK, and SK, based on the connection type.
Description
(Optional) Enter the asset description. The description can contain a maximum of 64 characters.
- Click OK to return to the connection list. You can query the created operation connection in the list.
Checking an Operation Connection
- Log in to the SecMaster console.
- Click
 in the upper left corner of the management console and select a region or project.
 - Click
 in the upper left corner of the page and choose Security & Compliance > SecMaster.
 - In the navigation pane on the left, choose Workspaces > Management. In the workspace list, click the name of the target workspace.
Figure 3 Workspace management page

- In the navigation pane on the left, choose . On the displayed page, click the Operation Connections tab.
Figure 4 Operation Connections tab

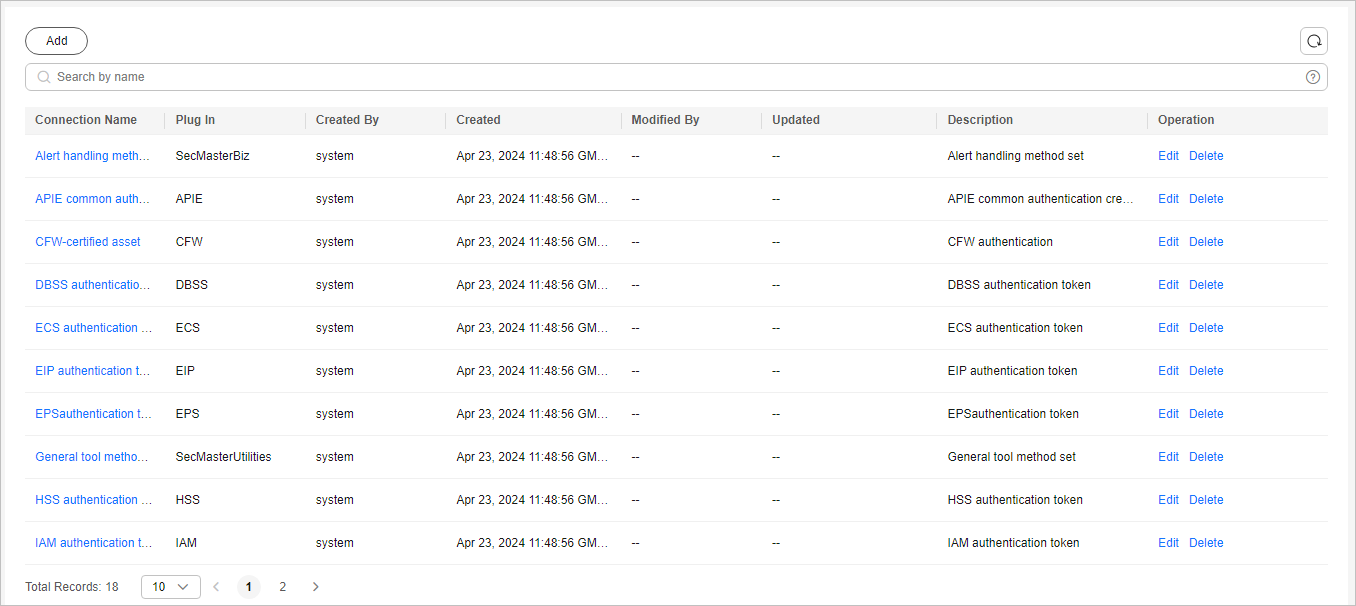
- On the Operation Connections page, view operation connections.
Figure 5 Viewing operation connections

- In the operation connection list, you can view the name, plugin, and creator of a connection.
- If there are many operation connections, you can use the search function to quickly query the specified operation connection.
- To view the details of an operation connection, click the name of the operation connection to be viewed. The operation connection details page is displayed.
Editing an Operation Connection
- Log in to the SecMaster console.
- Click
 in the upper left corner of the management console and select a region or project.
 - Click
 in the upper left corner of the page and choose Security & Compliance > SecMaster.
 - In the navigation pane on the left, choose Workspaces > Management. In the workspace list, click the name of the target workspace.
Figure 6 Workspace management page

- In the navigation pane on the left, choose . On the displayed page, click the Operation Connections tab.
Figure 7 Operation Connections tab

- In the Operation column of the target operation connection, click Edit. The Edit Operation Connection page is displayed.
- On the Edit Operation Connection page, edit the operation connection parameters. For details about the parameters, see Table 2.
Table 2 Operation connection parameters Parameter
Description
Connection Name
Enter the name of the operation connection. The naming rules are as follows:
- Only uppercase letters (A to Z), lowercase letters (a to z), digits (0 to 9), and underscores (_) are allowed.
- A maximum of 64 characters are allowed.
Plugin
Select the plugin required for the operation connection. For details about plugins, see Viewing Plugin Details.
Connection Type
Select the type of the operation connection.
Credential
If you select an external plugin for the operation connection and the connection type supports AK&SK, username and password, or plugin login credential, you need to enter the credential required, such as the endpoint, AK, and SK, based on the connection type.
Created By
The creator of the operation connection. This parameter cannot be modified.
Created
Time when the operation connection was created. This parameter cannot be modified.
Modified By
The user who last modified the operation connection. This parameter cannot be modified.
Description
(Optional) Provide a brief description of the operation connection. The description can contain a maximum of 64 characters.
- Click OK. The operation connection has been edited.
- After the editing is complete, go to the Operation Connections tab and click the corresponding connection name to view the operation connection details.
Deleting an Operation Connection
- Log in to the SecMaster console.
- Click
 in the upper left corner of the management console and select a region or project.
 - Click
 in the upper left corner of the page and choose Security & Compliance > SecMaster.
 - In the navigation pane on the left, choose Workspaces > Management. In the workspace list, click the name of the target workspace.
Figure 8 Workspace management page

- In the navigation pane on the left, choose . On the displayed page, click the Operation Connections tab.
Figure 9 Operation Connections tab

- Locate the row that contains a desired asset connection, click Delete in the Operation column.
- In the confirmation dialog box, enter DELETE and click OK.

Deleted operation connections cannot be restored. Exercise caution when performing this operation.
Feedback
Was this page helpful?
Provide feedbackThank you very much for your feedback. We will continue working to improve the documentation.


