Scheduling a CDM Job by Transferring Parameters Using DataArts Factory
You can use EL expressions in DataArts Factory to transfer parameters to a CDM job to schedule it.

- The parameter transfer function is supported by CDM 2.8.6 or later versions.
- This section uses a CDM job for migrating data from Oracle to MRS Hive as an example.
Prerequisites
A CDM incremental package is available.
Creating a CDM Migration Job
- Log in to the console, locate an instance, click Access, and click DataArts Migration.
- On the Cluster Management page, click Job Management in the Operation column.
Figure 1 Cluster Management

- Click the Links tab and then Create Link to create an Oracle link and an MRS Hive link. For details, see Link to an Oracle Database and Link to Hive.
- Click the Table/File Migration tab and then Create Job to create a data migration job.
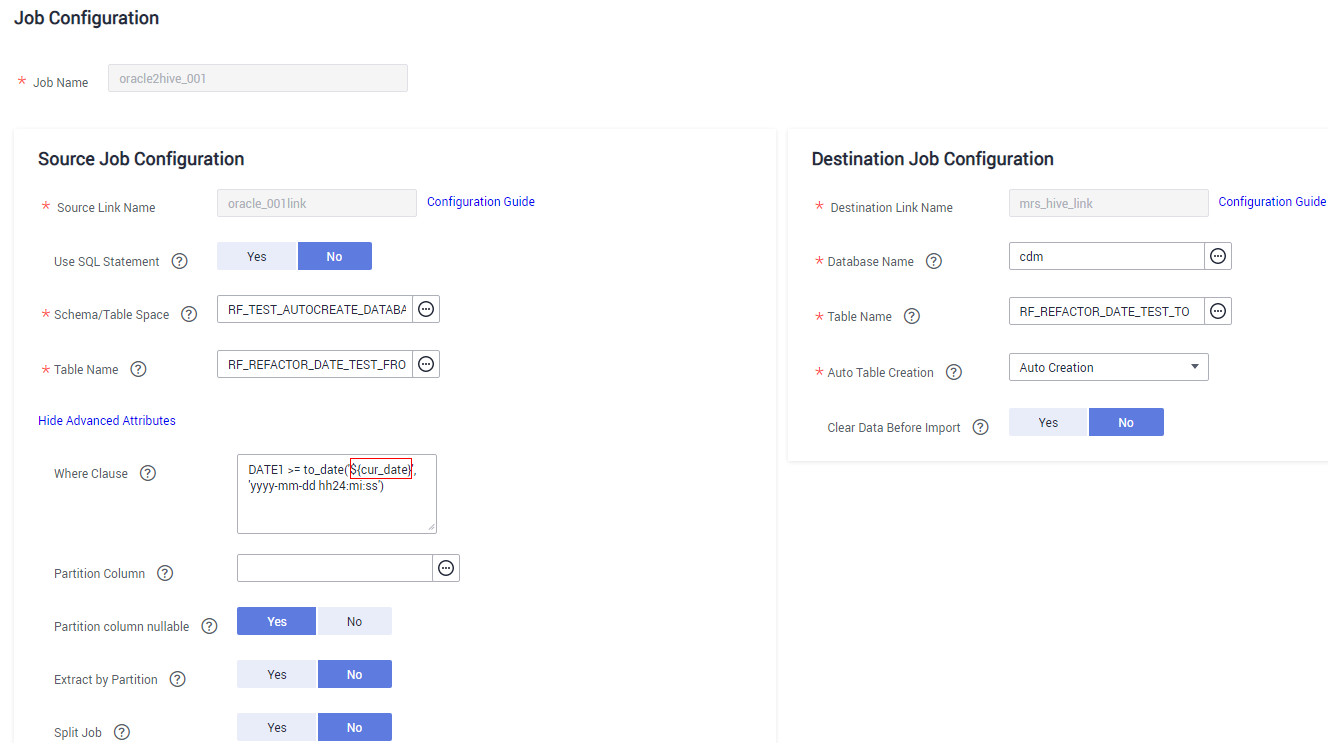
- Configure parameters for the source Oracle link and destination MRS Hive link, and configure the parameter to transfer in ${varName} format (${cur_date} in this example).
Figure 2 Creating a job


The Retry upon Failure parameter is unavailable in the CDM migration job. You can configure this parameter on the CDM node in DataArts Factory.
Creating and Executing a Data Development Job
- On the DataArts Studio console, locate a workspace and click DataArts Factory.
- In the navigation pane of the DataArts Factory homepage, choose Data Development > Develop Job.
- On the Develop Job page, click Create Job.
Figure 3 Create Job

- In the displayed dialog box, configure job parameters and click OK.
Table 1 Job parameters Parameter
Description
Job Name
Name of the job. The name must contain 1 to 128 characters, including only letters, numbers, hyphens (-), underscores (_), and periods (.).
Job Type
Type of the job.
- Batch processing: Data is processed periodically in batches based on the scheduling plan, which is used in scenarios with low real-time requirements. This type of job is a pipeline that consists of one or more nodes and is scheduled as a whole. It cannot run for an unlimited period of time, that is, it must end after running for a certain period of time.
You can configure job-level scheduling tasks for batch processing jobs. For details, see Setting Up Scheduling for a Job Using the Batch Processing Mode.
- Real-time processing: Data is processed in real time, which is used in scenarios with high real-time performance. This type of job is a business relationship that consists of one or more nodes. You can configure a scheduling policy for each node, and the tasks started by nodes can keep running for an unlimited period of time. In this type of job, lines with arrows represent only service relationships, rather than task execution processes or data flows.
You can configure node-level scheduling tasks for real-time processing jobs. For details, see Setting Up Scheduling for Nodes of a Job Using the Real-Time Processing Mode.
Creation Method
Job creation method
- Create Empty Job: Create an empty job.
- Create Based on Template: Use a template provided by DataArts Factory to create a job.
Select Directory
Directory to which the job belongs. The default value is the root directory.
Owner
Owner of the job
Priority
Priority of the job. The options are High, Medium, and Low.
Agency
After an agency is configured, the job interacts with other services as an agency during job execution.
NOTE:A job-level agency takes precedence over a workspace-level agency.
Log Path
Path of the OBS bucket for storing job logs. By default, logs are stored in an OBS bucket named dlf-log-{Projectid}.
NOTE:- If you want to customize a storage path, select the bucket that you have created on OBS by following the instructions provided in (Optional) Changing a Job Log Storage Path.
- Ensure that you have the read and write permissions on the OBS bucket specified by this parameter, or the system cannot write or display logs.
- Batch processing: Data is processed periodically in batches based on the scheduling plan, which is used in scenarios with low real-time requirements. This type of job is a pipeline that consists of one or more nodes and is scheduled as a whole. It cannot run for an unlimited period of time, that is, it must end after running for a certain period of time.
- Add a CDM Job node in the data development job and associate the node with the created CDM job.
Figure 4 Associating the CDM Job node with the created CDM job

- Configure the parameter to be transferred to the CDM job.
Figure 5 Configuring the parameter to be transferred


When the job is scheduled and executed, the value of the configured parameter will be transferred to the CDM job. The value of the parameter cur_date can be set to a fixed value (for example, 2021-11-10 00:00:00) or an EL expression (for example, #{DateUtil.format(DateUtil.addDays(Job.planTime,-1),"yyyy-MM-dd")} which means the day before the scheduled job execution date. For more EL expressions, see EL expressions.
- Save and submit a job version and click Test to execute the data development job.
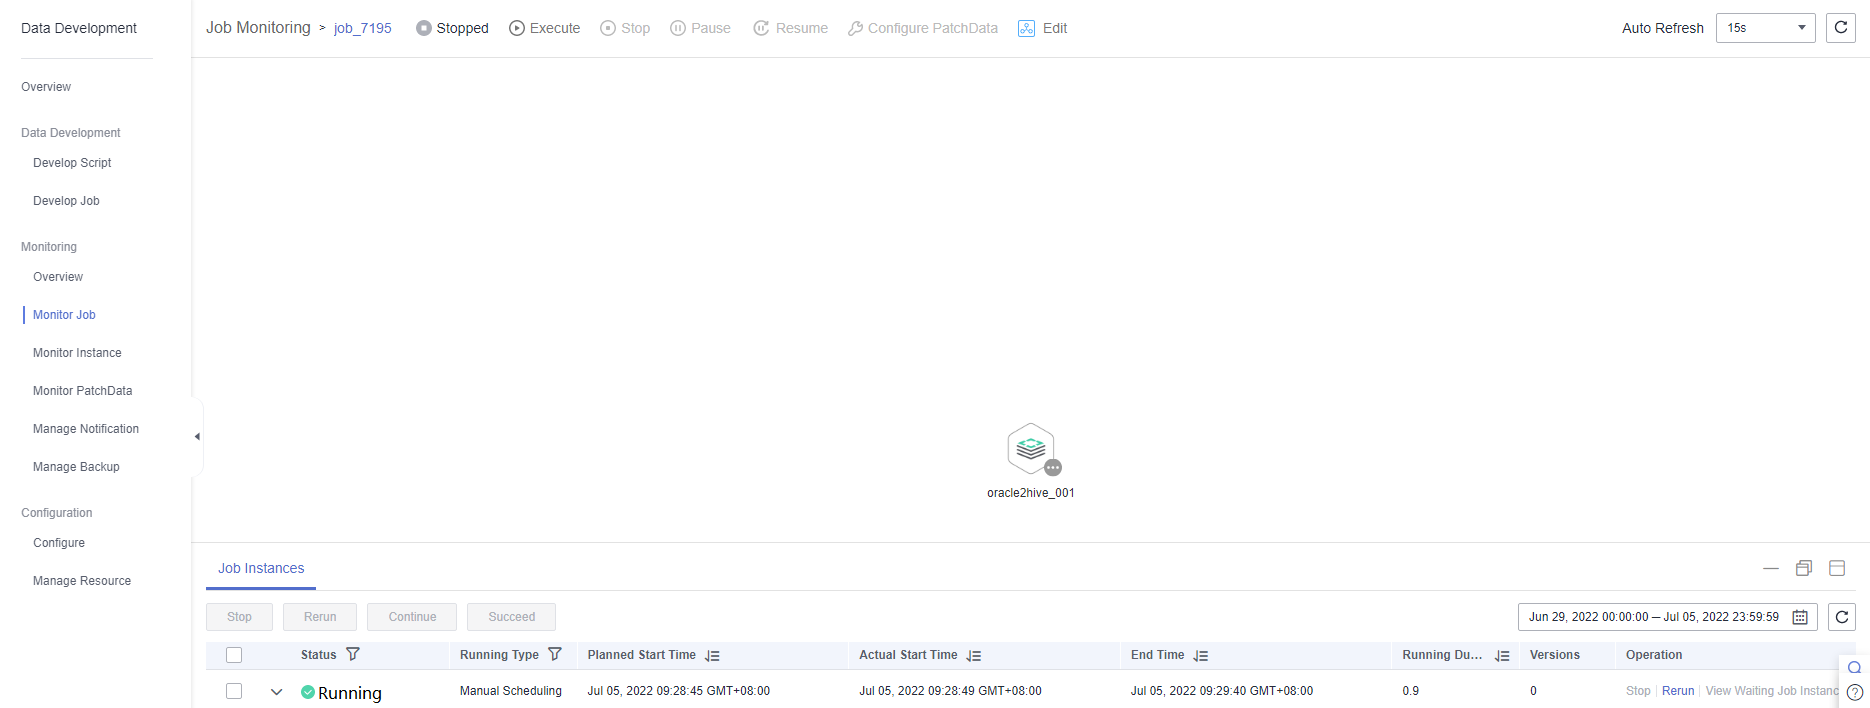
- After the data development job is executed, click Monitor in the upper right corner to go to the Monitor Job page and check whether the generated task or instance meets requirements.
Figure 6 Viewing the execution result

Feedback
Was this page helpful?
Provide feedbackThank you very much for your feedback. We will continue working to improve the documentation.


