

更新时间:2023-10-19 GMT+08:00
前提准备
如果是初次使用编译构建服务,请先新建项目,然后开始本示例。
准备WebServer项目代码仓库
- 在本地新建一个用于存放代码的目录“WebServer”并进入该目录。
- 在“WebServer”目录下新建名称为“pom.xml”的文件,文件内容如下:
<project xmlns="http://maven.apache.org/POM/4.0.0" xmlns:xsi="http://www.w3.org/2001/XMLSchema-instance" xsi:schemaLocation="http://maven.apache.org/POM/4.0.0 http://maven.apache.org/maven-v4_0_0.xsd"> <modelVersion>4.0.0</modelVersion> <groupId>com.xx.demo</groupId> <artifactId>server</artifactId> <packaging>jar</packaging> <version>1.0</version> <name>server</name> <url>http://maven.apache.org</url> <dependencies> <dependency> <groupId>junit</groupId> <artifactId>junit</artifactId> <version>3.8.1</version> <scope>test</scope> </dependency> </dependencies> <build> <pluginManagement> <plugins> <plugin> <groupId>org.apache.maven.plugins</groupId> <artifactId>maven-jar-plugin</artifactId> <version>2.6</version> <configuration> <archive> <manifest> <addClasspath>true</addClasspath> </manifest> <manifestEntries> <Main-Class> HelloWorld </Main-Class> </manifestEntries> </archive> </configuration> </plugin> </plugins> </pluginManagement> </build> </project> - 新建“src\main\java”目录。
- 在步骤3创建的目录中,新建名称为“HelloWorld.java”的文件,内容如下:
public class HelloWorld { public static void main(String[] args) { System.out.println("Hello World!"); } } - 在编译构建首页,单击右上角
 ,选择“自定义构建环境”。
 - 进入“自定义构建环境”页面,单击“基于centos7包含各种常用工具的X86基础镜像”,即可获取该基础镜像对应的Dockerfile文件。
可使用DockerHub或SWR仓库中公开镜像,本例中使用CentOS作为基础镜像。
- 查看步骤2中WebServer项目pom.xml中构建包的坐标定义。
Maven构建包名格式为:artifactId-version.packaging,构建包默认生成于“./target”目录下。则最终构建包路径为:./target/server-1.0.jar。
- 使用步骤6中获取的构建包路径编写Dockerfile,内容如下:
FROM centos
MAINTAINER <devcloud@demo.com>
USER root
RUN mkdir /demo
COPY ./target/server-1.0.jar /demo/app.jar
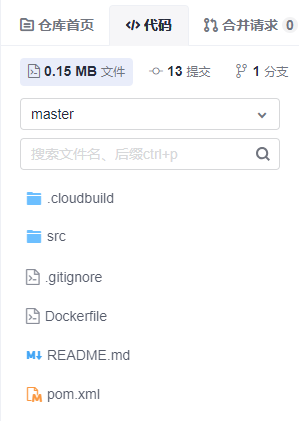
- 在导航栏选择,参考创建代码仓库创建名为“WebServer”的代码仓库,然后将步骤2、步骤3和步骤7中创建的文件上传代码至代码仓库,代码上传完后,可进入代码仓库查看内容。
准备WebUtil项目代码仓库
- 在本地新建一个用于存放代码的目录“WebUtil”。
- 在步骤1创建的目录下新建名称为“pom.xml”的文件,内容如下:
<project xmlns="http://maven.apache.org/POM/4.0.0" xmlns:xsi="http://www.w3.org/2001/XMLSchema-instance" xsi:schemaLocation="http://maven.apache.org/POM/4.0.0 http://maven.apache.org/maven-v4_0_0.xsd"> <modelVersion>4.0.0</modelVersion> <groupId>com.xx.demo</groupId> <artifactId>util</artifactId> <packaging>jar</packaging> <version>1.0</version> <name>util</name> <url>http://maven.apache.org</url> <dependencies> <dependency> <groupId>junit</groupId> <artifactId>junit</artifactId> <version>3.8.1</version> <scope>test</scope> </dependency> </dependencies> <build> <pluginManagement> <plugins> <plugin> <groupId>org.apache.maven.plugins</groupId> <artifactId>maven-jar-plugin</artifactId> <version>2.6</version> <configuration> <archive> <manifest> <addClasspath>true</addClasspath> </manifest> <manifestEntries> <Main-Class> HelloWorld </Main-Class> </manifestEntries> </archive> </configuration> </plugin> </plugins> </pluginManagement> </build> </project> - 本地新建“src\main\java”目录。
- 在步骤3创建的目录下新建名称为“HelloWorld.java”的文件,内容如下:
public class HelloWorld { public static void main(String[] args) { System.out.println("Hello World!"); } } - 在导航栏选择,参考创建代码仓库创建名为“WebUtil”的代码仓库,然后将步骤2和步骤4创建的文件上传代码至代码仓库,代码上传完后,可进入代码仓库查看内容。
准备私有依赖扩展点
- 在导航栏选择。
- 单击“新建服务扩展点”,选择“nexus repository”。
- 在弹出的对话框中填写参数信息。
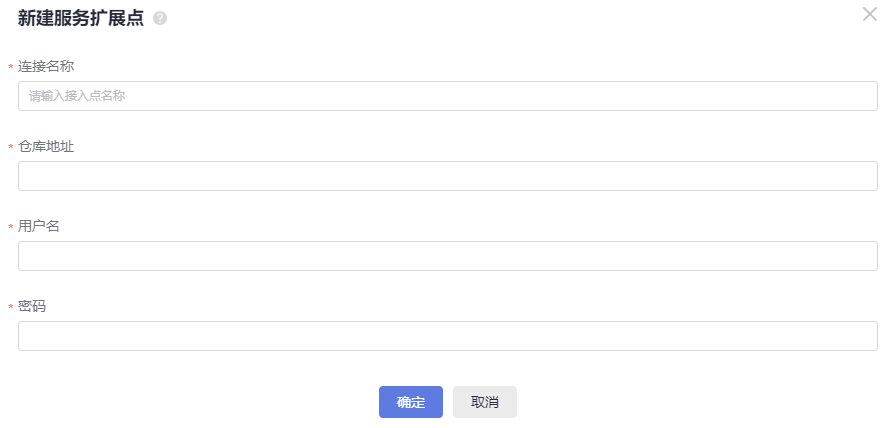
- 连接名称:使用私有依赖扩展点的显示名称,本例中可命名为“私有依赖扩展点”。
- 仓库地址:私有仓库地址。
- 用户名:从私有依赖库下载的指定私有仓库配置文件中的用户名。
- 密码:从私有依赖库下载的指定私有仓库配置文件中的密码。
参数信息来源如下:
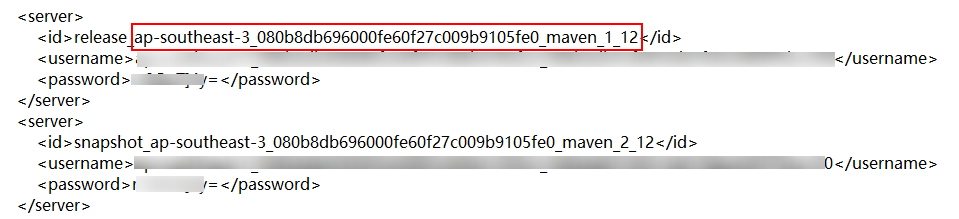
- 在导航栏选择,单击仓库地址旁的
 ,获取私有仓库地址。
- 单击“操作指导”。
- 选择Maven依赖管理工具,单击“下载配置文件”。

- 获取文件中的用户名和密码。
需要使用ID为仓库地址最后一个参数的用户名和密码。
- 请到容器镜像服务SWR创建组织,制作镜像并推送到SWR仓库时,需要指定SWR组织名。
父主题: 使用Maven构建包制作Docker镜像


