使用CodeArts 编码智能助手自动生成单元测试用例
背景介绍
在代码开发过程中,代码质量的保障离不开测试用例的看护。然而,手工编写测试用例往往面临诸多现实问题。
- 耗时费力,且用例维护代价较大,占用业务管道多。
- 复杂业务Mock场景繁杂,外部交互服务多,各种中间件的使用导致了大量复杂的Mock逻辑需求。
- 对研发人员技能有一定要求,需要学习并正确应用多种测试框架。
通过CodeArts 编码智能助手自动生成测试用例,可有效验证功能的正确性,发现潜在缺陷,并为后续的维护和优化提供可靠的参考依据,提高测试用例编写效率。本案例以冒泡排序为例,介绍如何通过CodeArts 编码智能助手自动生成测试用例。
准备工作
- 安装CodeArts盘古助手插件(本案例以IntelliJ IDEA为例介绍)。
- 准备如下示例代码(冒泡排序):
public class BubbleSort {
    /**
     * 对整型数组进行冒泡排序(升序)
     * @param arr 待排序的整型数组
     */
    public static void bubbleSort(int[] arr) {
        if (arr == null || arr.length <= 1) {
            return; // 数组为空或只有一个元素,无需排序
        }
        int n = arr.length;
        for (int i = 0; i < n - 1; i++) {
            // 提前退出优化:如果某一轮没有发生交换,说明数组已有序
            boolean swapped = false;
            for (int j = 0; j < n - i - 1; j++) {
                if (arr[j] > arr[j + 1]) {
                    // 交换 arr[j] 和 arr[j+1]
                    int temp = arr[j];
                    arr[j] = arr[j + 1];
                    arr[j + 1] = temp;
                    swapped = true;
                }
            }
            if (!swapped) {
                break; // 本轮无交换,排序完成
            }
        }
    }
}
操作步骤
- 在IntelliJ IDEA编辑器中,打开示例代码。
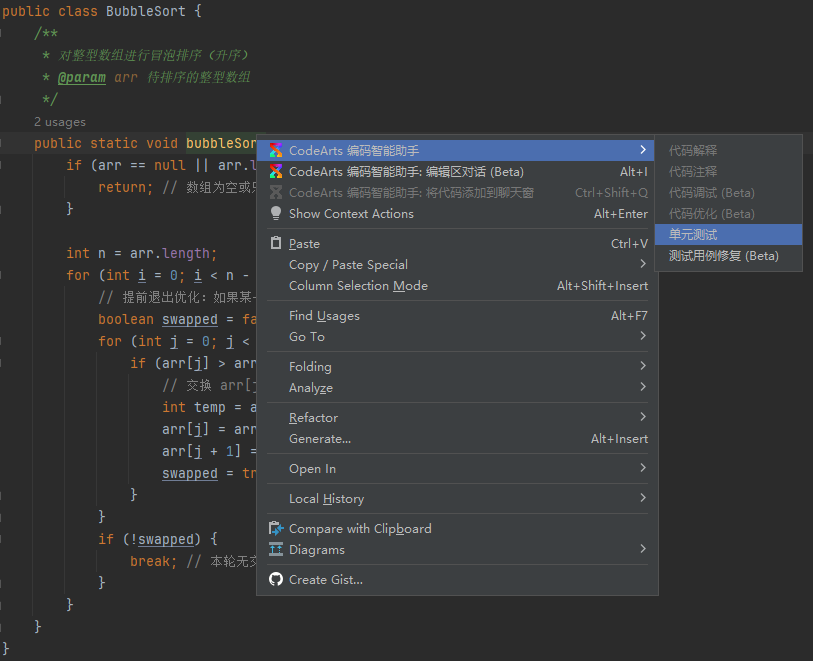
- 将鼠标放在被测方法处,右键选择“CodeArts 编码智能助手 > 单元测试”。
图1 单元测试

- 弹出“生成单元测试”对话框,选择测试框架和Mock框架,单击“确认”。
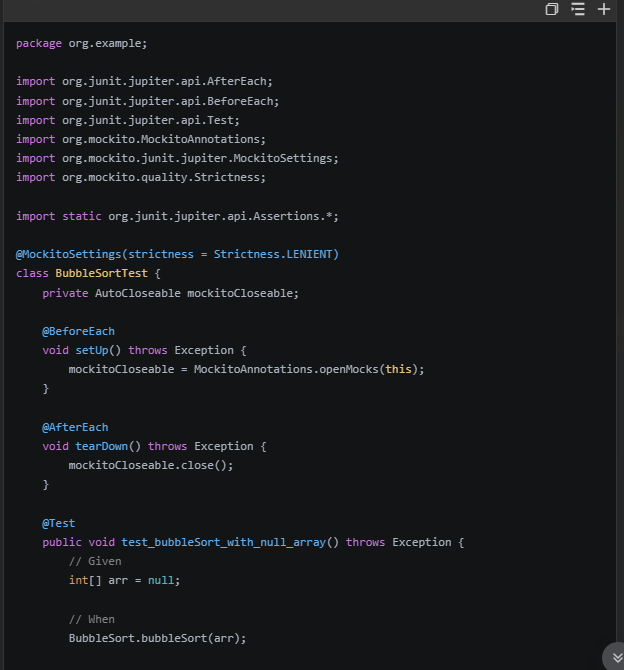
- CodeArts盘古助手将会在右侧研发问答窗口输出测试用例代码。
图2 生成测试用例

示例代码如下:
package org.example; import org.junit.jupiter.api.AfterEach; import org.junit.jupiter.api.BeforeEach; import org.junit.jupiter.api.Test; import org.mockito.MockitoAnnotations; import org.mockito.junit.jupiter.MockitoSettings; import org.mockito.quality.Strictness; import static org.junit.jupiter.api.Assertions.*; @MockitoSettings(strictness = Strictness.LENIENT) class BubbleSortTest { private AutoCloseable mockitoCloseable; @BeforeEach void setUp() throws Exception { mockitoCloseable = MockitoAnnotations.openMocks(this); } @AfterEach void tearDown() throws Exception { mockitoCloseable.close(); } @Test public void test_bubbleSort_with_null_array() throws Exception { // Given int[] arr = null; // When BubbleSort.bubbleSort(arr); // Then assertNull(arr); } @Test public void test_bubbleSort_with_single_element_array() throws Exception { // Given int[] arr = {1}; // When BubbleSort.bubbleSort(arr); // Then assertArrayEquals(new int[]{1}, arr); } @Test public void test_bubbleSort_with_sorted_array() throws Exception { // Given int[] arr = {1, 2, 3, 4, 5}; // When BubbleSort.bubbleSort(arr); // Then assertArrayEquals(new int[]{1, 2, 3, 4, 5}, arr); } @Test public void test_bubbleSort_with_unsorted_array() throws Exception { // Given int[] arr = {5, 4, 3, 2, 1}; // When BubbleSort.bubbleSort(arr); // Then assertArrayEquals(new int[]{1, 2, 3, 4, 5}, arr); } @Test public void test_bubbleSort_with_array_containing_duplicates() throws Exception { // Given int[] arr = {3, 1, 2, 3, 1}; // When BubbleSort.bubbleSort(arr); // Then assertArrayEquals(new int[]{1, 1, 2, 3, 3}, arr); } } - 单击代码框右上角
 图标,在弹窗中选择代码保存路径。
 - 单击“确定”,即可将测试代码保存为文件并在IDEA编辑器自动打开。
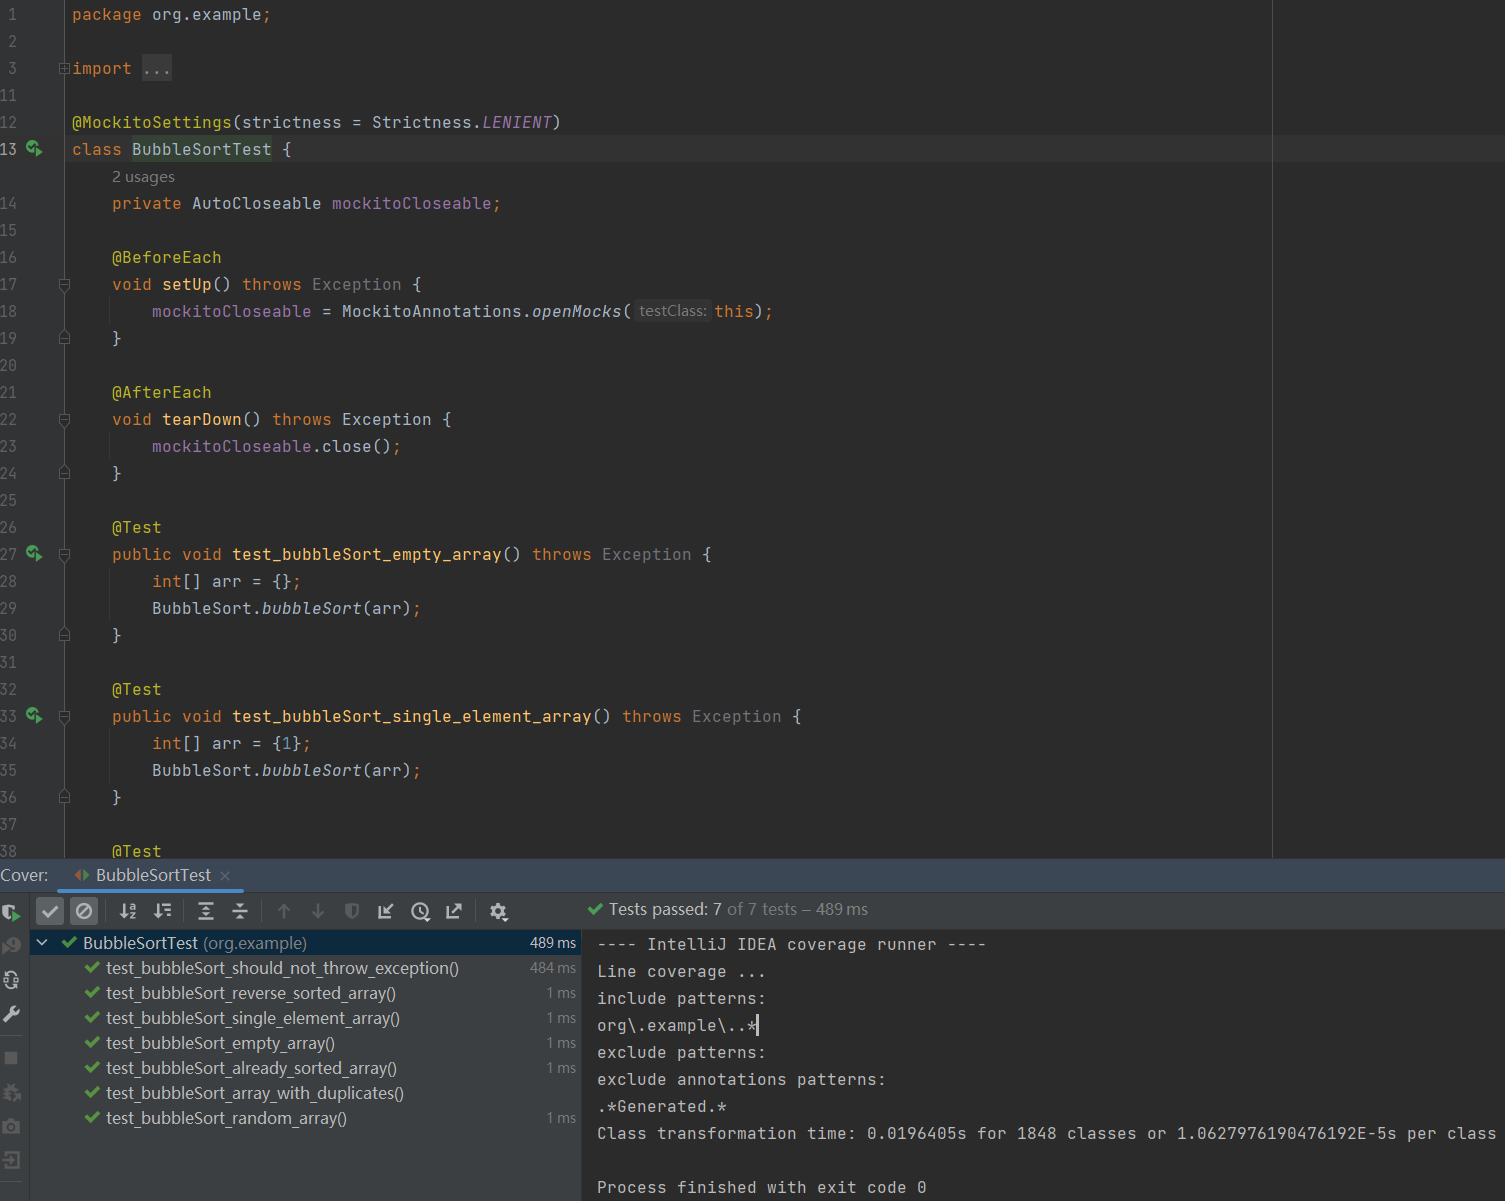
- 将鼠标放在类名处,右键选择“More Run/Debug > Run 'BubbleSortTest' with Coverage”,执行测试用例。
- 执行完成后,即可查看执行结果。
图3 测试用例执行结果


