QingTian Enclave网络代理工具
QingTian Enclave网络代理工具(qproxy)概述
qproxy(QingTian Enclave proxy)是QingTian Enclave的网络代理工具。借助此工具,您可以无需任何改动,直接将部署在基于QingTian架构虚拟机中的网络业务移植到QingTian Enclave中,实现传统网络业务的无感迁移。
qproxy是一个可执行的二进制文件,需要在父虚拟机和QingTian Enclave中通过不同的命令运行:
- 在父虚拟机中,通过执行“/path/to/qproxy host --config=/path/to/config_qproxy.toml <cid>”命令启用qproxy。
- 在QingTian Enclave中,通过执行“/path/to/qproxy enclave --config=/path/to/config_qproxy.toml”命令启用qproxy。
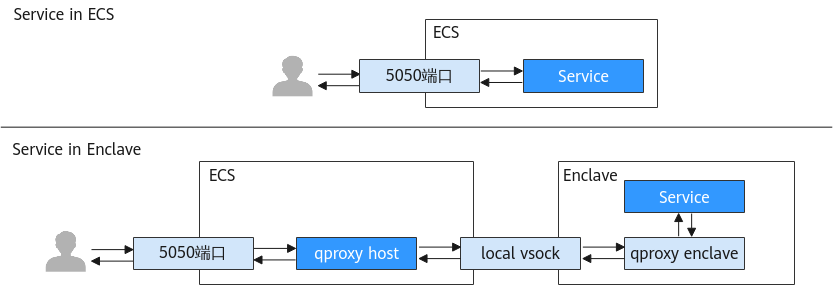
以一个简单的网络服务为例,网络服务直接部署在虚拟机中,负责处理来自最终用户的请求。最终用户通过该服务暴露的端口,发起网络请求,等待服务响应。在将该网络服务迁移至QingTian Enclave之后,通过qproxy代理,可以提供和原本网络服务相同的服务。
使用同一个qproxy二进制文件,通过qlog host和qlog enclave命令,使其分别运行在父虚拟机和QingTian Enclave中,两者会建立基于local vsock的通信链路。父虚拟机中的qproxy组件会监听5050端口,接收用户请求,并通过local vsock将收到的请求转发给QingTian Enclave中的qproxy组件。该组件会将请求发送到QingTian Enclave中监听的5050端口。网络服务处理完成之后,响应数据会原路返回。

本文介绍qproxy的操作步骤。
前提条件
- 获取qproxy源码。
git clone https://gitee.com/HuaweiCloudDeveloper/huawei-qingtian.git
- 获取cargo工具链。
- 执行以下命令安装rustup。
curl --proto '=https' --tlsv1.2 -sSf https://sh.rustup.rs | sh
- 安装完成后执行以下命令加载rustup。
source $HOME/.cargo/env
- 执行以下命令验证rustc和cargo安装成功。
rustc -V
cargo -V
- 执行以下命令安装rustup。
- qproxy的前置依赖。
表1 前置依赖 依赖项
最低测试版本
cargo
1.77.0
libcbor
0.10.2
libssl (libcrypto)
3.0.0
libcurl
4.0.0
- QingTian Enclave的环境准备。
- 安装qt CLI工具和其他必要rpm包。
- 安装Docker。
- 安装python3以及几个必要的python module : docker和knack。
操作步骤
- 构建qproxy。
生成的qproxy程序在目录qingtian-tools/qproxy/target/release下。
cargo build --release
- 创建工作目录。
新建工作目录workspace,将qproxy程序拷贝到workspace下,后续创建的文件都放在workspace中。
mkdir -p /home/workspace
cp ./qproxy /home/workspace/
- 配置config_qproxy.toml。
在workspace目录中创建config_qproxy.toml文件,内容如下:
[[inbound_connections]]
host_port = 5050
enclave_port = 5050
vsock_port = 9995

[[inbound_connections]]
host_port = 5443
enclave_port = 5443
vsock_port = 9994

[log_location]
host_log = "host.log" # qproxy host log name, e.g./var/log/qproxy/host.log
enclave_log = "enclave.log" # qproxy enclave log name, e.g./var/log/qproxy/enclave.log
log_level = "info" # qproxy logger level, e.g. "off", "info", "warn", "error", "debug", "trace"
host_log_dir = "/var/log/qproxy" # qproxy host log dir, and its default value is "/var/log/qproxy"
enclave_log_dir = "/var/log/qproxy" # qproxy enclave log dir, and its default value is "/var/log/qproxy"
- 制作含qproxy的QingTian Enclave镜像。
- 在workspace目录中创建http请求测试脚本app.sh:
#!/bin/bash PORT=5050 while true; do echo -e "HTTP/1.1 200 OK\nContent-Type: text/plain\n\nHello world!" | nc -l 127.0.0.1 $PORT done - 赋予app.sh执行权限,在workspace目录中执行以下命令:
chmod +x app.sh
- 在workspace目录中创建start.sh脚本:
#!/bin/bash
ip link set lo up
/root/qproxy enclave --config=/root/config_qproxy.toml &
/root/app.sh
- 赋予start.sh执行权限,在workspace目录中执行以下命令:
chmod +x start.sh
- 在workspace目录中创建Dockerfile文件:
FROM ubuntu:22.04 COPY ./qproxy /root/qproxy COPY ./config_qproxy.toml /root/config_qproxy.toml COPY ./start.sh /root/start.sh COPY ./app.sh /root/app.sh RUN apt-get update && \ apt-get install -y netcat-openbsd && \ apt-get install -y iproute2 CMD "/root/start.sh" - 制作docker镜像,在workspace目录中运行以下命令:
docker build -f Dockerfile -t test_qproxy_enclave .
- 制作QingTian Enclave镜像,在workspace目录中运行以下命令:
qt enclave make-img --docker-uri test_qproxy_enclave --eif test_qproxy_enclave.eif
- 在workspace目录中创建http请求测试脚本app.sh:
- 启动qproxy。
- 启动一台QingTian Enclave,在workspace目录中运行以下命令:
qt enclave start --cpus 2 --mem 1024 --cid 4 --eif test_qproxy_enclave.eif
- 启动父虚拟机中的qproxy,在workspace目录中运行以下命令:
./qproxy host --config=./config_qproxy.toml 4 &
- 父虚拟机中执行curl命令:
curl localhost:5050
可以看到终端输出"Hello world!"。
- 启动一台QingTian Enclave,在workspace目录中运行以下命令:
- qproxy环境变量设置。
qproxy包含两部分子命令,一部分在QingTian Enclave(qproxy enclave)中运行,另一部分在父虚拟机(qproxy host)中运行。
通过设置环境变量RUST_LOG可以控制二进制文件的日志输出信息等级。
- 设置RUST_LOG=OFF,日志信息会全部关闭不显示。
- 设置RUST_LOG=info,日志信息会显示info,warn和error三个级别的信息。
- 默认情况下,只会显示warn和error两个级别的日志信息。
- 可以通过查看EnvFilter文档获取更多信息。
qproxy帮助信息
qproxy help
$ qproxy --help
Usage: qproxy <COMMAND>

Commands:
   host          The part of qproxy that runs outside the enclave
   enclave       The part of qproxy that runs inside the enclave
   check-config  Check the qproxy configuration file
   help          Print this message or the help of the given subcommand(s)

Options:
   -h, --help     Print help
   -V, --version  Print version
qproxy enclave help
$ qproxy enclave --help
The part of qproxy that runs inside the enclave

Usage: qproxy enclave [OPTIONS]

Options:
      --parent-cid <PARENT_CID>
          The CID of the parent VM of this enclave

          [env: QPROXY_PARENT_CID=]
          [default: 3]

      --config <CONFIG>
           Path to the configuration file

  -t, --threads <THREADS>
           Number of threads the async runtime is allowed to use

           [env: TOKIO_WORKER_THREADS=]

       --control-port <CONTROL_PORT>
            The port where to listen for control messages from the enclave

            Leave at default value unless you know what you are doing

            [env: QPROXY_CONTROL_PORT=]
            [default: 6666]
            [0..=65535]

  -h, --help
            Print help (see a summary with '-h')
qproxy host help
$ qproxy host --help
The part of qproxy that runs outside the enclave

Usage: qproxy host [OPTIONS] <CID>

Arguments:
  <CID>
           The CID of the enclave

           [env: QPROXY_LISTEN_CID=]

Options:
        --config <CONFIG>
             Path to the configuration file

  -t, --threads <THREADS>
             Number of threads the async runtime is allowed to use

             [env: TOKIO_WORKER_THREADS=]

      --ipv4
          Only resolve IPv4 addresses

      --ipv6
          Only resolve IPv6 addresses

      --control-port <CONTROL_PORT>
          The port where to listen for control messages from the enclave

          Leave at default value unless you know what you are doing

          [env: QPROXY_CONTROL_PORT=]
          [default: 6666]
          [0..=65535]

  -h, --help
          Print help (see a summary with '-h')
配置信息(Config)
配置参数解释
- outbound_connections:配置转发QingTian Enclave外发流量到外部特定服务(hostname/IP)及其端口。
- inbound_connections:配置转发父虚拟机指定端口收到的流量到QingTian Enclave中。
|
Bound |
Variable |
Type |
Description |
|---|---|---|---|
|
outbound_connections |
hostname |
String |
用于转发流量的主机名(hostname),可以是IP地址,例如:hostname = "api.myservice.com"。 |
|
vsock_port |
u32 |
QingTian Enclave内vsock要使用的端口,必须唯一,并且不能和qproxy端口冲突。 |
|
|
tcp_port |
u32 |
服务器转发流量的端口(将连接到hostname:port),不能和qproxy端口冲突(默认是8080)。 |
|
|
inbound_connections |
host_port |
u32 |
主机端(host)qproxy将会监听的端口,如host_port = 80,主机端qproxy将会监听0.0.0.0:80。 |
|
enclave_port |
u32 |
QingTian Enclave端qproxy将会监听的端口,如enclave_port = 80,QingTian Enclave端qproxy将会监听127.0.0.1:80。 |
|
|
vsock_port |
u32 |
QingTian Enclave内vsock要使用的端口,必须唯一,并且不能和qproxy端口冲突。 |
日志文件配置
|
Variable |
Type |
Description |
|---|---|---|
|
host_log |
String |
qproxy在主机端(host)日志文件名称, 例如:host_log = "host.log"表示主机端(host)qproxy日志文件名为host.log。 |
|
enclave_log |
String |
qproxy在QingTian Enclave端日志文件名称,例如:enclave_log = "enclave.log"表示QingTian Enclave中qproxy日志文件名为enclave.log。 |
|
log_level |
String |
qproxy日志级别, 例如:log_level = "info"表示显示信息,警告和错误。全部级别有 "off", "info", "warn", "error", "debug", "trace"。 |
|
host_log_dir |
String |
qproxy在主机端(host)日志目录,默认是 "/var/log/qproxy" |
|
enclave_log_dir |
String |
qproxy在QingTian Enclave端日志目录,默认是 "/var/log/qproxy" |
配置文件参考
[[outbound_connections]]
hostname = "api.myservice.com"
vsock_port = 7777
tcp_port = 443

[[outbound_connections]]
hostname = "another.api.com"
vsock_port = 7778
tcp_port = 5555

[[inbound_connections]]
host_port = 80
enclave_port = 80
vsock_port = 9000

[[inbound_connections]]
host_port = 443
enclave_port = 443
vsock_port = 9001

[log_location]
host_log = "host.log"
enclave_log = "enclave.log"
log_level = "info"
host_log_dir = "/var/log/qproxy"
enclave_log_dir = "/var/log/qproxy"


