Connecting to a Hive Data Source
DataArts Insight allows you to connect to a Hive data source. This section describes how to connect DataArts Insight to a Hive data source.
DataArts Insight can connect to Hive through the following methods:
- Public network connection: To connect to cloud service resources that do not belong to your current account, use this method. The data source must be bound to an EIP.
- VPC network connection: To connect to cloud service resources under your current account, use this method.
- VPCEP service: To connect to data sources that are not associated with your current account or for which you lack VPCEP permissions, as well as ECS self-built data sources, use this method.
Preparations
- Log in to the management console.
- In the service list, choose Analytics > MapReduce Service to access the MRS console.
- Select a region in the upper left corner.
- In the navigation pane on the left, choose Clusters.
- Click the name of the cluster you want to connect to. The cluster overview page is displayed.
- Locate the Network Information area. Click Add Security Group Rule next to EIP. In the Add Security Group Rule dialog box, click Manage Security Group Rule. Click the Inbound Rules tab and check whether a VPC endpoint security group or EIP is added.
- If yes, return to the DataArts Insight data source editing page to connect to the data source.
- If no, perform the following steps to add a security group:
- Click Add Rule. In the displayed Add Inbound Rule dialog box, set the protocol, port, and source IP address. To add multiple rules, click Fast-Add Rule.
- Confirm the parameter settings and click OK to return to the DataArts Insight page and connect to the data source.

If no EIP is bound, locate the Network Information area and click Bind next to EIP. Click Manage Security Group Rule and then the Inbound Rules tab to check or add a security group.
If the data source connection test fails after the security group is added, the possible cause is that SASL_SSL is not enabled for that data source.
Accessing a Hive Data Source Through a Public Network
- Log in to the DataArts Insight console.
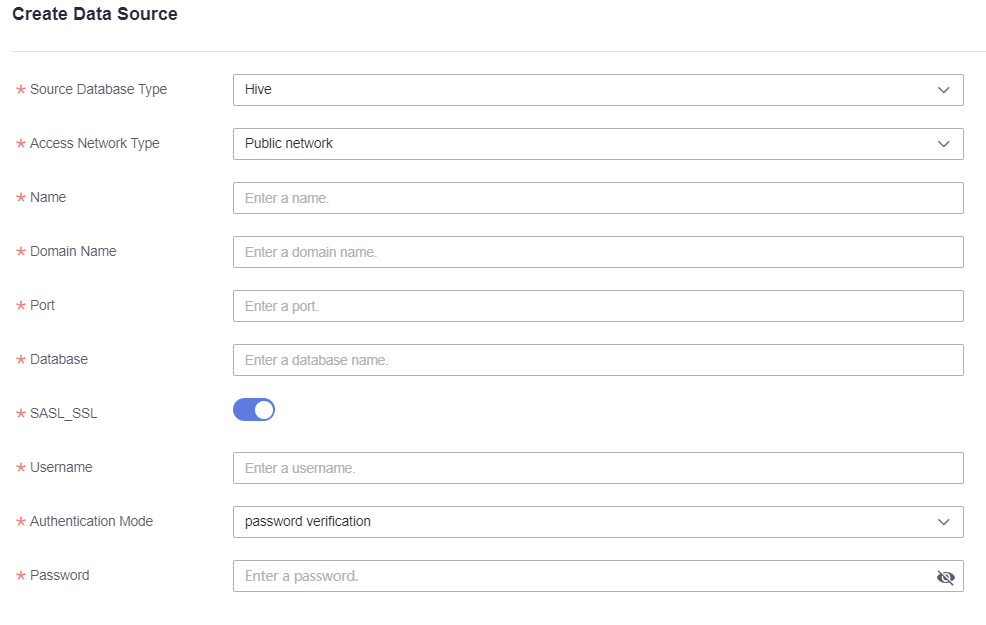
- In the navigation pane on the left, choose Data Management > Data Sources. On the displayed page, click Create Data Source. In the slide-out panel, set Source Database Type to Hive and Access Network Type to Public network.
- Set other parameters based on Table 1.
Figure 1 Parameters for connecting to a Hive data source

Table 1 Parameters Parameter
Mandatory
Description
Source Database Type
Yes
Type of the accessed data source. In this example, Hive is selected.
Access Network Type
Yes
In this example, Public network is selected.
Name
Yes
Name of the data source displayed in the list.
Domain Name
Yes
IP address of the data source.
Username
Yes
Username for logging in to the database.
Password
Yes
Password for logging in to the database.
Port
Yes
Port number for logging in to the database.
Database
Yes
Name of the database to be logged in to.
SASL_SSL
-
It is used for trusted identity authentication and secure data transmission when DataArts Insight retrieves data from the data source. This function is enabled by default.
NOTE:To connect to an MRS security cluster, enable SASL_SSL. For an MRS non-security cluster, disable SASL_SSL.
Username
Yes
Username for logging in to the database.
Authentication Mode
Yes
The options are Password authentication and Certificate authentication.
Password
No
Mandatory when Authentication Mode is set to password verification
Password for logging in to the database.
Security Certificate
No
Mandatory when Authentication Mode is set to certificate verification
To download and upload a security certificate, perform the following steps:
- Log in to FusionInsight Manager of the MRS cluster. Specifically, click an MRS cluster. On the displayed Dashboard tab, locate the O&M Management area, and click Access Manager next to MRS Manager.
- Click System on the top menu bar.
- Choose Permission > User. On the displayed page, locate a user, click More in the Operation column, and select Download Authentication Credential from the drop-down list.
- Once the certificate is downloaded, return to the page for creating a data source and click Upload Certificate to upload the certificate.
NOTE:
The certificate size for upload should not exceed 5 MB and must be in a file format ending with .tar.
principal
No
Mandatory when Authentication Mode is set to certificate verification
How to obtain:
- Log in to FusionInsight Manager of the MRS cluster. Specifically, click an MRS cluster. On the displayed Dashboard tab, locate the O&M Management area, and click Access Manager next to MRS Manager.
- Click Homepage in the upper part of the page.
- Click More and select Download Client. The Download Cluster Client page is displayed.
- Set Select Client Type to Configuration Files Only and Select Platform Type to x86_64, and click OK. The client configuration file is successfully downloaded.
- Decompress the client configuration file, open the Hive > config > hive-site.xml file, search for principal, and obtain the principal value.
Figure 2 Obtaining the principal value

- Return to the page for creating a data source and enter the obtained principal value in the principal field box.
- Click Test Connection to test the data source connectivity.
- Once the test is successful, click OK.
Accessing a Hive Data Source Through a VPC Network
- Log in to the DataArts Insight console.
- Click
 in the upper left corner of the management console to select a region and select an enterprise project from Enterprise Project in the upper right corner of the Workspace page.
 - On the top of the console, click Projects and click the name of the desired project.
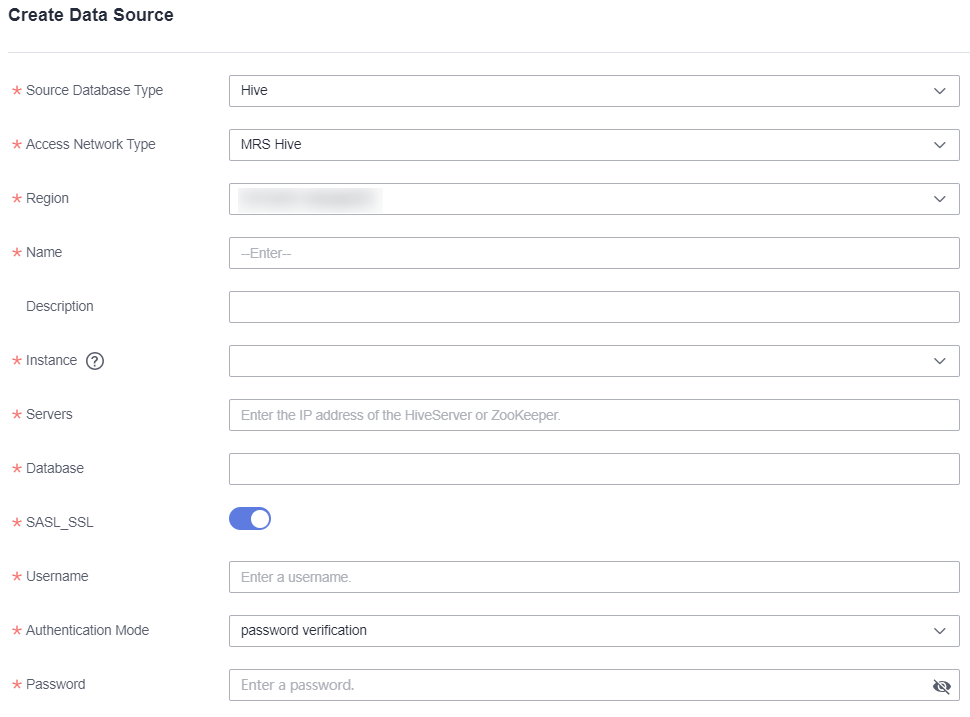
- In the navigation pane on the left, choose Data Management > Data Sources. On the displayed page, click Create Data Source. In the slide-out panel, set Source Database Type to Hive and Access Network Type to MRS Hive.
- Set other parameters based on Table 2.

The selection of MRS instances only determines the VPC and subnet to be connected, and does not have any corresponding relationship with the server list.
Figure 3 Parameters for connecting to a Hive cloud data source
Table 2 Parameters Parameter
Mandatory
Description
Source Database Type
Yes
Type of the accessed data source. In this example, Hive is selected.
Access Network Type
Yes
In this example, MRS Hive is selected.
Region
Yes
Region where the Hive service host is located.
Name
Yes
Name of the data source displayed in the list, which is user-defined.
Description
No
Description of the data source.
Instance
Yes
Role instance corresponding to the Hive service.
Servers
Yes
Hive server list.
Database
Yes
Name of the database to be logged in to.
SASL_SSL
-
It is used for trusted identity authentication and secure data transmission when DataArts Insight retrieves data from the data source. This function is enabled by default.
NOTE:To connect to an MRS security cluster, enable SASL_SSL. For an MRS non-security cluster, disable SASL_SSL.
Username
Yes
Username for logging in to the database.
Authentication Mode
Yes
The options are Password authentication and Certificate authentication.
Password
Yes
Password for logging in to the database.
- Click Test Connection to test the data source connectivity.
- Once the test is successful, click OK.
Connecting to a Hive Data Source Through a VPC Endpoint Service
VPCEP enables connections to data sources using the VPCEP service name, offering flexible data access and addressing issues related to cross-account access and self-built data source access for ECS. Furthermore, the same main account and its IAM users can share a single connection channel, streamlining connection management. The existing access method eliminates the need for permission delegation, further simplifying operations.
- Prerequisites
- Connection Approval has been enabled on the basic information page of the VPCEP service. For details, see Viewing a VPC Endpoint Service.
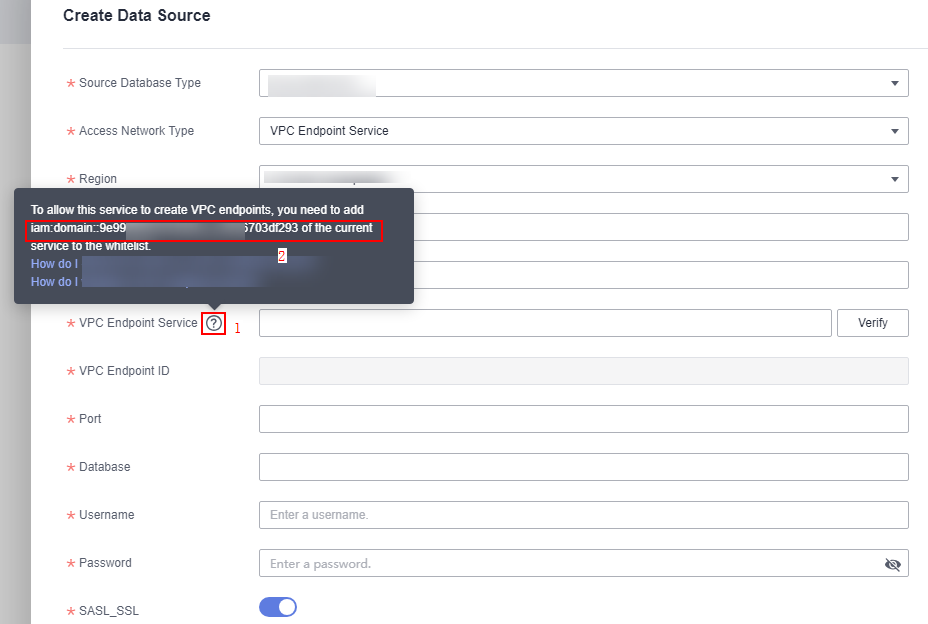
- You have whitelisted the VPCEP service by adding its domain ID to the whitelist. For details, see Managing Whitelist Records of a VPC Endpoint Service. You can obtain the domain ID in the Create Data Source dialog box.
Figure 4 Obtaining the domain ID

- Procedure
- Log in to the DataArts Insight console.
- Click
 in the upper left corner of the management console to select a region and select an enterprise project from Enterprise Project in the upper right corner of the Workspace page.
 - On the top menu of the console, click Project. On the displayed My Projects page, click the name of the desired project.
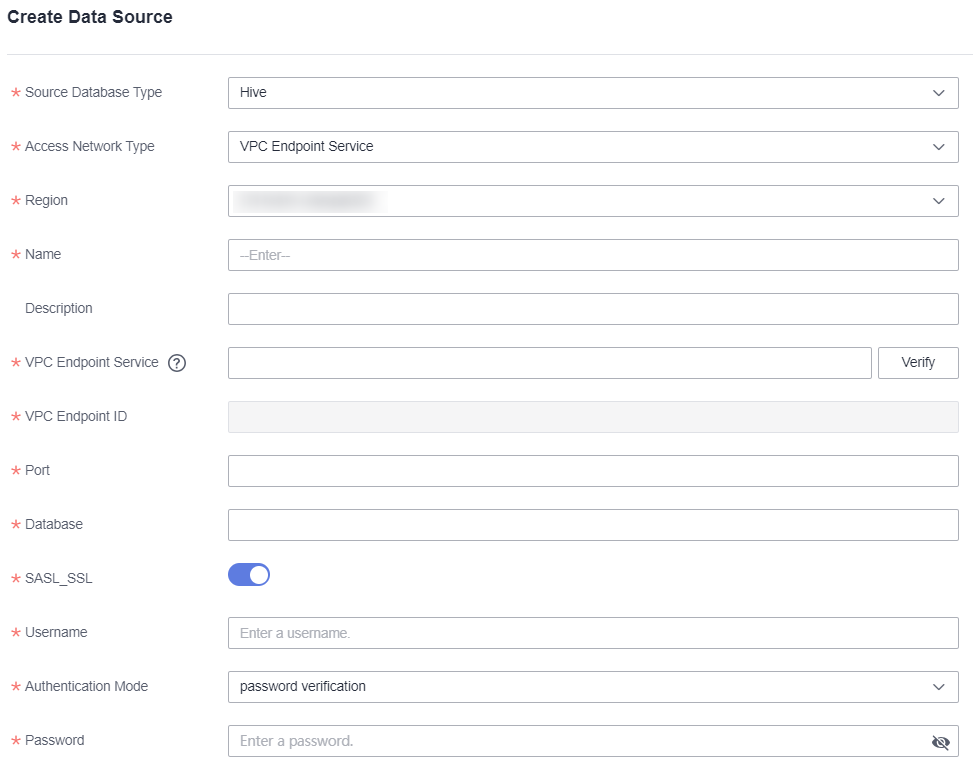
- In the navigation pane on the left, choose Data Management > Data Sources. On the displayed page, click Create Data Source. In the slide-out panel, set Source Database Type to Hive and Access Network Type to VPC Endpoint Service.
- Set other parameters based on Table 3.
Figure 5 Connection through a VPCEP service

Table 3 Parameters Parameter
Mandatory
Description
Source Database Type
Yes
Type of the accessed data source. In this example, Hive is selected.
Access Network Type
Yes
Select VPC Endpoint Service.
Region
Yes
Region where the Hive service host is located.
Name
Yes
Name of the data source displayed in the list, which is user-defined.
Description
No
Description of the data source.
VPC Endpoint Service
Yes
Name of the VPCEP service to be connected. The prerequisites for connecting to a VPCEP service are as follows:
- You have obtained the correct VPCEP service name. For details, see Checking a VPC Endpoint Service.
- You have whitelisted the VPCEP service by adding its domain ID to the whitelist. For details, see Managing Whitelist Records of a VPC Endpoint Service.
Verify
-
After entering the VPCEP service name, click Verify. If a green tick is displayed next to the VPC endpoint ID, the verification is successful. If a red exclamation mark (
 ) is displayed next to the VPC endpoint ID, the VPCEP service is connected to for the first time. In this case, you need to authorize the VPCEP service. To do so, log in to the VPCEP console. Under Network Console, choose VPC Endpoint > VPC Endpoint Services. On the displayed page, click the desired VPCEP service and click the Connection Management tab. On the tab page, authorize the VPCEP service. For details, see Managing Connections of a VPC Endpoint Service. Once the authorization is successful, click Verify again. The verification is successful.NOTE:
- All initial connections to the VPCEP service from different data sources require approval.
- Only an administrator account or an account with administrator permissions can approve the connection. If your current account does not have approval permissions, contact an administrator account for approval.
VPC Endpoint ID
Yes
This parameter is automatically filled in once you entered the VPCEP name and clicked Verify.
Port
Yes
Port number for logging in to the database.
Database
Yes
Name of the database to be logged in to.
Username
Yes
Username for logging in to the database.
Authentication Mode
Yes
The options are Password authentication and Certificate authentication.
Password
Yes
Password for logging in to the database.
- Click Test Connection to test the data source connectivity.
- Once the test is successful, click OK.
Feedback
Was this page helpful?
Provide feedbackThank you very much for your feedback. We will continue working to improve the documentation.See the reply and handling status in My Cloud VOC.
For any further questions, feel free to contact us through the chatbot.
Chatbot


