
Issuing a Domain Controller Certificate via OpenSSL
Scenarios
When certificate-based authentication is enabled in the AD scenario, the AD domain must have a valid domain controller certificate. The certificate can be provided by Active Directory Certificate Services (AD CS) on the AD domain. If AD CS is not installed, you can use OpenSSL to issue a domain controller certificate.
Prerequisites
- You have prepared a local Windows PC or ECS. For details about how to create an ECS, see Purchasing an ECS in Custom Config Mode.
- You have installed the OpenSSL tool on the local Windows PC or purchased ECS by referring to Installing OpenSSL.
- You have generated a certificate revocation list (CRL) file. For details, see Generating a CRL File.
- You have performed operations in Obtaining the objectGUID Value of the AD Server.
Notes and Constraints
- The certificate must point to a valid CRL.
- The certificate key must contain a digital signature and key for encryption.
- The enhanced certificate key must contain the following information:
- Client authentication (1.3.6.1.5.5.7.3.2)
- Server authentication (1.3.6.1.5.5.7.3.1)
- The certificate subject alternative name (SAN) must contain the domain name server (DNS) name. If simple mail transfer protocol (SMTP) replication is used, the SAN must also contain the globally unique identifier (GUID) of the domain controller object in the directory. Example SAN: 1.3.6.1.4.1.311.25.1 = ac 4b 29 06 aa d6 5d 4f a9 9c 4c bc b0 6a 65 d9 DNS Name=server1.northwindtraders.com
- The certificate template must have an extension that has the basic metabolic panel (BMP) data value DomainController.
- The domain controller certificate must be installed in the certificate store of the local computer.
Procedure
Using OpenSSL to generate a CA certificate
- Create a directory for storing the generated certificate on the local Windows PC or ECS, for example, RootCA.
- Go to the created RootCA directory and run the following commands to generate the certificate authority (CA) certificate:
- Generating a key: openssl genrsa -out ca.key 2048
- Generating a certificate request: openssl req -new -key ca.key -out ca.csr
- Generating a certificate: openssl x509 -req -days 365 -in ca.csr -signkey ca.key -out ca.crt
Generating a domain controller certificate using the CA certificate
- Create the flower_domain.cnf file on the local Windows PC or ECS.
- Copy the following content to the flower_domain.cnf file.
Set the following parameters as required:
- CN: full computer name of the AD server (Right-click This PC and choose Properties from the shortcut menu.)
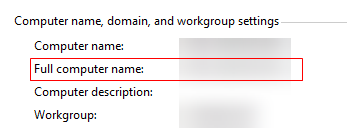
- DC: domain name of the AD server (Right-click This PC and choose Properties from the shortcut menu.)

- DNS.1: full computer name of the AD server (Right-click This PC and choose Properties from the shortcut menu.)

- OCTETSTRING: Obtain the value of ObjectGUID of the AD server. For details, see Obtaining the objectGUID Value of the AD Server.

Ensure that the value does not contain any space.
- URI.1: CRL file. For details, see Generating a CRL File.
[ req ]
distinguished_name = req_distinguished_name
default_bits        = 2048
prompt              = no
default_md          = sha256
req_extensions = v3_req
[ req_distinguished_name ]
CN  = WIN-HSDLL4RO8LJ.flower.com
OU = Domain Controllers
DC = flower
[ v3_req ]
basicConstraints = CA:FALSE
keyUsage = digitalSignature, keyEncipherment
extendedKeyUsage = clientAuth, serverAuth
subjectAltName = @alt_names
1.3.6.1.4.1.311.20.2 = ASN1:BMP:DomainController
crlDistributionPoints = @crl_section
[ template_sample ]
filed1 = UTF8:some
[ alt_names ]
otherName.1 = 1.3.6.1.4.1.311.25.1;FORMAT:HEX,OCTETSTRING:DDB5053B5EDB014080ED528D4B34DB8B
DNS.1 = WIN-HSDLL4RO8LJ.flower.com
[ v3_ca ]
basicConstraints = CA:TRUE, pathlen:0
keyUsage = critical, keyCertSign, cRLSign
[ crl_section ]
URI.1 = http://WIN-HSDLL4RO8LJ.flower.com/sc-root-ca.crl
- CN: full computer name of the AD server (Right-click This PC and choose Properties from the shortcut menu.)
- On the local Windows PC or ECS, press Win+R, enter cmd in the Run dialog box, and press Enter to open the command line interface (CLI).
- Go to the directory where the flower_domain_.cnf file is stored and run the following command:
Example: cd D:\Users\file (file indicates the directory where the flower_domain.cnf file is located.)
- Copy the ca.key and ca.crt files generated in 2 to the directory where the flower_domain_.cnf file is stored.
- Run the following command to generate the certificate private key:
openssl genrsa -out flower_domain.key 2048
- Run the following command to generate the request file based on the private key and configuration file:
openssl req -new -key flower_domain.key -config flower_domain.cnf -out flower_domain.csr
- Run the following command to generate the domain controller certificate file:
openssl x509 -req -in flower_domain.csr -CA ca.crt -CAkey ca.key -CAcreateserial -days 3650 -extfile flower_domain.cnf -extensions v3_req -out flower_domain.crt
- (Optional) Run the following commands to combine the certificate and private key to generate the domain controller certificate:
openssl pkcs12 -export -inkey flower_domain.key -in flower_domain.crt -certfile ca.crt -out flower_domain.pfx -password pass:Password
- The password in the preceding command can be customized.
- This command combines the certificate and private key into one file. You are advised to save the file for future use.
Importing the generated domain controller certificate to the AD server
- Log in to the AD server using the account and password.
- Copy the domain controller certificate (flower_domain.crt) generated in 8 to the AD server.
- Press Win+R, enter cmd in the displayed Run dialog box, and press Enter to open the CLI.
- Go to the domain controller certificate directory and run the following command:
Example: cd D:\Users\file (file indicates the directory where the domain controller certificate resides.)
- Run the following commands in the CLI to import the domain controller certificate:
certutil -enterprise -addstore NTAuth flower_domain.crt
Obtaining the objectGUID Value of the AD Server
Before issuing a CA certificate via OpenSSL, you need to obtain the objectGUID value of the AD server for the command line.
- Log in to the AD server using the account and password.
- Press Win + R. In the Run dialog box displayed, enter dsa.msc and press Enter. The Active Directory Users and Computers page is displayed.
- Choose View > Advanced Features, as shown in Figure 1.
- Expand the domain name of the AD server and select Domain Controllers.
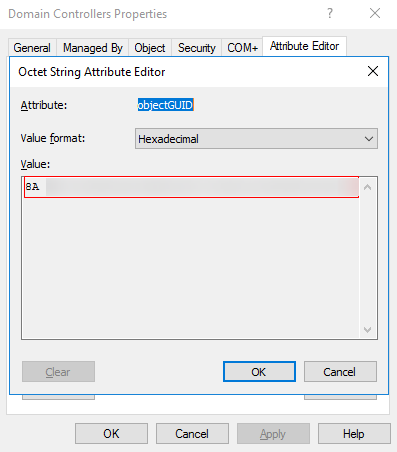
- Right-click Domain Controllers and choose Properties from the shortcut menu. On the displayed page, check the Attribute Editor tab, as shown in Figure 2.
- On the displayed tab page, select the objectGUID attribute from the drop-down list and double-click objectGUID to check its value, as shown in Figure 3.


Installing OpenSSL
- You have prepared a local Windows PC or ECS. For details about how to create an ECS, see Purchasing an ECS in Custom Config Mode.
- You have downloaded OpenSSL from the OpenSSL official website.
Installation on Windows
The OpenSSL official website does not provide the installation package for Windows. You can download it on other open-source platforms. For example, you can download it here. The following uses this tool as an example:
- Download the 32-bit or 64-bit version, for example, Win64OpenSSL_Light-3_5_0.exe.
- On the Windows PC or ECS, double-click the installation package, select I accept the agreement, and click Next.

- Click Next four times and click Install.
- Configure environment variables. For example, if the tool is installed in the C:\Program Files\OpenSSL-Win64 directory, copy C:\Program Files\OpenSSL-Win64\bin to the Path of the user variable or system variable, as shown in Figure 4.

Generating a CRL File
CRL is a digital signature file maintained by a CA and is used to identify revoked certificates.
- Create the index.txt and crlnumber files on the ECS.
- Create the crl_v3.cnf file on the ECS and copy the content below to the file.
Set the following parameters as required:
- dir: Select the path of the CA root certificate and private key created in 2.
- certificate: Select the root CA certificate created in 2.
- private_key: Select the key file generated in 2.
[ ca ]
default_ca = my_ca
[ my_ca ]
dir               = D:/project/V14-CRL
database          = $dir/index.txt
new_certs_dir     = $dir/newcerts
certificate       = $dir/ca.crt
private_key       = $dir/ca.key
serial            = $dir/serial
crlnumber         = $dir/crlnumber
crl               = $dir/sc-root-ca.crl
default_crl_days  = 365
default_md        = sha256
[ crl_ext ]
authorityKeyIdentifier=keyid:always,issuer
- Press Win+R, enter cmd in the displayed Run dialog box, and press Enter to open the CLI.
- Go to the directory where the crl_v3.cnf file is stored and run the following command:
Example: cd D:\Users\file (file indicates the directory where the crl_v3.cnf file is stored.)
- Run the following command to generate a CRL file:
openssl ca -gencrl -config crl_v3.cnf -out sc-root-ca.crl
sc-root-ca.crl is the generated CRL file.
Feedback
Was this page helpful?
Provide feedbackThank you very much for your feedback. We will continue working to improve the documentation.See the reply and handling status in My Cloud VOC.
For any further questions, feel free to contact us through the chatbot.
Chatbot


