Managing Test Cases
You can import test cases from the local PC to the test case library in CodeArts TestPlan, and export test cases from the test case library. You can also add test cases in batches, manage test cases through the feature directory, associate test cases with requirements, comment on test cases, filter test cases, customize the columns to be displayed in the test case list, and set test case fields.
Constraints
- When importing test cases from a file, make sure that the file size is smaller than 5 MB, and that the number of test cases in the version will not exceed the package limit.
- A maximum of 500 API automation test cases can be imported using an Excel file.
- A test case can be associated with up to 100 requirements.
- API automation test cases can be imported either by Postman and Swagger files. The file types can be:
Postman: Postman Collection v2.1 standard, Postman Collection JSON file
Swagger: Swagger 2.0 and 3.0 standards, YAML file
Importing a Manual Test Case from Excel
- In the navigation pane, choose .
- Click the Manual Test tab, click Import on the right of the page, and choose Import from File from the drop-down list.
Alternatively, click the All Cases tab, click Import on the right of the page, and choose Import from File from the drop-down list. In the displayed dialog box, set Execution Type to manual test and auto function test.
- Decide whether to allow the uploaded cases to overwrite the existing cases with the same IDs, and select the corresponding option.
YES: If the uploaded cases have the same IDs with the existing cases, the existing ones will be overwritten.
NO: All cases will be uploaded to the case list.
- In the displayed dialog box, select Whether to create a directory.
The directory corresponds to the feature directory on the page. Directory structure: level-1 subdirectory, level-2 subdirectory, level-3 subdirectory, and level-4 subdirectory. The level-1 subdirectory is the first directory under the Features directory.
- In the displayed dialog box, click Download Template.
Enter the test case information based on the format requirements in the template, return to the Testing Case page, upload the created test case file, and click OK.

- Currently, CodeArts TestPlan supports the Excel format. If the data does not meet the import criteria, a message asking you to download the error report is displayed. Modify the data and import it again.
Adding Manual Test Cases from Another Project
- In the navigation pane, choose .
- Click the Manual Test tab, click Import on the right of the page, and choose Import from Project from the drop-down list.
- In the displayed dialog box, select the source project.
- Select a source version.
- Select or deselect the overwriting rule for the test cases with duplicate IDs.
- If the rule is selected, the uploaded cases will overwrite the existing cases with the same IDs.
- If the rule is deselected, the uploaded cases will not be imported if they have the same IDs as the existing cases.
- Select the original feature or requirement to which the test cases belong. You can find them by using the search box on the left.
- Search for or filter the required cases by using the search box above the test case list.
- Select the cases and click Target Folder. In the displayed dialog box, select the feature or requirement to which the cases are imported, and click OK.
If you select Synchronize cases only, only the cases in the original directory are imported to the target directory.
- Click OK.
The directory of the original feature or requirement will also be imported to the current project.
Importing Postman or Swagger Files to Generate API Automation Test Cases
- In the navigation pane, choose .
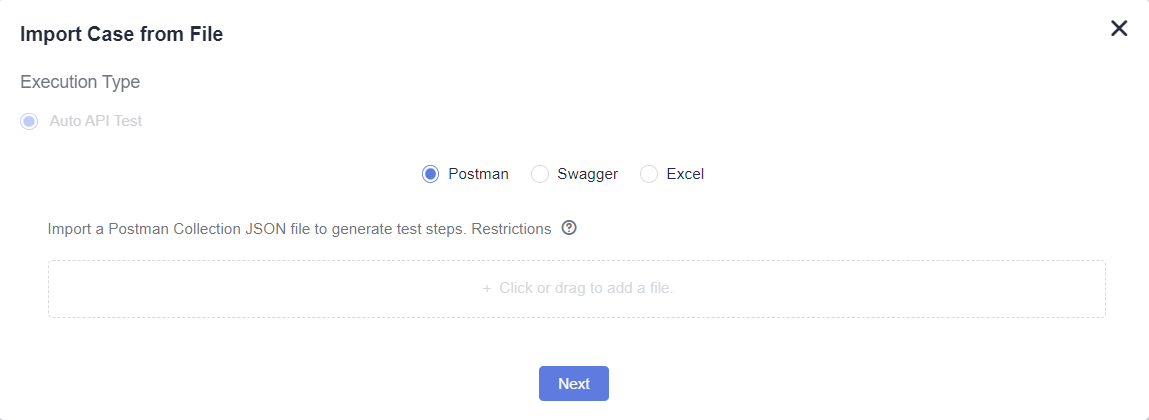
- Click the Auto API Test tab and choose Import > Import from File on the right of the page. The Import Case from File window is displayed.
- Select Postman or Swagger.
Drag a file from the local PC to the window, or click Click or drag to add a file and select a file from the local PC. Click Next.

- In the displayed list, select the items that you want to create test cases for in the specified order, and click Save.
Generating API Automation Test Cases by Importing an Excel File
- In the navigation pane, choose .
- Click the Auto API Test tab and choose Import > Import from File on the right of the page.
Alternatively, click the All Cases tab, click Import on the right of the page, and choose Import from File from the drop-down list. In the displayed dialog box, set Execution Type to Auto API Test.
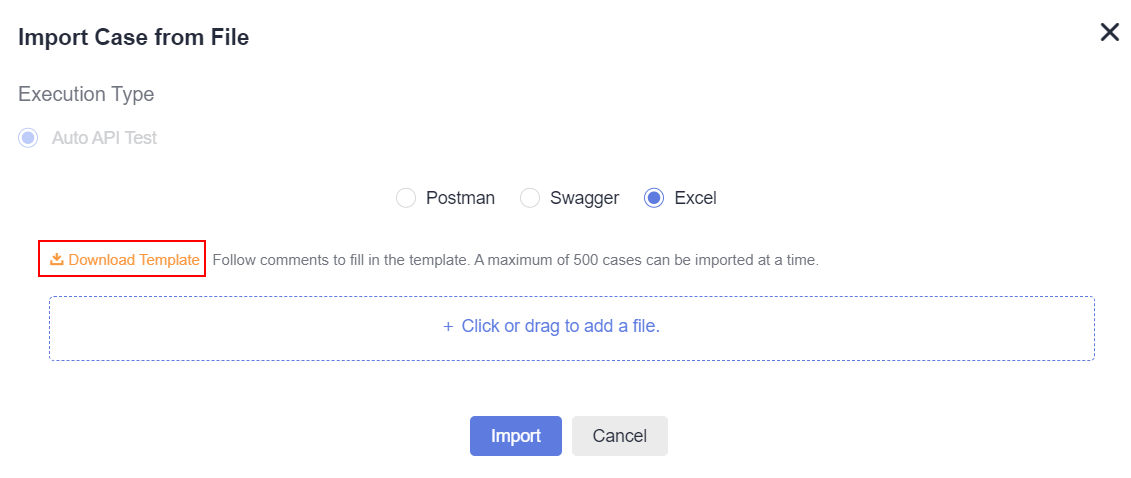
- Select Excel and click Download Template.

- Open the Excel template on the local PC and edit the test case information based on the comments in the template headers. The columns marked with asterisks (*) are required.
The following table shows the template fields.
Field
Description
Case Name (mandatory)
The value can contain 1 to 128 characters. Only letters, digits, and special characters (-_/|*&`'^~;:(){}=+,×...—!@#$%.[]<>?–") are supported.
Case Description
Max. 500 characters.
Request Type (mandatory)
Only GET, POST, PUT, and DELETE are supported.
Request Header Parameter
Format: key=value.
If there are multiple parameters, separate them with &, that is, key=value&key1=value1.
Request Address (mandatory)
The request protocol can be HTTP or HTTPS. The format is https://ip:port/pathParam?query=1.
Environment Group
Environment parameter group.
IP Variable Name
Generates the variable name in the corresponding Environment Group, extracts the content of the Request Address, and generates the corresponding global variable.
Request Body Type
The value can be raw, json, or formdata, which corresponds to the text, JSON request body, or form parameter format on the page, respectively.
If this parameter is not set, the JSON format is used by default.
Request Body
If the request body type is formdata, the request body format is key=value. If there are multiple parameters, separate them with &, that is, key=value&key2=value2.
When cases are imported using an Excel file, formdata does not support the request body in file format.
Checkpoint Matching Mode
Supports exact match and fuzzy match. Exact match indicates Equals, and Fuzzy match indicates Contains.
Expected Checkpoint Value
Target value of the checkpoint.
- Save the edited Excel file and drag it from the local PC to the Import Case from File window, or click Click or drag to add a file. and select a file from the local PC. Click Next.
- View the import result.
- Import successful: New test cases are displayed in the list. The number of new test cases is the same as the number of rows in the Excel file.
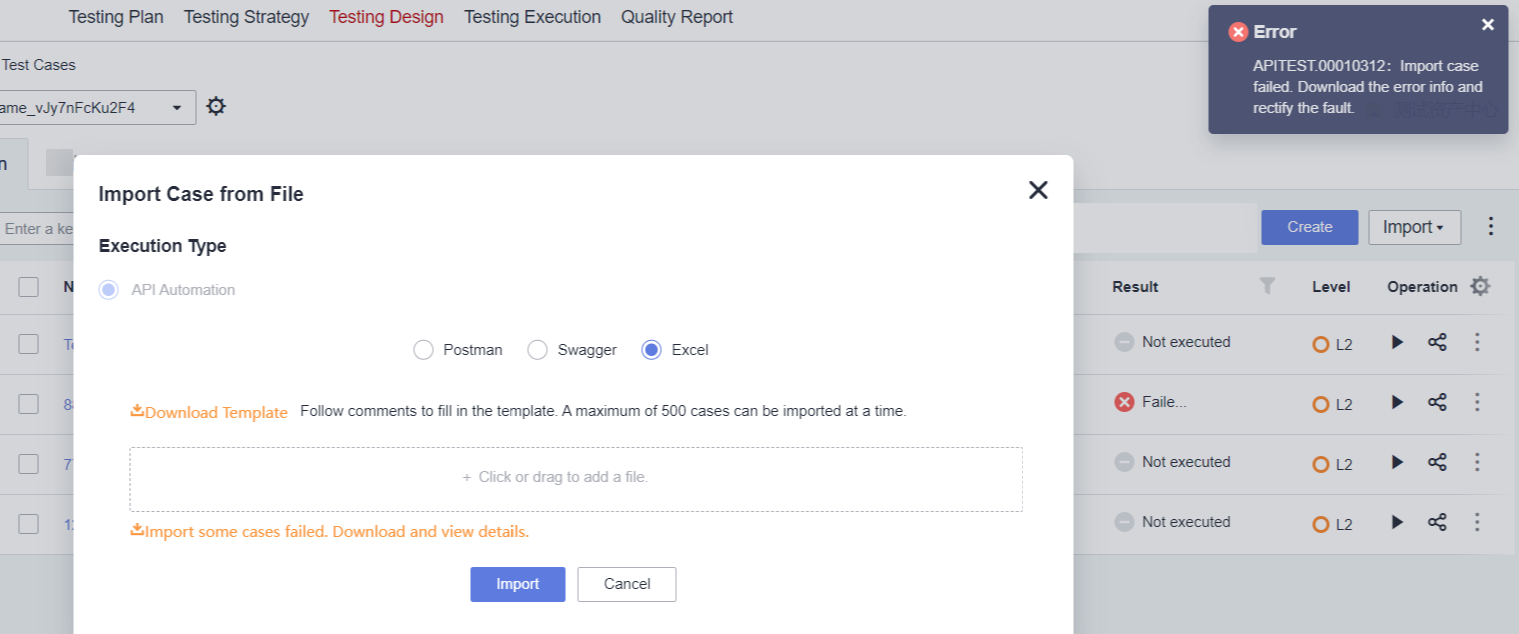
- Import failed: A failure message is displayed in the upper right corner.

Download the error list from the Import Case from File window. Modify the Excel file based on the error causes, and import it again.
Exporting Test Cases
- Click an execution type tab, click More on the right and choose Export from the drop-down list.
- In the displayed dialog box, select the case export scope. You can select Export All.
Select Partial Export, set Start position to the case to be exported to the first row of the table and End position to the case to be exported as the last row of the table, and click OK.
- Select Export Directory Hierarchy as required.
- Open the exported Excel file on the local PC and check the exported test case. (You will see the IDs of bugs and requirements associated with the exported test cases. Multiple IDs are separated by commas.)
Adding Test Cases in Batches from the Test Case Library
Add manual and automated API test cases from the test case library to test plans in batches.
- Log in to the CodeArts homepage, search for your target project, and click the project name to access the project.
- In the navigation pane, choose .
- Click Test case library in the upper left corner of the page and select the target test plan from the drop-down list.
- Click the Manual Test or Auto API Test tab, click Import in the right area, and select Add Existing Cases from the drop-down list.
- In the displayed dialog box, select a test case and click OK.
- Test cases that already exist in the test plan cannot be added again.
- All test cases related to requirements in the test plan can be added.
Reviewing Test Cases Online
Review the created test cases.
Creating a Review
- Log in to the CodeArts homepage, search for your target project, and click the project name to access the project.
- In the navigation pane, choose .
- Click the tab of the corresponding test type, click
 on the right of the case to be reviewed, and click Create Review.
 - In the displayed dialog box, configure the following information and click Confirm.
Configuration Item
Description
Name
By default, the name of a new review is the same as the test case name.
Test Case Modification Time
By default, the time is set to the current system date.
Review Auto-Close
You can enable or disable the automatic closure function for the review.
- Yes: The review will be automatically closed after it is created.
- No: The test case will be manually reviewed and closed by the person to whom the review is assigned to.
Expected Closure Time
If you select No for Review Auto-Close, you can select the expected closure time.
Review Comment
Enter review information containing a maximum of 1,000 characters.
Assigned To
If you select No for Review Auto-Close, you can select a person to whom the review is assigned to close.
Batch Review
- In the navigation pane, choose .
- In the test case list, select the test cases to be reviewed in batches.
- Click Batch Review.
- In the displayed dialog box, configure the following information and click Confirm.
- Review Auto-Close: If this parameter is set to Yes, the review status is automatically set to Closed. If this parameter is set to No, the test case will be manually reviewed and closed by the person to whom the review is assigned.
- Expected Closure Time: If you select No for Review Auto-Close, you can select the expected closure time.
- Review Comment: Enter review information containing a maximum of 1000 characters.
- Assigned to: If you select No for Review Auto-Close, you can select a person to whom the review is assigned for closure.
Checking Review Records
- Log in to the CodeArts homepage, search for your target project, and click the project name to access the project.
- In the navigation pane, choose .
- Click Review Record. The created review record is displayed on the page.
- Click the search bar on the review record page and select a filter field.
- Enter a keyword to search for the corresponding review record.
- Delete, edit, or close reviews that have not been closed.

- To delete an unclosed review, click
 in the Operation column and click OK.
 - To edit an unclosed review record, click
 in the Operation. In the displayed dialog box, edit the review.
 - To close an unclosed review, click
 in the Operation column. In the Close Review dialog box, close the review.
- To delete an unclosed review, click
Associating Test Cases with Project Requirements
CodeArts TestPlan supports association between test cases and requirements.
- In the navigation pane, choose .
- Associate test cases with requirements in one of the following ways:
- Click the required test type tab. In the case list, click
 in the row of the target case and select Associated With Requirement.
 - Click the All tab. In the Operation column of the target test case, click
 to associate the case with a requirement.
 - Go to the test case details page, click the Requirements tab, and click Associated With Requirements.
- To associate multiple test cases with one requirement, select the required test cases in the list and click Batch Associate Requirements on the toolbar below the list.
- Click the required test type tab. In the case list, click
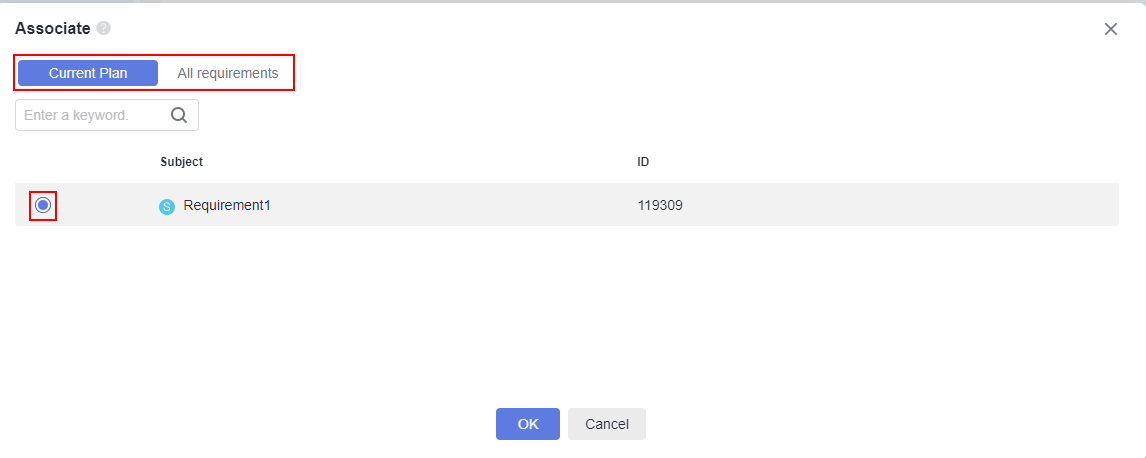
- In the displayed dialog box, select the requirement to be associated on the Current Plan or All requirements tab page, and click OK.
When you associate the target requirement in All requirements, if the requirement has not been added to the current test plan, select Add it synchronously. or Only the requirement is associated. in the dialog box.

Adding Test Cases from Associated Requirements
Prerequisites
The requirements in the test plan have been associated with test cases in the test case library.
Managing Test Cases by Requirement
- On the Testing Case page, click the Requirements tab on the left. By default, the requirements that have been associated are stored in the Requirements directory.
- Click a requirement to view all cases associated with it.
- On the right of the requirement name, click
 and choose to view the requirement details or create a test case for the requirement.
Adding Test Cases from Requirements Associated with a Test Plan
- Click Test case library in the upper left corner of the page and select the target test plan from the drop-down list.
- Click the Manual Test or Auto API Test tab, click Import in the right area, and select Add Existing Cases from the drop-down list.
- In the displayed dialog box, select Select all test cases related to the requirements in this test plan.. The test cases associated with requirements in the test plan are automatically selected.
- Click OK.
Requirement Change Notification
If a requirement associated to a test case is changed in CodeArts Req, a red dot will show up next to the requirement name on the Testing Case page. This signals that you should update the test cases for that requirement or add new ones.
Test Cases and Bugs
When a test case fails to be executed, the test case is usually associated with a bug. You can create a bug or associate the test case with an existing bug.
The following uses manual test cases as an example.
- In the navigation pane, choose .
- Select a test case to be associated with a bug. Create or associate a bug in one of the following ways:
- Click
 in the Operation column to associate an existing bug in the current project.
 - Click
 in the Operation column, and select Create and Associate Defects to create a bug as prompted.
- Click a test case to associate it with a bug.
Click the test case name. On the displayed page, select Defects and click Create and Associate Defects.
- Associate multiple test cases with bugs: Select the required test cases and click Associate with Defect. In the displayed dialog box, select the required bugs and click OK.
- Click
- After a defect is created or associated, view the defect information on the Defects tab page. You can click
 to disassociate the current bug.
Commenting on a Test Case
You can comment on test cases.
- In the navigation pane, choose .
- Select a test case to be commented on, click the test case name, and click the Details tab.
- Enter your comments in the Comments text box at the bottom of the page and click Save.
The comments that are successfully saved are displayed below the Comments text box.
Filtering Test Cases
CodeArts TestPlan supports filtering of test cases by using custom filter criteria. The following procedure uses the Testing Case > Manual Test as an example.
Using the Default Filter Criteria
- In the navigation pane, choose .
- On the Manual Test tab page, select an option from the All cases or All drop-down list.
- All cases: Displays all cases in the current test plan or case library.
- My cases: Displays all cases whose Processor is the current login user.
- Unassociated with test suites: Displays test cases that are not associated with any test suite.
You can click the two drop-down list boxes and filter all cases, your test cases, or test cases that are not associated with test suites.
Setting Advanced Filter Criteria
If the default filter criteria do not meet your requirements, you can customize filter criteria.
- In the navigation pane, choose .
- Click Advanced Filter above the test case list. Common filter criteria are displayed on the page.
- Set filter criteria as required and click Filter. Test cases that meet the filter criteria are displayed on the page.
You can also click Save and Filter. In the displayed dialog box, enter the filter name and click OK. The saved filter is added to the All cases drop-down list.
- (Optional) If advanced filter criteria still do not meet requirements, click Add Filter, select a filter field from the drop-down list box as required. The filtering field is displayed on the page. Repeat 3 to complete the filtering. You can add custom filter fields for advanced filtering.
Updating Test Case Fields in Batches
- In the navigation pane, choose and click the target case type tab.
- In the test case list, select the target test cases.
- To select all test cases on the current page, hover the cursor over the topmost check box and click Select Current Page.
- To select specified test cases, hover the cursor over the topmost check box and click Select More. In the displayed dialog box, select all test cases or set the selection scope, and click OK.
- Click Batch Update Property.
- In the displayed dialog box, select the field to be modified from the left drop-down list box, and select the target option from the right drop-down list box.
- To modify more fields, click
 .
. - To delete a field, click
 .
.
- To modify more fields, click
Customizing Test Case List Columns
CodeArts TestPlan supports customizing columns to be displayed in the test case list. The following procedure uses manual test cases as an example.
- In the navigation pane, choose .
- On the Manual Test tab page, click
 in the last column of the test case list. In the displayed dialog box, select the fields to be displayed, deselect the fields to be hidden, and drag the selected fields to rearrange their display sequence. You can also add custom headers to the test case list.
Searching for a Test Case
You can search for test cases by name, ID, or description.
- Create a test case.
- In the search box above the test case list, enter a keyword of the name, ID, or description.
- Click
 .
. - The required test cases are filtered and displayed in the list.
Deleting a Test Case
In the test case list, you can delete test cases one by one or in batches.
- In the navigation pane, choose .
- In the upper part of the test case list, select the target version or test plan.
- Click the tab of the target test execution type.
- Delete test cases one by one or in batches.
- Delete a single test case: Find the target test case, click
 in the Operation column of the test case, and click Delete. The test case is removed to the recycle bin.
 - Delete test cases in batches: Select the test cases to be deleted and click Batch Delete below the list. The test cases are removed to the recycle bin.
If the test case to be removed is associated with a test suite, a dialog box is displayed. In the dialog box, click
 to disassociate the test case from the suite.
 - Delete a single test case: Find the target test case, click
Recycle Bin
- In the navigation pane, choose .
- Click Recycle Bin in the lower left corner of the page.
- Perform the following operations on the removed test cases as required:
- Click
 in the Operation column of a test case to restore it.
 - Click
 in the Operation column of a test case to delete it permanently.
 - Select some or all test cases and click Recover or Delete in the lower part of the page to restore or delete them in batches.
- Click
Feedback
Was this page helpful?
Provide feedbackThank you very much for your feedback. We will continue working to improve the documentation.See the reply and handling status in My Cloud VOC.
For any further questions, feel free to contact us through the chatbot.
Chatbot


