Enabling Access Control for a Proxy Instance
If load balancing is enabled for a proxy instance, the security group associated with the proxy instance does not apply. You need to use access control to limit access from specific IP addresses.
Constraints
If access control is not displayed on the management console, the security group associated with the proxy instance is used.
Procedure
- Log in to the TaurusDB console.
- On the Instances page, click the instance name to go to the Basic Information page.
- In the navigation pane, choose Database Proxy and click the name of a proxy instance to go to the Basic Information page.
- Click
 under Access Control.
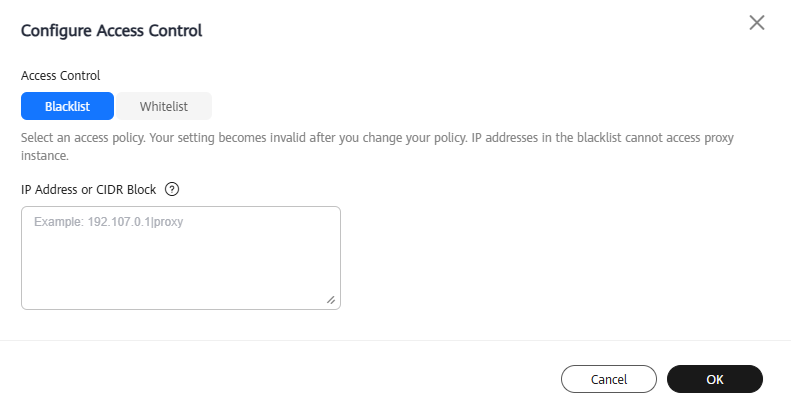
 - Click Configure. In the displayed dialog box, configure required parameters.
Figure 1 Configuring access control

Table 1 Parameter description Parameter
Description
Access Control
The blacklist and whitelist cannot be configured at the same time. If you switch between lists, your previously entered settings will be lost. IP addresses or CIDR blocks in the whitelist can access the proxy instance, while those in the blacklist cannot.
IP Address or CIDR Block
You need to enter IP addresses or CIDR blocks that meet the following requirements:
- Each line contains an IP address or a CIDR block and ends with a line break.
- Each IP address or CIDR block can include a description separated by a vertical bar symbol (|), for example, 192.168.10.10|TaurusDB01. The description can include up to 50 characters but cannot contain angle brackets (<>).
- Up to 300 IP addresses or CIDR blocks can be added.
- On the Basic Information page of the proxy instance, check that access control is enabled. Click Configure to view the new access control setting.
- Log in to the TaurusDB console.
- On the Instances page, click the instance name to go to the Basic Information page.
- In the navigation pane, choose Database Proxy and click the name of a proxy instance to go to the Basic Information page.
- Click
 under Access Control.
 - In the displayed dialog box, click OK.
- Refresh the page later and check that access control is disabled.
Feedback
Was this page helpful?
Provide feedbackThank you very much for your feedback. We will continue working to improve the documentation.See the reply and handling status in My Cloud VOC.
For any further questions, feel free to contact us through the chatbot.
Chatbot


