IntentDetection Node
The IntentDetection node is used to enable an application to understand the intent or purpose expressed by a user in natural language. It can be used in scenarios where user questions need to be classified or where different branches are processed for comprehensive functions.
The IntentDetection node performs inference and analysis on user input, matches predefined intent keyword categories, and directs the corresponding processing flow based on the matching result. This node is usually located in the front of the workflow.
The IntentDetection node can run in normal or advanced mode.
- Normal mode: applies to scenarios where a small number of intents can be classified.
- Advanced mode: applies to scenarios where a large number of intents can be classified.
The IntentDetection node is an optional node. If it does not need to be configured, skip this section.
To configure the IntentDetection node, perform the following steps:
- Click Add Node at the bottom of the canvas, drag the IntentDetection node from the node drawer to the canvas, and click the node to open the node configuration page.
- Configure the IntentDetection node by referring to Table 1.
Table 1 IntentDetection node configuration description Configuration Type
Parameter Name
Description
Model configuration
Model selection
Model used for intent recognition. You can select any model accessed to the platform.
Temperature
Controls the randomness of the generation result. A higher temperature makes the model output more diverse and innovative. A lower temperature makes the output more compliant with the instruction requirements, but reduces the diversity of the model output.
Top P
During output, the model selects words with the highest probability until the total probability of these words reaches the Top P value. The Top P value can restrict the model to select these high-probability words, thereby controlling the diversity of output content. You are advised not to adjust this parameter together with the Temperature parameter.
Parameter configuration
Input params
- Param name: The default value is input, which is a fixed value and cannot be changed.
- Type and Value: Type can be set to ref and literal.
- ref: You can select the output variable values of the previous nodes contained in the workflow.
- literal: The value can be customized.
Output params
The classification_id and name parameters are fixedly output.
- classification_id: sequence number of the recognized intent.
- name: name of the recognized intent.
Intention configuration
Intents
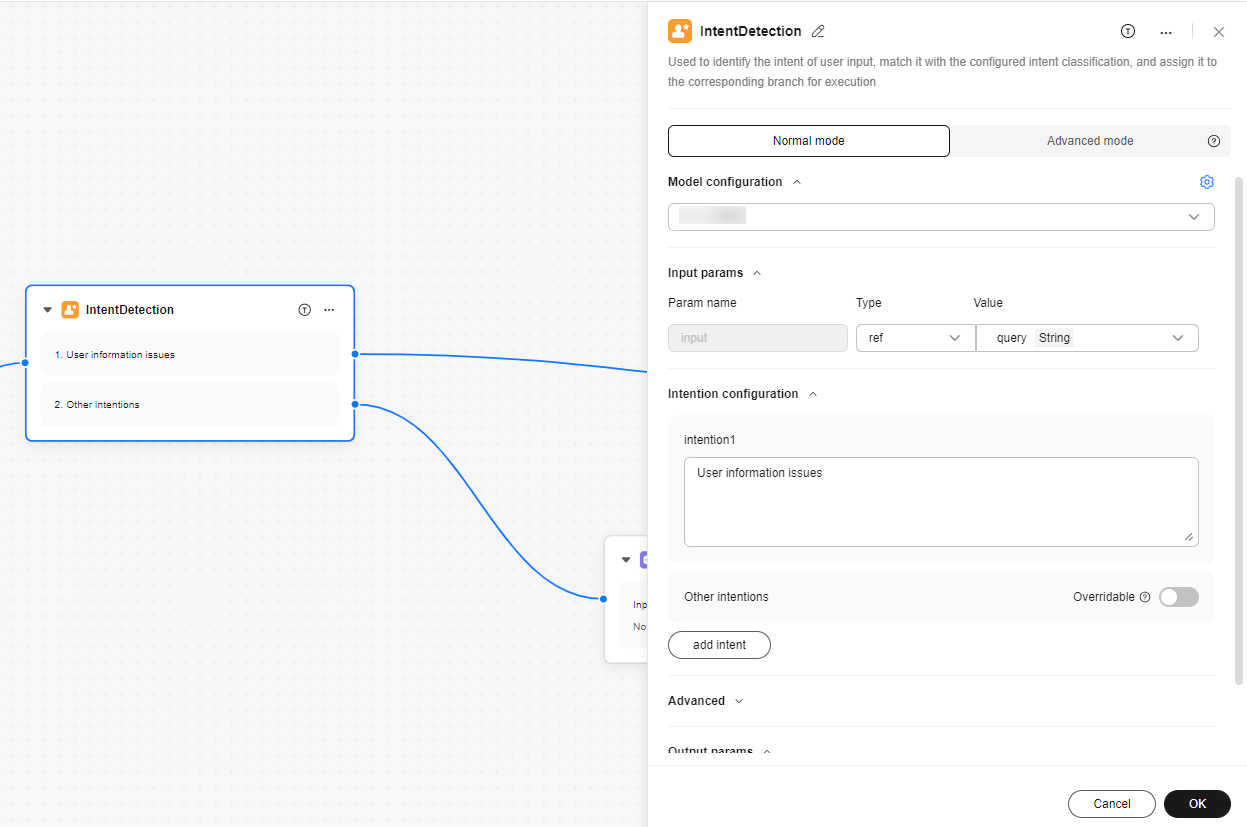
This area is used to configure intent keywords. You can add intents. The default intent categories are intention 1, intention 2, and so on. A maximum of 20 intents can be added.
Enter the intent description in the text box. The description is a statement or keyword for the category, and is also used as a basis for inference and classification of the LLM.
Other intents
Applies to scenario where the input intent of a user cannot be identified. If the predefined intent categories cannot be matched after inference and analysis, the subsequent process is executed by default in the branch corresponding to other intents.
Advanced settings
Prompt
Allows developers to modify prompts. If this configuration item is not set, the default value is used. The quality of prompts may affect the accuracy of the IntentDetection node.
Historical dialogue rounds
Whether to enable the historical dialogue reference function. The default value is 0, indicating that the dialogue history is not referenced. If this parameter is set to N, the content of N-round dialogues can be recorded.
auxiliary identification
After auxiliary identification is enabled, intent recognition is preferentially performed based on the exact match of the category sample knowledge base to improve the classification capability of the IntentDetection node.
- intent sample knowledge: To enable auxiliary identification, you need to create and configure a category sample knowledge base and configure the knowledge base.
- match threshold: When the matching degree of a category sample is lower than the threshold, the default LLM is used for intent recognition and classification. The threshold ranges from 0 to 1.
Figure 1 IntentDetection node configuration example
- After completing the configuration, click OK.
- Connect the IntentDetection node to other nodes.
Examples:
For example, in a workflow that provides comprehensive functions and processes user questions in different branches, the IntentDetection node classifies user input and transfers the input to different functional modules for processing.
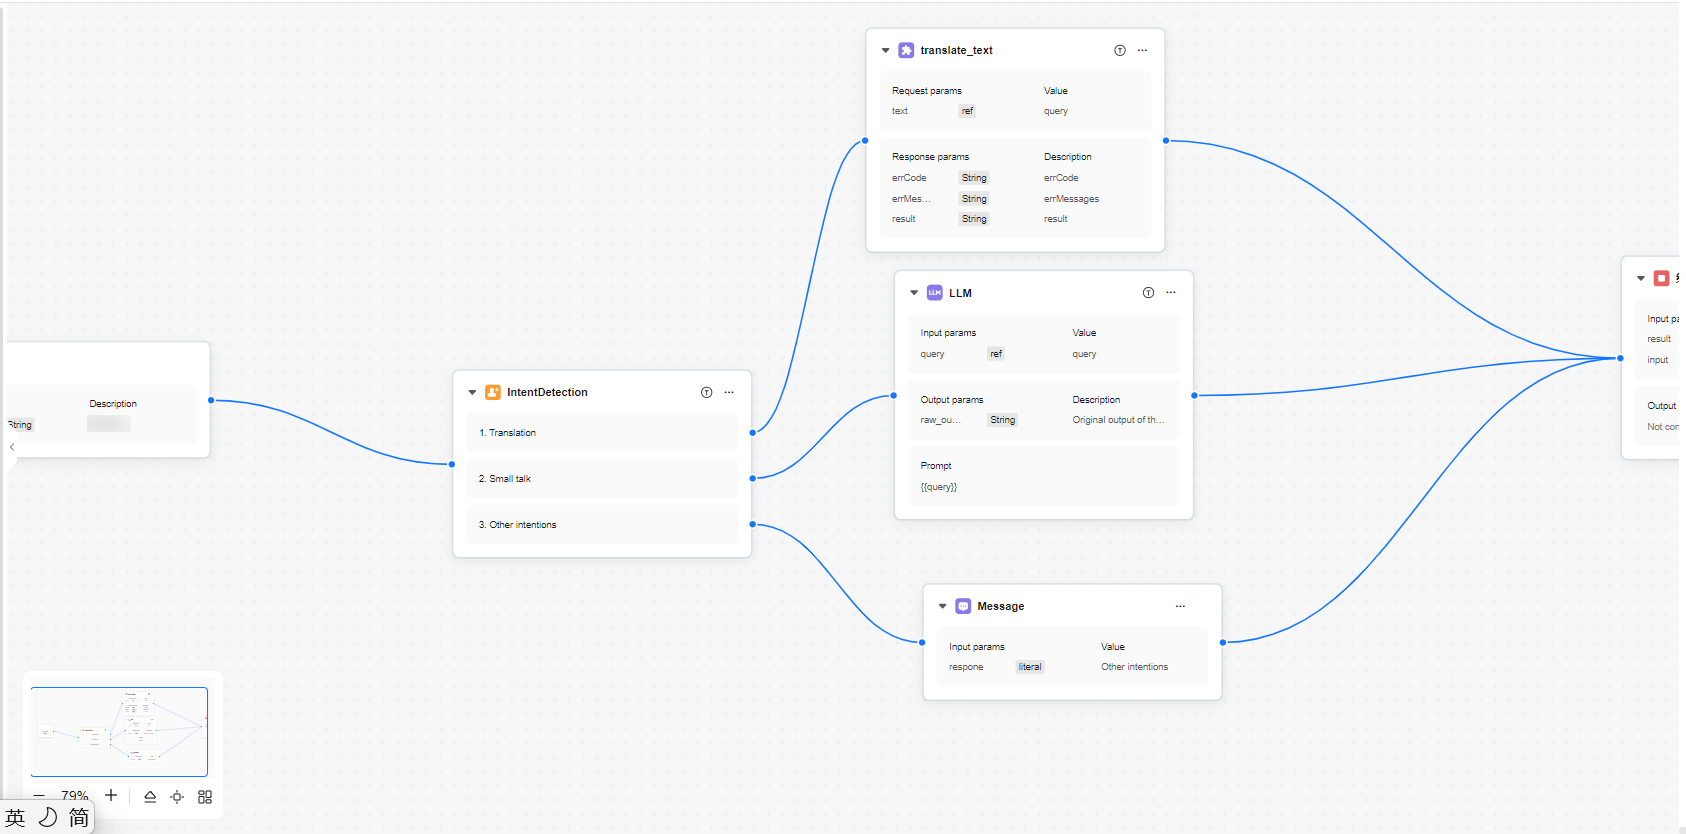
For example, for a workflow that provides the translation function, the node configuration is as follows:
- IntentDetection node: The workflow classifies user queries into two categories: translation and chat. The category description of intent 1 is added to the intent configuration of the node as text translation. The category is followed by the Translation Plug-in node to implement the translation function. The category description of intent 2 is chat, the category is transferred to the LLM node to implement the chat function. Other default intent categories are transferred to the Message node. The default reply content is configured in the Message node to implement the back-stop reply in the scenario where the intent is not identified.

Advanced mode
If there are more than 100 intent branches, you are advised to use the advanced mode. In this mode, you can configure intent branch information on an independent page and complete service configuration by selecting the interaction mode of sub-workflows.
Procedure:
- Configure an intent package.
- Choose Configuration Management > Intent Management from the navigation pane and click Create Intent Package.
- Click
 to add an intent category to the intent package. The category information includes the name and example.
Figure 2 Configuring an intent package
- Drag the IntentDetection node on the left to the canvas and click the node to open the node configuration page. Switch to the advanced mode.
- Complete the configuration by referring to the IntentDetection mode configuration description.
Table 2 IntentDetection node configuration description Configuration Type
Parameter Name
Description
Model configuration
Model selection
Model used for intent recognition. You can select any model deployed on the platform.
Temperature
Controls the randomness of the generation result. A higher temperature makes the model output more diverse and innovative. A lower temperature makes the output more compliant with the instruction requirements, but reduces the diversity of the model output.
Top P
During output, the model selects words with the highest probability until the total probability of these words reaches the Top P value. The Top P value can restrict the model to select these high-probability words, thereby controlling the diversity of output content. You are advised not to adjust this parameter together with the Temperature parameter.
Parameter configuration
Input params
- Param name: The default value is input, which is a fixed value and cannot be changed.
- Type and Value: Type can be set to ref and literal.
- ref: You can select the output variable values of the previous nodes contained in the workflow.
- literal: The value can be customized.
Output params
The classification_id and name parameters are fixedly output.
- classification_id: sequence number of the recognized intent.
- name: name of the recognized intent.
Intention configuration
Intent package
Select the configured intent package.
Advanced settings
Prompt
Allows developers to modify prompts. If this configuration item is not set, the default value is used. The quality of prompts may affect the accuracy of the IntentDetection node.
Memory
Whether to enable the memory function. By default, this function is disabled. If it is enabled, the content of multiple rounds of dialogs can be recorded.
Figure 3 IntentDetection node configuration example
- After completing the configuration, click OK.
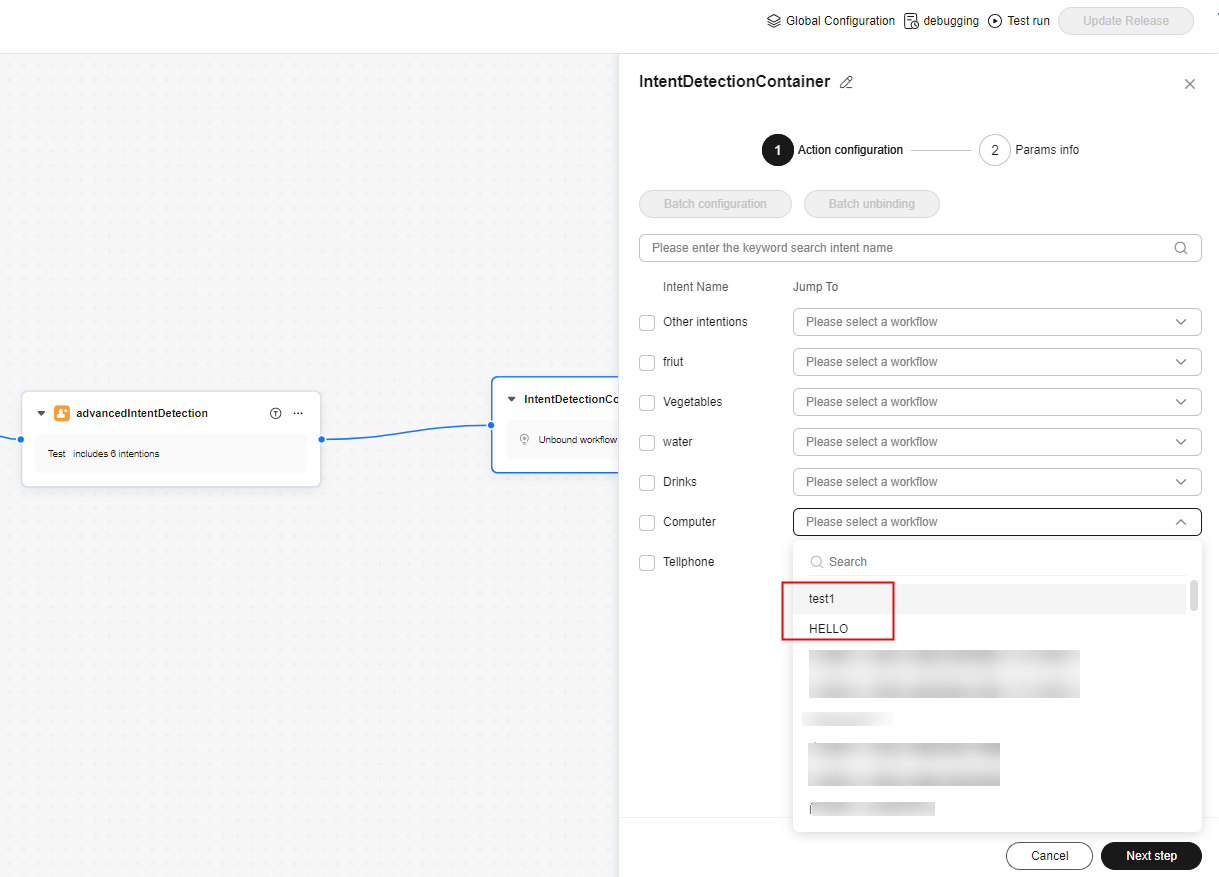
- Click the IntentDetectionContainer node and configure the processing logic corresponding to the branch.
Figure 4 Configuring the processing logic

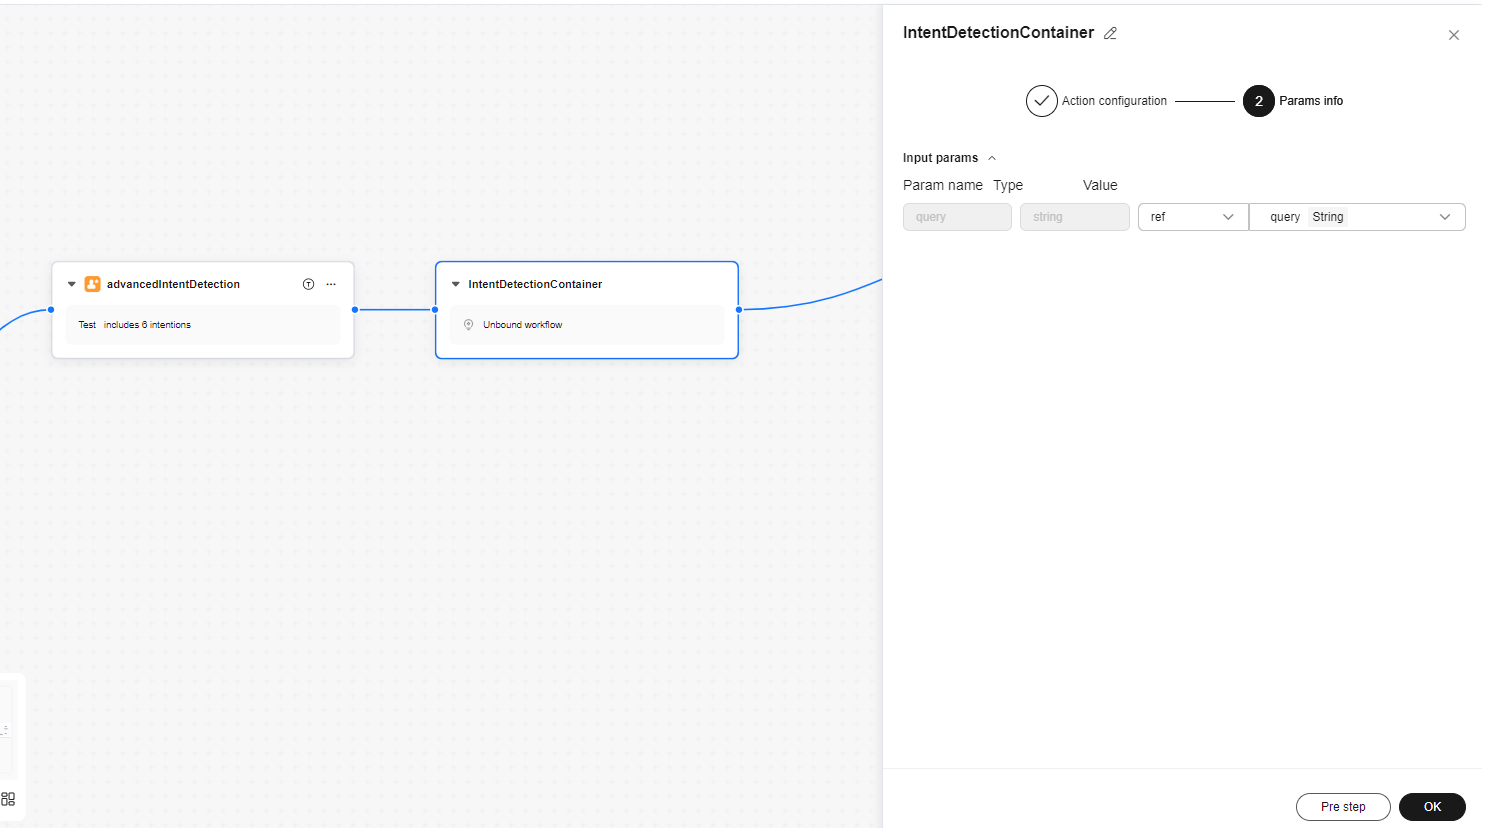
- Set the input parameters of the sub-workflow.
Figure 5 Setting input parameters

- Click OK.
- Connect the intent action node to other nodes.
Feedback
Was this page helpful?
Provide feedbackThank you very much for your feedback. We will continue working to improve the documentation.See the reply and handling status in My Cloud VOC.
For any further questions, feel free to contact us through the chatbot.
Chatbot


