Managing Graphs Using Indexes
The index management function is added to the graph access page to facilitate index addition, deletion, and search.
Creating an Index
- Access the GES graph editor. For details, see Accessing the Graph Editor.
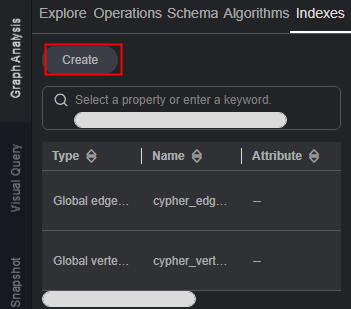
- On the Indexes tab of the graph editor, click Create.
Figure 1 Creating an index

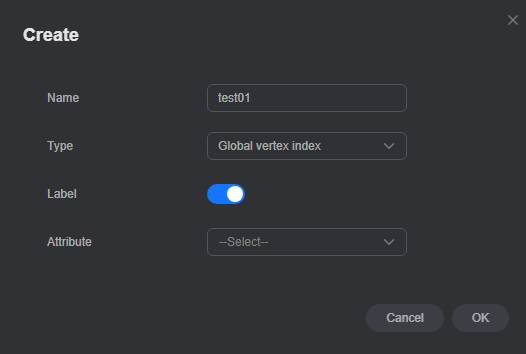
- In the Create dialog box that appears, set the following parameters:
- Name: Enter a custom index name.
- Type:
- Memory edition: The options are Global vertex index and Global edge index.
- Database edition: The options are Global vertex index, Global edge index, Local vertex index, and Local edge index.
Note: If you select Full-Text/Vector Indexing when creating a graph, the index type can be full-text index, vertex vector index, or edge vector index.
- Label: You can choose to toggle on or off this slider. (This option is not available when the index type is vector index.)
- Label Name: This parameter is available only when Type is Local vertex index or Local edge index.
- Attribute: Only the attributes whose attribute cardinality is of the single-value type are displayed here. Multi-values are not shown. (When the index type is vector index, only one attribute is supported and the attribute type is list.)
Figure 2 Parameters for creating an index


For a database edition graph, you can create any number of indexes. For a memory edition graph, you can create up to 10 indexes.
- Click OK. A dialog box appears, where you can choose whether to go to the task center to monitor the index creation progress.
Figure 3 Monitoring the creation progress

- Once the creation is successful, the new index is displayed on the Indexes tab.
Deleting an Index
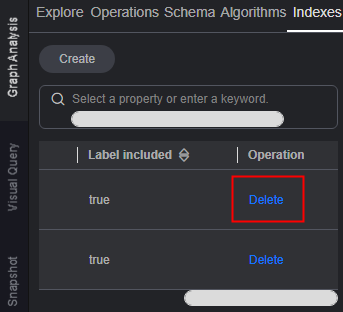
- On the Indexes tab of the graph editor, locate the index you want to delete and slide the scroll bar from left to right.
- Click Delete in the Operation column.
Figure 4 Deleting an index

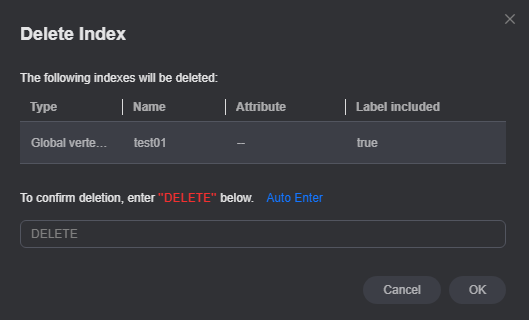
- In the Delete Index dialog box that appears, confirm the index information, manually enter DELETE or click Auto Enter, and click OK.
Figure 5 Deleting an index

Feedback
Was this page helpful?
Provide feedbackThank you very much for your feedback. We will continue working to improve the documentation.See the reply and handling status in My Cloud VOC.
For any further questions, feel free to contact us through the chatbot.
Chatbot


