Shared KMS
To share your KMS resources with other accounts, create a resource share first. During the creation, you need to specify resources to be shared, configure permissions, specify users to be shared with, and confirm the configuration.
You can use shared KMS to encrypt the secrets and key pairs in DEW, and create an encryption task for instances in Relational Database Service (RDS), Document Database Service (DDS), and Object Storage Service (OBS).
Prerequisites
You have granted the billing system policy of the corresponding service to the IAM user. For details, see Services That Support Shared Key Encryption and System-defined Policies.
Creating Shared KMS Resources
- Log in to the DEW console.
- Click
 in the upper left corner and choose .
 - In the navigation pane on the left, choose .
- Click Create Resource Share in the upper right corner.
Figure 1 Specifying shared resources

- Set resource type to kms:KeyId, choose the corresponding region, and select keys to be shared. Click Next: Associate Permissions.
- Associate a RAM managed permission with each resource type on the displayed page. Then, click Next: Specify Principals in the lower right corner.
- Specify the target principals and click Next: Confirm in the lower right corner.
- Check the configurations and click Submit in the lower right corner.

After a shared instance is created, the organization accepts the instance automatically, while Huawei cloud accounts need to perform certain operations. For details, see .
Viewing Shared KMS Resources
- Log in to the DEW console.
- Click
 in the upper left corner and select a region or project.
 - Check the shared key resources in the Shared Key tab.
Figure 2 Shared keys


In the Shared Key tab, you can choose a scenario by entering the copied KMS encryption key ID.
Using Shared KMS Resources
When you use a shared key to create related resources, ensure that your account has the permission to perform operations on keys. For details, see Key Owner and Recipient Permissions.
- Log in to the DEW console.
- Click
 in the upper left corner and select a region or project.
 - In the navigation pane on the left, choose Cloud Secret Management Service.
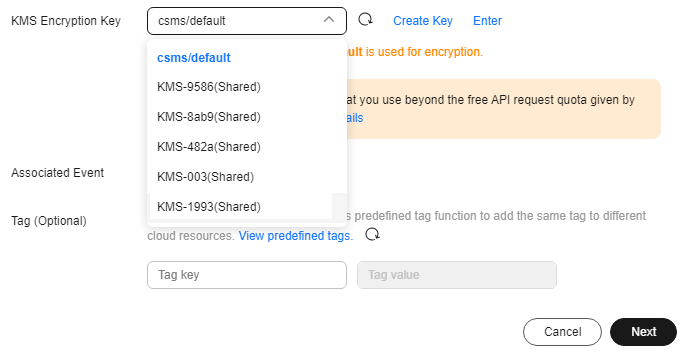
- Click Create Secret. On the displayed page, select or enter a shared key for KMS Encryption Key.
Figure 3 Selecting a shared key


- When creating a key pair, you can select shared KMS keys.
- When creating an RDS, DDS, or OBS instance, you can choose shared KMS keys. For details, see Cloud Services with KMS Integrated.
Updating a Resource Share
You can update a resource share at any time, including its name, description, tags, shared resources, shared permissions, and principals.
- Log in to the DEW console.
- Click
 in the upper left corner and choose .
 - In the navigation pane on the left, choose .
- Locate the target share and click Edit in the Operation column.
- On the displayed Specify Resource Share Details page, update the name, description, tag, and resources to be added or deleted as required.
- After the update is complete, click Next: Associate Permissions in the lower right corner.
- Add or delete the permissions supported by kms:KeyId. Wait until the update is complete, click Next: Grant Access to Principals.
- On the displayed page, add or delete principals based on your needs. Then, click Next: Confirm in the lower right corner.
- Confirm the configurations and click OK in the lower right corner.
Leaving a Resource Share
If you no longer need to access shared key resources, you can leave at any time. After leaving the share, you cannot access the shared keys.
- Log in to the DEW console.
- Click
 in the upper left corner and choose .
 - In the navigation pane on the left, choose .
- In the Accepted Resource Shares tab, locate the target instance, and click Leave in the Operation column.
- In the displayed dialog box, click Leave.
Feedback
Was this page helpful?
Provide feedbackThank you very much for your feedback. We will continue working to improve the documentation.See the reply and handling status in My Cloud VOC.
For any further questions, feel free to contact us through the chatbot.
Chatbot


