
Step 1: Buy Database Security Encryption
This section describes how to buy a database encryption instance. The instance can be billed on a yearly/monthly basis.
Limitations and Constraints
Database encryption and access cannot be used across regions. The database to be encrypted and accessed must be in the same region as the purchased instance.
Procedure
- Log in to the management console.
- Select a region, click
 , and choose . The Dashboard page is displayed.
 - In the upper right corner of the page, click Buy DBSS.
- (Optional) Enter the purchase information.
Table 1 Basic configuration parameters Parameter
Description
Service Type
The value is fixed at Database Audit Service.
Billing Mode
Only the yearly/monthly mode is available.
Region
Select the region where the instance is located. Regions are geographic areas isolated from each other. Resources are region-specific and cannot be used across regions through internal network connections. For low network latency and quick resource access, select the nearest region.
AZ Type
Only general AZs are supported.
AZ
An AZ is a physical location that uses an independent power supply and network. AZs in the same region can communicate with each other over an intranet.
You can select random allocation or specify an AZ.
Standby AZ
You can select random allocation or specify an AZ.
Table 2 Edition specifications Parameter
Description
Edition
Select Database Audit Encryption Enhanced Edition under advanced edition.
The specifications are as follows:
- Asset quantity: A maximum of 10 databases are supported.
- System resources:
- CPU: 16 vCPUs
- Memory: 32 GB
- Encryption/decryption performance: 40,000 QPS
- Maximum concurrent connections: 3000
Figure 1 Network configuration
Table 3 Network configuration parameters Parameter
Description
Example Value
VPC
Select the VPC to be associated.
A VPC facilitates internal network management and configuration, and allows you to perform secure and quick network changes. It is recommended that the VPC be the same as that of the agent node.
-
Security Group
This parameter is mandatory when Deployed Location is set to Huawei Cloud.
Security groups are used for access control.
NOTICE:The security group must have rules to allow TCP port 9595 in the inbound direction.
-
Subnet
A subnet is a range of IP addresses in your VPC. All of the resources in a VPC must be deployed in subnets.
NOTE:Subnets cannot be used across geolocations. A general AZ cannot use the subnet of an edge AZ, and an edge AZ cannot use the subnet of a general AZ.
-
Assign IPv4 Address
This parameter is mandatory when Deployed Location is set to Huawei Cloud.
Select an IPv4 address.
Automatically assign IP address
(Optional) EIP
This parameter is mandatory when Deployed Location is set to Huawei Cloud.
Select the EIP bound to the instance.
-
IP address of the active node
This parameter is mandatory when Deployed Location is set to outside Huawei Cloud.
Enter the IP address of the active node.
-
IP address of the standby node
This parameter is mandatory when Deployed Location is set to outside Huawei Cloud.
Enter the IP address of the standby node.
-
Floating IP address
This parameter is mandatory when Deployed Location is set to outside Huawei Cloud.
Enter a floating IP address.
-
Figure 2 Advanced configuration and login information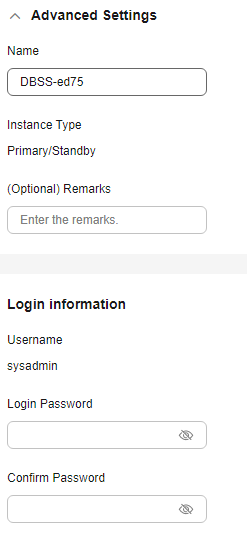
Table 4 Parameters Parameter
Description
Example Value
Name
The name is automatically generated. You can also customize the name.
-
Instance Type
Currently, only the active/standby mode is supported.
Primary/Standby
Remarks (Optional)
Remarks about the instance.
-
Username
Default username.
sysadmin
Login Password
Set the password for logging in to the instance.
NOTE:The password must contain:
- Contains 8 to 26 characters.
- The password must contain at least two of the following types of characters: uppercase letters, lowercase letters, digits, and the following special characters: ~!@#$%^&*()_+`=-[]{}|;':,".<>?/\
- The password should be different from the username or the username spelled backwards.
-
Confirm Password
Enter the confirm password, which must be the same as the login password.
-
Figure 3 Required duration After you select Auto-renew, the system automatically renews the instance upon expiry if your account balance is sufficient. You can continue to use the instance. Table 5 describes the auto-renewal period.
 - Confirm the configuration and click Next.
For any doubt about the pricing, click Pricing details to understand more.
- On the Details page, read the Database Security Service Statement, select I have read and agree to the Database Security Service Statement, and click Submit.
- On the displayed page, select a payment method.
- Balance/Online payment
Use your account balance to pay for your order. If the balance is insufficient, click Top Up to recharge your account.
- Select Balance.
- Click Pay.
- Request Online Contract and Pay
- Choose Request Online Contract and Pay and click Create Contract.
- Enter the contract information and click Create Formal Contract.
- Balance/Online payment
- After you pay for your order, you can view the creation status of your instances.
Feedback
Was this page helpful?
Provide feedbackThank you very much for your feedback. We will continue working to improve the documentation.See the reply and handling status in My Cloud VOC.
For any further questions, feel free to contact us through the chatbot.
Chatbot


