Creating a VPC Border Firewall
A VPC border firewall can collect statistics on the traffic between VPCs, helping you detect abnormal traffic. Before enabling a VPC border firewall, create it and associate it with an enterprise router first.
Prerequisites
- For details about Enterprise Router pricing, see Billing.
- For details about how to create an enterprise router, see Creating an Enterprise Router.
You are advised to deselect Default Route Table Association and Default Route Table Propagation while creating a route.
Constraints
Only the professional edition supports VPC border firewalls.
Precautions
- An enterprise router is used for traffic diversion. It must meet the following requirements:
- Not associated with other firewall instances.
- Belongs to the current account and is not shared with other users.
- Default Route Table Association, Default Route Table Propagation, and Auto Accept Shared Attachments must be disabled.
- A CIDR block is used to forward traffic to CFW. It must comply with the following restrictions:
- This CIDR block cannot overlap with the private network segment to be protected, or routing conflicts may occur.
- The CIDR block 10.6.0.0/16-10.7.0.0/16 is reserved for CFW and cannot be specified.
Creating a VPC Border Firewall
- Log in to the CFW console.
- Click
 in the upper left corner of the management console and select a region or project.
 - (Optional) Switch to another firewall instance. Select a firewall from the drop-down list in the upper left corner of the page.
- In the navigation pane, choose Assets > Inter-VPC Border Firewalls.
- Click Create Inter-VPC Firewall.
- In the displayed dialog box, set Route type to Enterprise Router, and click Next.
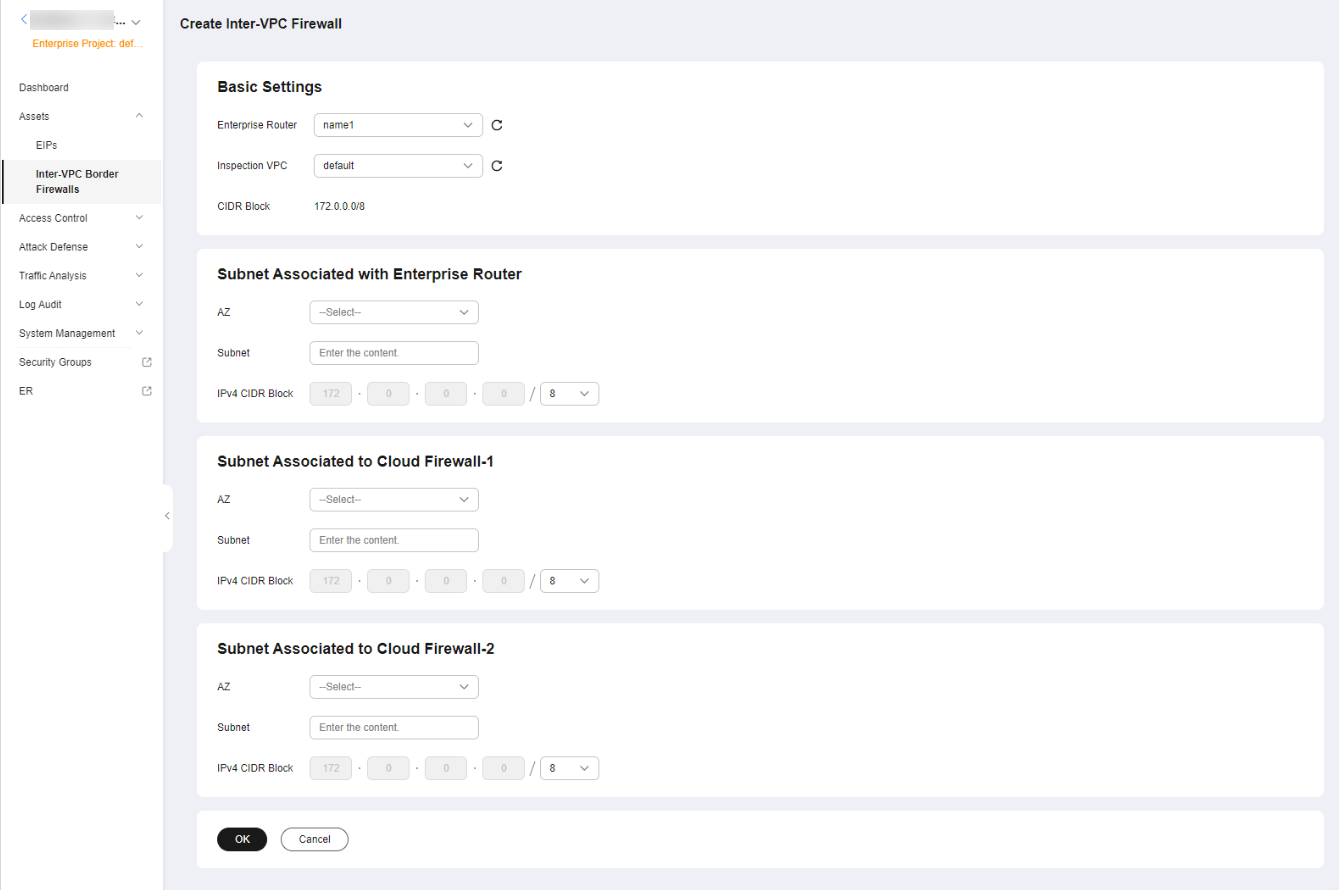
- Select an enterprise router and configure a proper CIDR block.
Figure 1 Creating a VPC Border Firewall

- An enterprise router is used for traffic diversion. It must meet the following requirements:
- Not associated with other firewall instances.
- Belongs to the current account and is not shared with other users.
- Default Route Table Association, Default Route Table Propagation, and Auto Accept Shared Attachments must be disabled.
- After a CIDR block is configured, an inspection VPC is created by default to forward traffic to CFW. A CFW-associated subnet is automatically allocated to forward traffic to an enterprise router. Pay attention to the following restrictions:
- After a firewall is created, its CIDR block cannot be modified.
- The CIDR block must meet the following requirements:
- Only private network address segments (10.0.0.0/8, 172.16.0.0/12, and 192.168.0.0/16) are supported. Otherwise, route conflicts may occur in public network access scenarios, such as SNAT.
- The CIDR block 10.6.0.0/16-10.7.0.0/16 is reserved for CFW and cannot be specified.
- This CIDR block cannot overlap with the private CIDR block to be protected, or routing conflicts and protection failures may occur.
- If the page shown in Figure 2 is displayed, you are using the old CFW version. For details about how to configure the VPC border firewall, see Enterprise Router Mode (Old).
- An enterprise router is used for traffic diversion. It must meet the following requirements:
- Click OK. The firewall will be created in 3 to 5 minutes.
During the creation, you can only check the Dashboard page. The firewall status will change to Upgrading.
References
Disabling a firewall: After a firewall is created, it cannot be deleted or unsubscribed from. You can disable firewall protection. For details, see Disabling VPC Border Protection. If VPC border protection is no longer required, after you disable protection, you still need to manually restore the configuration of the enterprise router.
Feedback
Was this page helpful?
Provide feedbackThank you very much for your feedback. We will continue working to improve the documentation.See the reply and handling status in My Cloud VOC.
For any further questions, feel free to contact us through the chatbot.
Chatbot


