
Configuring Outbound Call Data
Outbound call data is customer numbers to be called in outbound call tasks. You can configure customer numbers one by one or import them in batches based on the number of customers.
Procedure
- Sign in to the AICC as a tenant administrator and choose .
- If batch information is not configured for an outbound call task, click
 to create a batch. Enter a batch name and click
  .
. - Click Pending Calls.
Table 1 Batch data parameters Parameter
Description
Customer ID
Unique ID of a customer.
If multiple available numbers are configured for a customer ID, the system considers the call complete as long as any number is called successfully, and will not call other numbers.
Customer Number
Customer number. This parameter is restricted by the tenant parameters Minimum length of outbound customer number, Maximum length of outbound customer number, The begin digits of the customer number, International Crown Code, and International area code. These tenant parameters are set under Configuration Center > System Management > Tenant Parameter.
Available Calls
Number of available numbers of a customer ID.
Operation
Operations that can be performed.
- Edit
- Delete
- (Optional) Click Set Attributes and configure attributes by referring to Configuring Outbound Call Data Attributes.
- Configure outbound call data.
Select a data configuration method and configure outbound call data as required by referring to Adding Outbound Call Data Records One by One, Importing Outbound Call Data, Adding Outbound Call Data Through Scheduled Import, or Importing Outbound Call Data to Multiple Tasks Through a Task Group.
- (Optional) Click Details corresponding to the configured outbound call data record to view details about the outbound call data. Click Modify to modify configuration items other than Customer ID. Click Delete to delete the configured outbound call data record. Select multiple outbound call data records and click Batch Delete on the top to delete them in batches.
Configuring Outbound Call Data Attributes
- Choose .
- Click Contact list corresponding to an outbound call task in the Draft state. Figure 1 Batch management page

- Click Set Attributes.
- By default, all defined outbound call data attributes are displayed. For details about how to configure customized attributes, see Defining Outbound Call Data Attributes.
- Click
 to enable an attribute.
 - Select the attributes to be configured as required.
Figure 2 Set Attributes - Custom Attributes page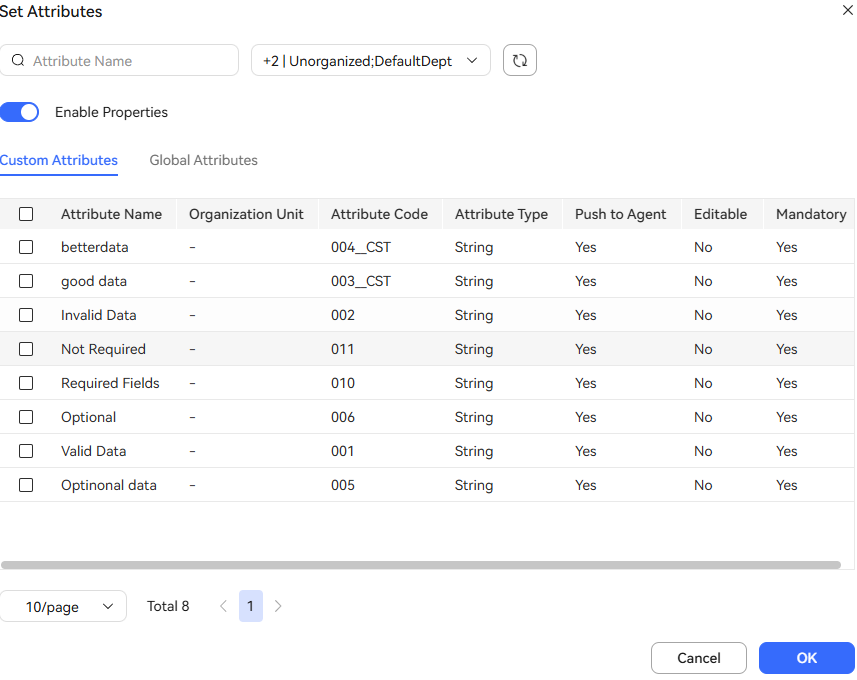 Figure 3 Set Attributes - Global Attributes page

- If Enable Properties is disabled, attributes do not need to be configured for the outbound call data.
- If Enable Properties is enabled but no attribute is selected, attributes whose Mandatory is Yes need to be configured for the outbound call data.
- If Enable Properties is enabled and attributes are selected, the selected attributes need to be configured for the outbound call data.
- It is recommended that the value of an attribute contain only digits and letters. If other formats need to be supported, configure the connection string by referring to "Commissioning the Intelligent Outbound Call Business > Configuring an ApLogic Data Source" in the commissioning guide.
- Contact O&M personnel to execute SQL statements to create global attributes. By default, all global attributes are selected.
- Click OK.
The outbound call data attributes configured here can be displayed on the outbound call result page.
If you choose to import outbound call data by using a template, you need to disable Enable custom attribute first. In this mode, customized attributes cannot be configured for outbound call data.
Importing Outbound Call Data
- Choose .
- Click Contact list corresponding to an outbound call task in the Draft state.
- Click Import and set import parameters. Figure 4 Import

Table 2 Parameters for importing outbound call data Parameter
Description
Import Method
File import mode.
The options are as follows:
- Using file: Upload an outbound call data file from the local PC.
- Using server: Upload an outbound call data file from a remote server.
Target Contact List
Import batch. Data of an outbound call task may need to be imported for multiple times. Since different batches of data have different execution logic, batch management is required.
Filter Data
The default value is No. If this parameter is set to Yes, outgoing call data can be filtered based on filtering rules.
Figure 5 Filter Rules dialog box
Import Sequence
The options are as follows:
- Ascending Order
- Descending Order
Mapping Rule
- Configure the mapping rule by referring to Mapping Rule.
- If the attributes associated with the outbound call task are different from those associated with the mapping rule, the service attributes associated with the mapping rule can be synchronized to the outbound call task attributes when the outbound call data is imported, as shown in Figure 6.
Download Outbound Call Data Template
- An outbound call data template is generated based on the mapping rule.
- The outbound call data template varies depending on the policy type selected for outbound call logic of the outbound call task. The following figures show the template content.
Figure 7 Import template for the global policy Figure 8 Import template for the contact policy
Upload
Click
 and select a local file. The file storage period is seven days.
Server
IP address of the server where the outbound call data file is stored when Import Method is set to Using server. For details about how to configure a server, see Configuring an Outbound Call File Server.
File Address
Path of the server where the outbound call data file is stored when Import Method is set to Using Server.
File Name
Name of the outbound call data file when Import Method is set to Using server. The file name contains the file name extension.
Set the cell format of the file to be imported to text. If you import data using a file, a maximum of 50,000 records can be imported at a time. If you import data using a server, a maximum of 2,000,000 records can be imported at a time. It is recommended that a maximum of 50,000 records be imported at a time. Otherwise, the outbound call rate may be affected.
The format of Called Number is restricted by the tenant parameters Minimum length of outbound customer number, Maximum length of outbound customer number, The begin digits of the customer number, International Crown Code, and International area code.
- In the Import dialog box, set the required parameters, select the file prepared in the previous step, and click OK.
- Click Import Result to view the import result, that is, the numbers of records that are successfully imported and that fail to be imported.
- Click a value in the Number of Failed Records column to download and view the outbound call data records that fail to be imported.
Possible import failure causes: number of numbers exceeding the maximum, incorrect separator, empty called number, empty interval, interval exceeding the range, empty number type, nonexistent number type, and blocklisted number.
- Click a value in the Number of Duplicate Records column to download and view the duplicate outbound call data.
- Click a value in the Number of Automatic Write Back column to download and view the blocklisted outbound call numbers.
- When files are imported using a server, after the import is complete (successful or failed), the original files are moved to a new directory, which is created by date (the date directory is created in the default path of the outbound call file server), for example, 20230714.
Pay attention to the disk space of the server to prevent import failures caused by full disk space.
- A number not bound to Blocklist Type is handled as a blocklisted number during import and counted into Number of Failed Records in the import result.
- A number with Blocklist Type set to Auto Wrap Up is counted into Number of Automatic Write Back in the import result.
- A number with Blocklist Type set to Pop Up is handled as a common number.
- When files are imported using a server, after the import is complete (successful or failed), the original files are moved to a new directory, which is created by date (the date directory is created in the default path of the outbound call file server), for example, 20230714.
- Click a value in the Number of Failed Records column to download and view the outbound call data records that fail to be imported.

Adding Outbound Call Data Through Scheduled Import
- Choose and click Contact List. Click Scheduled Import. Figure 9 Scheduled Import

- Click OK.
When scheduled import is configured, after the import is complete (successful or failed), the original files are moved to a new directory, which is created by date (the date directory is created in the default path of the outbound call file server), for example, 20230714.
Pay attention to the disk space of the server to prevent import failures caused by full disk space.
Adding Outbound Call Data Records One by One
- Choose and click Contact list in the Operation column.
- If batch information is not configured for an outbound call task, click
 to create a batch. Enter a batch name and click
  .
. - Click Pending Calls in the Operation column corresponding to the batch.
- On the batch data page, click New. The outbound call data configuration list is displayed, as shown in the following figure. Figure 10 Create Outbound Call Data page

Table 3 GUI elements on the Create Outbound Call Data page Element/Component
Description
Customer ID
This parameter is optional. If it is empty, a random number of 20 digits is used by default.
Priority
This field is displayed when Call Sequence is set to By priority in Table 2. The priority value ranges from 1 to 5. The default value is 3. 1 indicates the highest priority, and 5 indicates the lowest priority. When an outbound call task is executed, the outbound call data is extracted by priority.
Customer Number
- This parameter is mandatory. This parameter is restricted by the tenant parameters Minimum length of outbound customer number, Maximum length of outbound customer number, The begin digits of the customer number, International Crown Code, and International area code. These tenant parameters are set under .
Call Failure Delay Time(s)
This parameter is optional.
If Call Failure Delay Time(s) is set to 0 or is not set, the call interval is the outbound call interval configured in the Outbound Call Result Policy area on the Outbound Strategy page during outbound call task creation.
Attribute
For details about how to configure the attribute content, see Defining Outbound Call Data Attributes.
- Click OK.
Importing Outbound Call Data to Multiple Tasks Through a Task Group
- Sign in to the AICC as a tenant administrator and choose .
- Click New. Figure 11 Create task group

- Set parameters and click Save.
- Click Import. In the Import dialog box, download the outbound call data template, fill in the template, upload the file, and click OK.
(Optional) Adding Watermarks
- Choose .
- Choose .
- Set watermark parameters.
- Whether to enable page watermarking: Click Edit, set Parameter Value to Yes, and click Save.
- Page Watermark Character: Click Edit, set Parameter Value to the watermark to be displayed, and click Save.
- Choose and click Contact list corresponding to an outbound call task to go to the outbound call data management page to view the watermark effect. Figure 12 Outbound call data

Batch Management
- Choose and click Contact list in the Operation column.
- Click Create batch. In the Create batch dialog box, enter a batch name and click Save. Figure 13 Create batch

- Click Pending Calls corresponding to the new batch on the right. On the batch data page, you can add batch data. Figure 14 Batch data

- Return to the batch management page and click
 to enable the batch. Figure 15 Batch management page
Feedback
Was this page helpful?
Provide feedbackThank you very much for your feedback. We will continue working to improve the documentation.See the reply and handling status in My Cloud VOC.
For any further questions, feel free to contact us through the chatbot.
Chatbot


