Using ICAgent to Collect ECS Text Logs to LTS
Log Tank Service (LTS) is a one-stop log data solution for collecting, storing, searching, processing, and analyzing logs, viewing logs in dashboards, and reporting log alarms. LTS provides stable and reliable services, eliminating resource concerns like scalability. It also makes log O&M easier and improves the fault locating and metric monitoring efficiency.
This section uses Elastic Cloud Server (ECS) text logs as an example to help you get started with LTS. Follow these steps: Install ICAgent on the ECS from which you want to collect logs, create a log group and stream to store these ECS text logs, and configure ECS text log ingestion. Then, you can view the real-time logs on the LTS console.
Procedure
For details, see Figure 1.
Prerequisites
- Grant the LTS operation permissions to the user.
To do so, you must have the LTS administrator permissions LTS Full Access. For details, see Granting LTS Permissions to IAM Users.
- This section uses a Linux ECS as an example. Prepare an ECS for log collection. For details, see Purchasing an ECS in Custom Config Mode. If you already have an available ECS, skip this step.
Step 1: Installing ICAgent
ICAgent is the log collection tool of LTS. Install ICAgent on a host from which you want to collect logs. Then, you can collect logs of the host without installing ICAgent again.
The following describes how to install ICAgent. In this practice, set Host to Intra-region hosts, OS to Linux, and Installation Mode to Obtain AK/SK.
- Log in to the LTS console.
- Choose Host Management > Hosts in the navigation pane.
- Click Install ICAgent in the upper right corner. On the displayed page, set parameters by referring to Table 1.
Before installing ICAgent, ensure that the time and time zone of your local browser are consistent with those of the host.
Figure 2 Installing ICAgent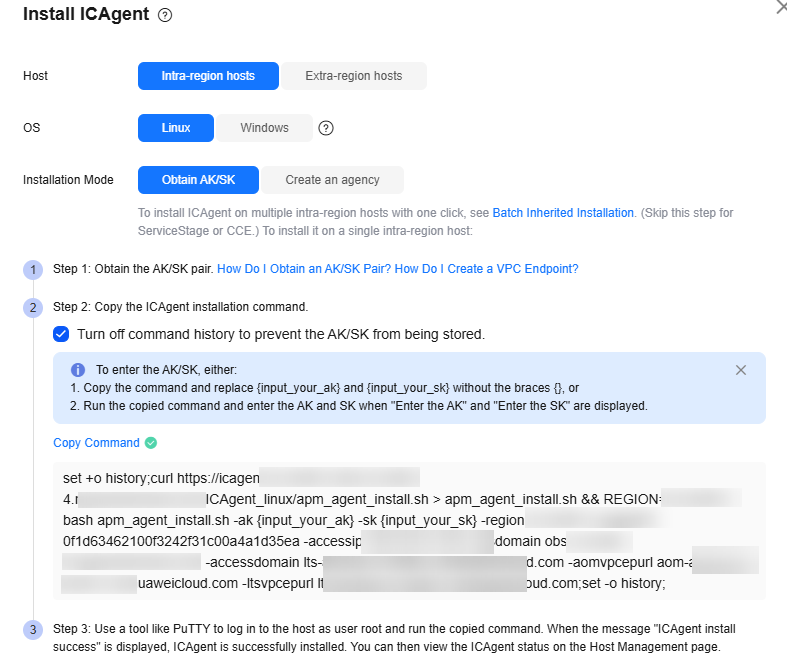
Table 1 Installing ICAgent Parameter
Description
Example Value
Host
Intra-region hosts is selected by default. Check whether the host whose logs need to be collected is in or out of the region.
An intra-region host is in the same region as the LTS console, for example, CN North-Beijing4.
-
OS
Linux is selected by default.
-
Installation Mode
Obtain AK/SK is selected by default. To obtain an AK/SK, see How Do I Obtain an Access Key (AK/SK)?
-
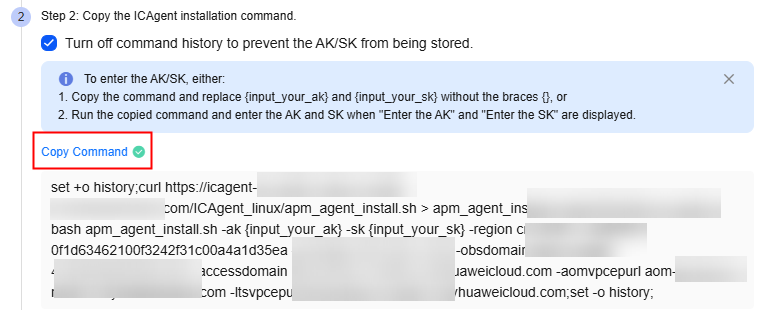
- On the Install ICAgent page, click Copy Command to copy the ICAgent installation command.
Figure 3 Copying the command
- Log in to the ECS. For details, see Logging In to a Linux ECS Using VNC.
- Log in to the ECS console.
- Click Remote Login in the Operation column of the target ECS where ICAgent is to be installed.
- In the Logging In to a Linux ECS dialog box, click Log In in the Other Login Modes area.
- On the displayed page, enter username root and the password set during ECS purchase.
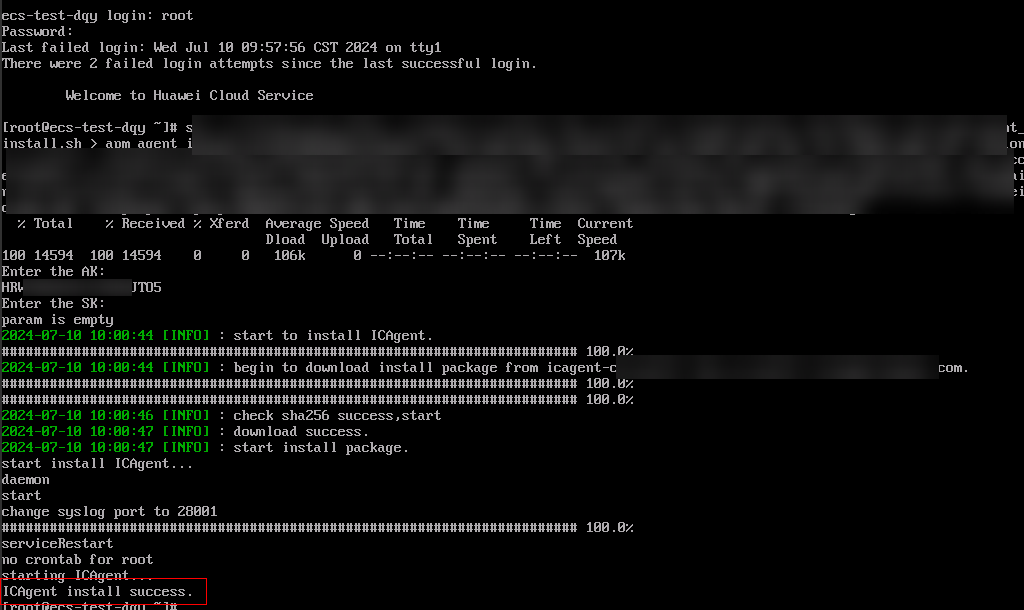
- After logging in to the ECS, run the ICAgent installation command and enter the obtained AK/SK as prompted. (If you have manually replaced the AK/SK when copying the command, the system will not prompt you to enter the AK/SK.)
- When message "ICAgent install success" is displayed, ICAgent has been installed in the /opt/oss/servicemgr/ directory of the host.
Figure 4 Installation command output
- After the installation is successful, choose Host Management in the LTS navigation pane and click Hosts to check whether the ICAgent status is Running for the host (ECS-test-dqy in this practice).
Figure 5 Hosts

- Create a host group and add the host with ICAgent installed to the host group.
- In the navigation pane of LTS, choose Host Management > Host Groups.
- On the Host Groups page, click Create Host Group. On the displayed page, create a host group by referring to Table 2.
Figure 6 Creating a host group
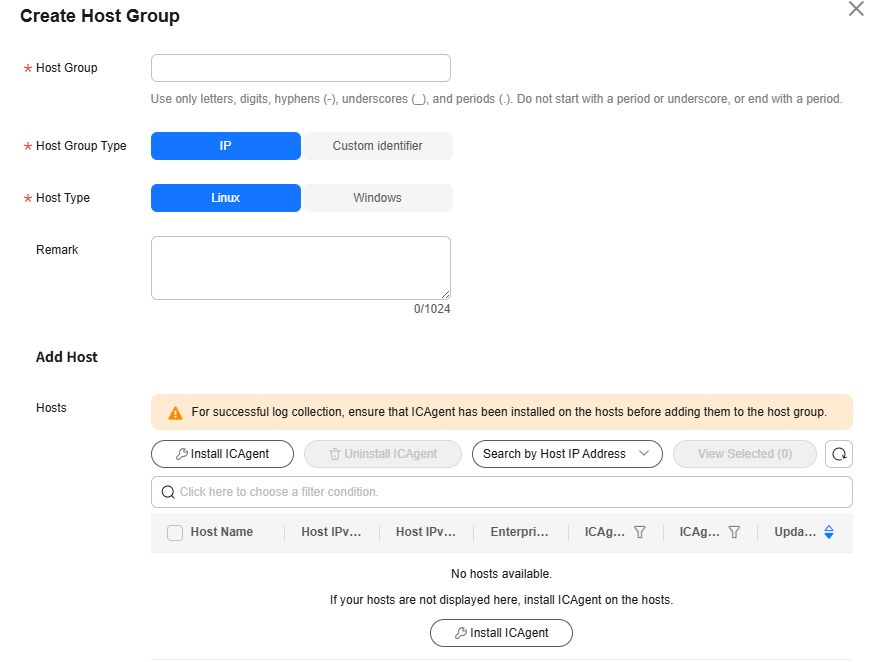
Table 2 Creating a host group Parameter
Description
Example Value
Host Group
Enter a custom host group name. Use only letters, digits, hyphens (-), underscores (_), and periods (.). Do not start with a period or underscore or end with a period.
testECS
Host Group Type
IP is selected by default.
Host groups of the IP type: Servers are added to the host group with their IP addresses, enabling identification based on IP addresses.
IP
Host Type
Linux is selected by default. The host type must be the same as that installed in 6.
Linux
Remark
Enter a description for the host group. Up to 1,024 characters are allowed. In this practice, you do not need to set this parameter.
-
Add Host
In the host list, select one or more hosts with ICAgent installed. The screenshot is for reference only. Select hosts based on site requirements.
ECS-test-dqy
- Click OK.
Step 2: Creating a Log Group and Stream
Log groups and log streams are basic units for log management in LTS. Before using LTS, create a log group and then create a log stream in the log group.
- Log in to the LTS console.
- On the Log Management page, click Create Log Group. On the displayed page, set parameters by referring to Table 3.
Figure 7 Creating a log group
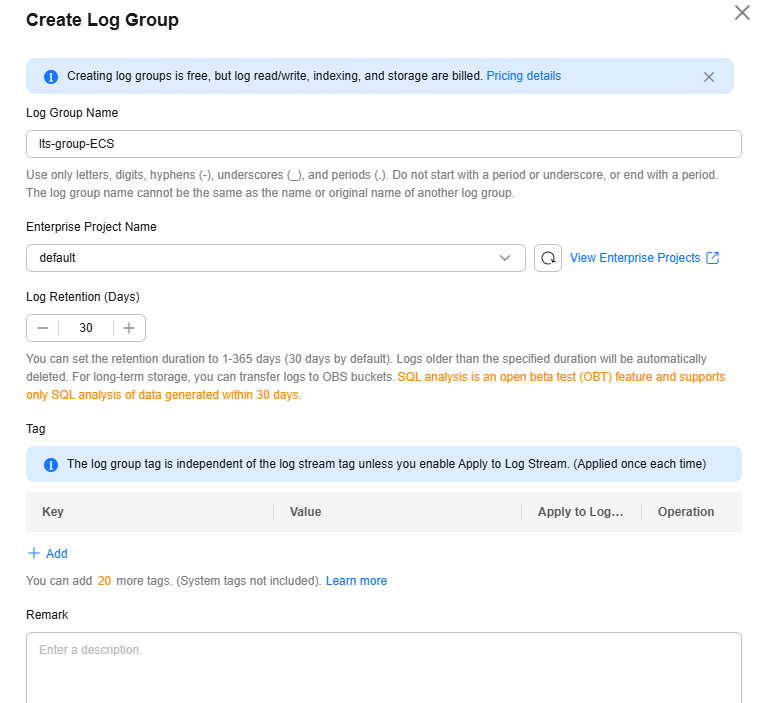
Table 3 Parameter description Parameter
Description
Example Value
Log Group Name
- Enter 1 to 64 characters, including only letters, digits, hyphens (-), underscores (_), and periods (.). Do not start with a period or underscore or end with a period.
- Collected logs are sent to the log group. If there are too many logs to collect, separate logs into different log groups based on log types, and name log groups in an easily identifiable way.
lts-group-ECS
Enterprise Project Name
Select the required enterprise project. The default value is default.
default
Log Retention (Days)
Specify the log retention duration for the log group, that is, how many days the logs will be stored in LTS after being reported to LTS.
By default, logs are retained for 30 days (customizable for 1 to 365 days).
LTS periodically deletes logs based on the configured log retention duration. For example, if you set the duration to 30 days, LTS retains the reported logs for 30 days and then deletes them.
30
Tag
You can tag log groups as required. In this practice, you do not need to set this parameter.
-
Remark
Enter a description. Up to 1,024 characters are allowed. In this practice, you do not need to set this parameter.
-
- Click OK. The created log group will be displayed in the log group list.
- Click
 on the left of target log group.
 - Click Create Log Stream. On the displayed page, set parameters by referring to Table 4.
Figure 8 Creating a log stream
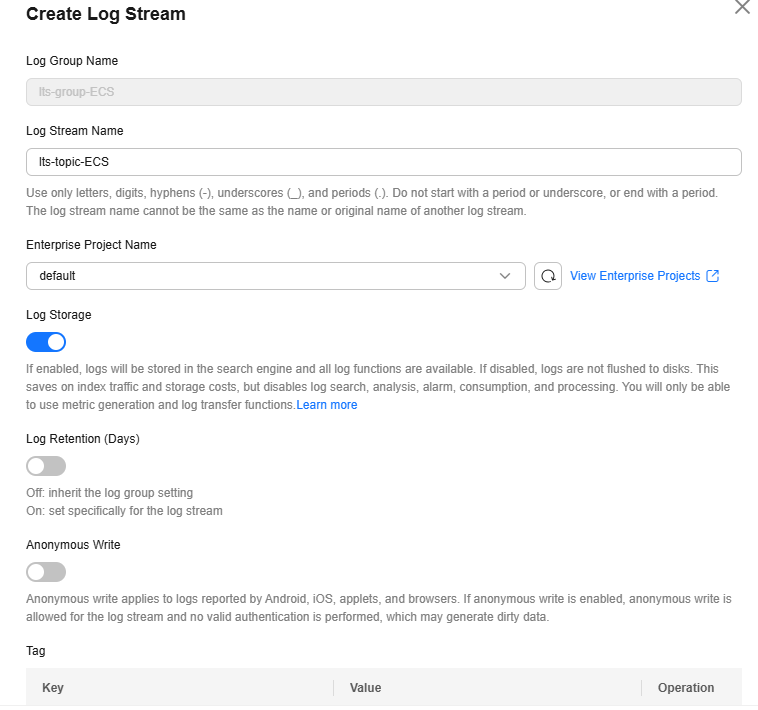
Table 4 Parameter description Parameter
Description
Example Value
Log Group Name
The name of the target log group is displayed by default.
-
Log Stream Name
- Enter 1 to 64 characters, including only letters, digits, hyphens (-), underscores (_), and periods (.). Do not start with a period or underscore or end with a period.
- Collected logs are sent to the created log stream. If there are a large number of logs, you can create multiple log streams and name them for quick log search.
lts-topic-ECS
Enterprise Project Name
Select the required enterprise project. The default value is default.
default
Log Storage
If this function is enabled, logs will be stored in the search engine and all log functions are available.
If this function is disabled, Log Retention (Days) cannot be enabled.
Enable
Log Retention (Days)
Specify the log retention duration for the log stream, that is, how many days the logs will be stored in LTS after being reported to LTS.
By default, logs are retained for 30 days (customizable for 1 to 365 days).
- If Log Retention (Days) is enabled for the log stream, the log retention duration set for the log stream is used.
- LTS periodically deletes logs based on the configured log retention duration. For example, if you set the duration to 30 days, LTS retains the reported logs for 30 days and then deletes them.
30
Tag
You can tag log groups as required. In this practice, you do not need to set this parameter.
-
Anonymous Write
Disabled by default. In this practice, retain the default setting.
This function is applicable to logs reported by Android, iOS, applets, and browsers.
Disable
Remark
Enter a description. Up to 1,024 characters are allowed. In this practice, you do not need to set this parameter.
-
- Click OK.
- Check the created log stream under the target log group.
Step 3: Ingesting ECS Logs to LTS
After installing ICAgent, configure the paths of host logs that you want to collect in log streams. ICAgent will pack logs and send them to LTS in the unit of log streams.
- On the LTS console, choose Log Ingestion > Ingestion Center in the navigation pane and click ECS (Elastic Cloud Server).
- The page for selecting a log stream is displayed.
- Select a log group from the drop-down list of Log Group, for example, lts-group-ECS.
- Select a log stream from the drop-down list of Log Stream, for example, lts-topic-ECS.
- Click Next: (Optional) Select Host Group.
- Select the host groups whose logs you want to collect, for example, host group testECS created in Step 1: Installing ICAgent.
- Click Next: Configurations.
- Configure collection rules. For details, see Table 5.
Figure 9 Collection configuration
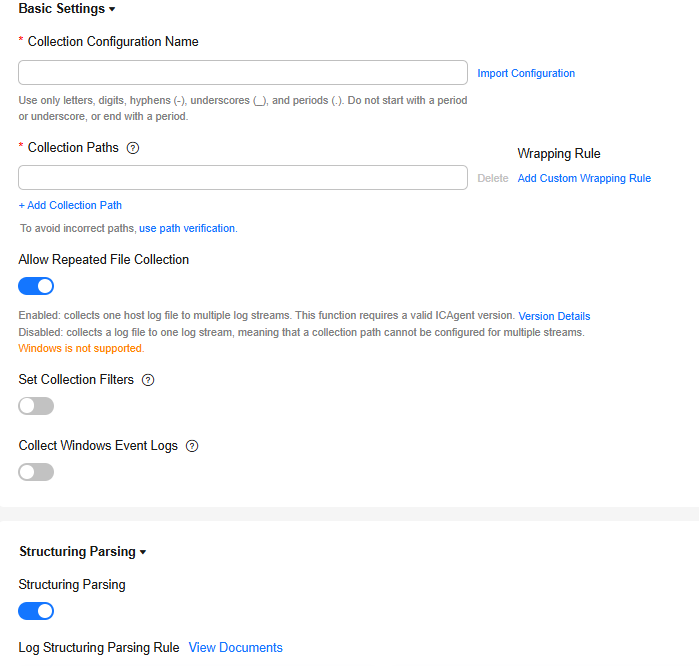
Table 5 Collection configuration Parameter
Description
Example Value
Collection Configuration Name
Enter a custom name. Use only letters, digits, hyphens (-), underscores (_), and periods (.). Do not start with a period or underscore or end with a period.
testECS
Collection Paths
Add one or more host paths. LTS will collect logs from these paths.
For example, /var/logs/**/a.log matches the following logs:
/var/logs/1/a.log
/var/logs/1/2/a.log
/var/logs/1/2/3/a.log
/var/logs/1/2/3/4/a.log
/var/logs/1/2/3/4/5/a.log
- /1/2/3/4/5/ indicates the 5 levels of directories under the /var/logs directory. All the a.log files found in all these levels of directories will be collected.
- Only one double asterisk (**) can be contained in a collection path. For example, /var/logs/**/a.log is acceptable but /opt/test/**/log/** is not.
- A collection path cannot begin with a double asterisk (**) such as /**/test to avoid collecting system files.
/var/logs/**/a.log
Allow Repeated File Collection
This function is not available to Windows.
After you enable this function, one host log file can be collected to multiple log streams.
Enable
Set Collection Filters
Blacklisted directories or files will not be collected. Filters can be exact matches or wildcard matches. If you specify a directory, all its files are filtered out. Collection filters cannot be set for Windows hosts.
In this practice, retain the default setting (disabled) for this parameter to collect all files.
Disable
Collect Windows Event Logs
In this practice, the host is a Linux host and this option is disabled by default.
Disable
Structuring Parsing
Enable structuring parsing and select Single Line - Full-Text Log for Log Structuring Parsing Rule. For more rules, see Setting ICAgent Structuring Parsing Rules.
Enable
Max Directory Depth
Specify the number of directory levels that can be traversed when using double asterisks (**) for fuzzy matching of log collection paths. LTS supports a maximum of 20 directory levels.
For example, to collect logs from /var/logs/department/app/a.log, set the collection path to /var/logs/**/a.log and Max Directory Depth to 5.
20
Split Logs
Splits single-line logs larger than the specified size into multiple lines for collection. Specify the size in the range from 500 KB to 1,024 KB. In this practice, enable this option and set the size to 500 KB.
In this way, a single-line log larger than 500 KB will be split into multiple lines for collection. For example, a 600 KB single-line log will be split into a line of 500 KB and a line of 100 KB.
Enable
Collect Binary Files
In this practice, enable this option to collect binary files.
Run the file -i File name command to view the file type. charset=binary indicates that a log file is a binary file.
If this option is enabled, binary log files will be collected, but only UTF-8 strings are supported. Other strings will be garbled on the LTS console.
Enable
Log File Code
The encoding format of log files is UTF-8.
-
Collection Policy
In this practice, set the collection policy to Incremental.
Incremental: When collecting a new file, ICAgent reads the file from the end of the file.
-
Custom Metadata
Disabled by default. In this practice, retain the default setting. ICAgent will collect logs based on system built-in fields and your custom key-value pairs.
-
Log Format
Set the display format of logs reported to LTS. In this practice, select Single-line. If Structuring Parsing is enabled, you do not need to set this parameter.
Single-line: Each log line is displayed as a single log event.
Single-line
Log Time
Set the log collection time to be displayed at the beginning of each log line. In this practice, select System time. If Structuring Parsing is enabled, you do not need to set this parameter.
System time: log collection time by default. It is displayed at the beginning of each log event.
System time
- Click Next: Index Settings. On the displayed page, retain the default parameter settings. After configuring the index, you can query and analyze logs. For more information, see Setting Indexes.
Figure 10 Index settings
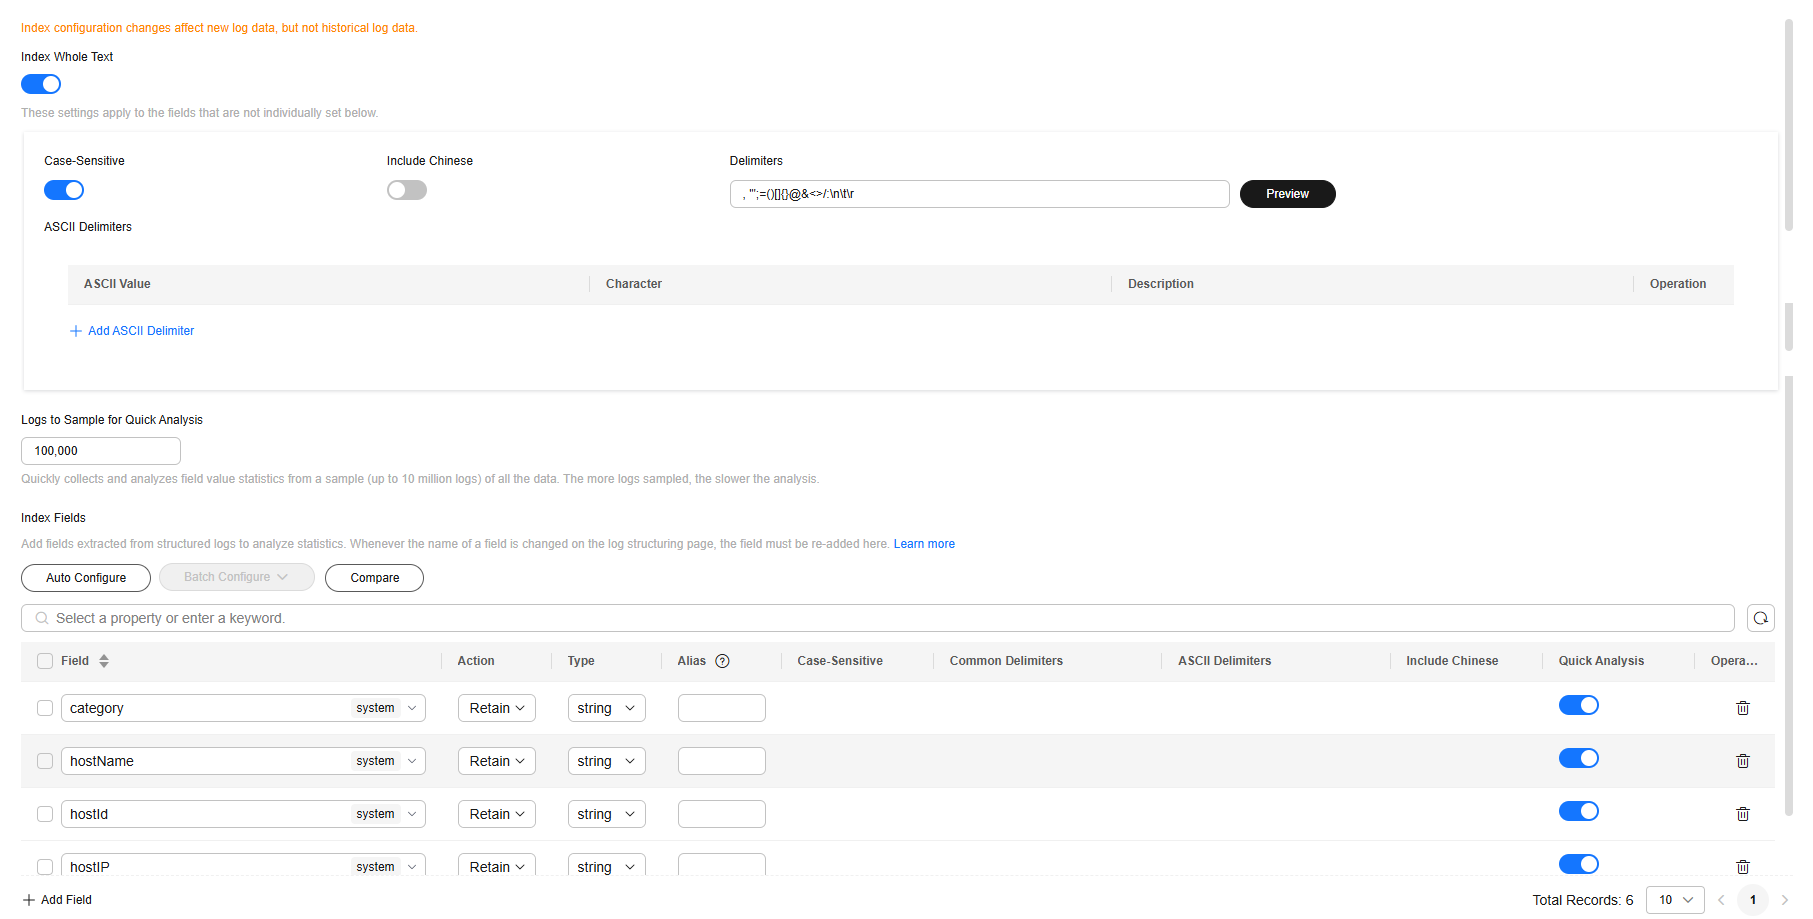
- Index Whole Text: enabled by default, indicating a full-text index is created. By default, Case-Sensitive is enabled, and the delimiters include the following characters: ,'";=()[]{}@&<>/:\\?\n\t\r
- Log Analysis: enables SQL visualized analysis for the configured field indexes. This parameter is enabled by default.
- Index Fields: LTS creates index fields for certain system reserved fields (such as hostIP, hostName, and pathFile) by default. For more system reserved fields, see Setting Indexes.
- Click Submit. After the log ingestion is complete, click Back to Ingestion Configurations. An ingestion configuration will be displayed on the Ingestion Management page.
Step 4: Viewing Logs in Real Time
After the log ingestion is configured, you can view the reported logs on the LTS console in real time.
Stay on the Real-Time Logs tab to keep updating them in real time. If you leave the Real-Time Logs tab, logs will stop being loaded in real time.
- On the Ingestion Management page, click the log stream name in the Log Stream column of the target ingestion task to access the log stream details page.
- Click the Real-Time Logs tab to view logs in real time.
Logs are reported to LTS once every 5 seconds. You may wait for at most 5 seconds before the logs are displayed.
Figure 11 Real-time logs
Related Information
After logs are ingested, click the log stream name in the Log Stream column of the target log ingestion task on the Ingestion Management page. On the log stream details page displayed, you can search and analyze reported logs by referring to Log Search and Analysis.
Feedback
Was this page helpful?
Provide feedbackThank you very much for your feedback. We will continue working to improve the documentation.See the reply and handling status in My Cloud VOC.
For any further questions, feel free to contact us through the chatbot.
Chatbot


